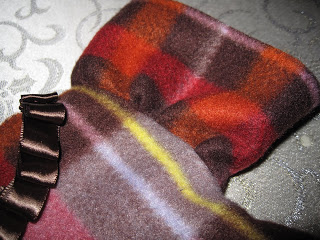
Ok, all my wonderful bloggy friends, I just have to let you know…I have been inspired! Have you seen the tutorial for the No Sew Flutter Cape on Ruffles and Stuff? It is absolutely adorable and after seeing it the other day I just felt the sudden urge to make one for Penelope!!! C’mon now, what 14 month old doesn’t need one of those sweet babies? The mastermind behind that darling little cape is Disney and this is one of the cutest things yet to come from her creative mind, if you haven’t checked out her blog you must do so now, she is amazing! Anyhoo, so after I saw that tutorial I somehow ended up at Joann’s (not quite sure how that always happens!) and somehow bee-lined it to the fleece section. I found the perfect fleece for Penny instantly, as if it was meant to be, and while waiting to have it cut had the brilliant idea that I needed to make Little Miss P a matching dress to go with her little cape. So, INSPIRATION…there you go! And now let me unveil to you, all my bloggy friends, Penny’s newest fall dress…spotlight please, on…the…Flutter Sleeve Fleece Dress…
Now , just imagine this cute little dress on my Peanut with some knit tights and furry boots…too sweet!
I was finally able to sit down and make this tonight after the kidlets went to bed so I have no little model in any of the pictures 🙁 Gotta work when the littles are sleeping or I end up using that darn seam ripper waaaay too much!
Alright, so let’s get the show on the road…here is how you do it!
***Edit*** I have this dress available as a giveaway on this post here…if you are interested check it out! The winner will be chosen this Friday, October 30th at 9pm CST!
Flutter Sleeve Fleece Dress
1 yard of fleece (this makes a dress in size 12-18 months)
favorite cute dress your little lady already owns
thread, rotary cutter and mat, sewing machine
ribbon, needle and thread (optional)
First, fold your fleece in half so you can cut both the front and the back of the dress at the same time. Lay your toddler’s pre-owned dress on top with the sleeves tucked behind and the bottom edge of the dress at the edge of the fleece.
 Sew a gathering stitch, by using the longest stitch length possible on your machine, and straight stitch all the way across one long end of the sleeve. Make sure to leave long threads at the beginning and end and DO NOT backstitch. You will pull on bobbin stitch to gather your fabric…make sure to do this very gently! Do this to both sleeves on one edge of each only!


Cut around your dress making sure to leave a 1/4 inch seam allowance!
Then, take your front dress piece and cut a half circle in the middle of the top so you have a cute little neckline.
Now, place your two dress pieces right sides together and zig zag stitch the tops of the shoulders together, see the picture above!
Next, we are going to make the sleeves! Cut two pieces of your remaining fleece to be around 3 x 11 inches long and wide.
 Sew a gathering stitch, by using the longest stitch length possible on your machine, and straight stitch all the way across one long end of the sleeve. Make sure to leave long threads at the beginning and end and DO NOT backstitch. You will pull on bobbin stitch to gather your fabric…make sure to do this very gently! Do this to both sleeves on one edge of each only!

This is a picture of what your sleeve should look like after you pull the bobbin thread and gather your fabric edge.

Place your gathered sleeve so that the gathered edge is the same direction as the edge of the arm hole when your dress body fabric is right side up, like I have in the picture above. **Note that you will be sewing the sleeve onto the dress with right sides of the sleeve and the dress facing each other!
Now, just pin the gathered sleeve to the right side of the arm hole so that it is centered and the free short edges will match up once you flip the sleeve outward. Sew in place with a zig zag stitch.
Next, you are going to zig zag stitch the all the way around the dress while it is right sides are together. Making sure to stitch the short free edges that are remaining on the two sleeves!
Now at this point you are done, hurray! But, if you want to you can add some ribbon embellishments to the neckline to spice it up a bit. I just took about 3 feet of ribbon and kept folding it over and hand-stitched it in place. I didn’t take any pictures of this process but only of the end result, sorry!…I’m so in the zone when I stitch by hand. Let me know if you can’t figure it out and I’ll help you through it!


Now that is super cute and awesome!! Can’t wait to see the model.
Thanks for the how-to!
what a great job! love the ribbon! 🙂
That’s adorble!! Super!!
I really like the ribbon collar!!
God Bless You and Yours!!!
Ohhhh my goodness! How gorgeous is that!?!?! Now YOU have inspired me, with those ruffle sleeves! And your compliments so made my night! That was just pick me up I needed with this terrible flu I’ve got.
Too cute!!
super cute! thank you for the tute, I wanna try this so bad! will it work with cotton?
Zura-
I am sure you could do the same thing with cotton…you would just need to hem the bottom and sleeves so they don’t fray! Have fun making one!!!
-Maggie
Love the fleece idea. I saw this on craft gossip. Way to go!
wondering how you did the opening at the back. Also, have you found a fleece that doesn’t pill when washed?
Bezzant Family-
I just cut a slit down the back with some very sharp scissors! AND…Joann’s sells anti-pill fleece as well as you can find it online! Happy sewing!
-Maggie