So, I had a lovely reader email me last week with a question on how to do 3-D decor letters. I can’t remember exactly who it was but I do remember that she was from England, so cool. I just read the email in my head using my English accent that only sounds good in my head…it sounds so good until I say it out loud, why is that!?! Well, I tried my hand at making some and this is what I came up with:

Aren’t they adorable!?!
I hope this is something close to what she had in mind!
Oh, and by the way, I just want to tell you all how I love all the emails you send me! It’s so nice to open my inbox and see piles and piles of email from all over the country and the world. Some of you just want to say “hi” while others of you have questions about crafts of sewing projects or just want to send me some pictures of what you made from my tutorials!! Oh, how I love it!! Sometimes, I can’t get back to you right away and I’m sorry about that, but I really do try to get back to all of you! And for all the comments I get, I also wanted to say a big thank you too. I love all your comments because it let’s me know who is reading my blog and what you all like to see more of. It’s also how I get to find out about all your awesome blogs too!!!
Thank you from the bottom of my heart!!!
Ok, so on with this craft…
Here is your list of items you will need to make some for yourself:
Fabric Block Letters
Cardboard or Paper Mache letters (I saw them called both. I bought mine at the Hob Lob but I realize this store may not exist in England, hopefully these two names will help you find them!)
1/4 yard of fabric for each letter
rotary cutter and mat
x-acto knife
modge podge
foam brush
freezer paper
**My letters were 50% off at Hobby Lobby so they ended up being $1 each and the fabric was $1 per 1/4 yard. So this total project was $8…not bad for all that CUTENESS!!!

Your accomplices for this project.
 Here is what the cardboard letter look like close up. If you have letters like a “P” that are top heavy you can cut into the base with an x-acto knife and fill the bottom with some rice or plastic pellets to keep it stable!
 First, you will cut your fabric around your letter with about a 1/2 inch border, like so.
 Then, get out your modge podge and lay it on thick! Press your fabric onto the modge podge, smoothing it out as you go. Do one flat side, then the outer edges of the letter, then modge podge the other flat side, and then overlap the outer edge to make sure no cardboard is showing.
  You will then cut out the inside of the “G” with an x-acto knife and modge podge the fabric to the inner cardboard edges.
 Then, cut a strip of fabric that is slightly smaller than the width of your letter’s edge and modge podge it to the inner edge of the letter “G”. This is to help cover all the open spots of cardboard that you have remaining from cutting your fabric around all the corners and curves.
The finished letter “G”
Now, who wants to see another letter being modge podged?
Ok, here is how I did the letter “I”
 Again, cut around your letter with a 1/2 inch border.
 Time to layer on the modge podge and press on your fabric…nice and smooth!
 When you get to the corners, again, snip the fabric and modge podge each side separately! You will need to go back and cut a small strip of fabric to cover the little bits of cardboard that remain to be seen.

The finished letter “I”
 If you have letters with a lot of curves like the letter “R” just snip the fabric all around the curves to make it easier to modge podge the fabric onto the cardboard without all the ugly bumps!
When you are finished modge podge-ing, go ahead and let your letters dry for 20-30 minutes. Then get your modge podge out again and brush the outside of the fabric with modge podge to seal the letters up. I let my letters dry on the waxy side of the freezer paper so I didn’t mess up my cutting mat. Make sure to use the waxy side too, so the letters come off nice and easy!

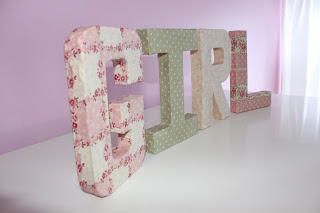

SO cute! Wouldn’t this be a great baby gift!

Side View

Little Miss P’s Dresser Top all decked out!
Sweet!


Wow. Those are freakin’ adorable! Thanks for the tute!
Cute! I love them.
Hi its me, the girl from England who asked about the letters. Its so funny that you read my email with a English accent!
i just want to say a huge thankyou the Fabric Block Letters are great i can’t wait to make them, i think yours look far better than the ones available in the shops here, your designs have real character. Thankyou so much!
Limara!!!
I am so glad you liked them, I am going back now to search my emails for your name so I can send you a note in case you don’t get this one!!
Mags
Cute, cute!! It’s funny, these just came on my radar as a project I want to do with all the boys names on them!! I was thinking about painting them and just mod-podging material on the tops, but I may go ahead and do it your way instead! 🙂
Hello Maggie,
Congrats to you and Cliff with #3! Will have to show Joanne your blog; she’s a crafter like you, and will love this page!
All the best!
Lou Lentz
Adorable!
I’ve been in a paper-mood lately, but this is the 3rd fabric craft I’ve seen that has caught my eye.
They look so cute and “girlified”..
Hi, these letters look really good. I’ve been trying to do the letter ‘N’ and I’m really struggling with covering the inside corners of the diagonal bit neatly. Do you have any tips?
Thanks,
Nadia (also from the England!)
Iloveee!!!!! these letters look really good. Thanks
Caroline White
hormone imbalance symptoms
Wow thanks! Funny I just picked these up at Hobby Lobby to spell baby and wanted to cover in fabric1 Now I know some tips!! Thanks for taking the time to make a great tutorial-much appreciated ;)-TOODLES-Angela
great project!!
I have a girl that could totally lovethis in her bedroom
I featured this tutorial in my “Top Ten CRAFTS I loved this week #3”.
It’s an awesome tutorial!!!
Thanks!
http://cosiendoycriando.blogspot.com/
PS:It is also a linking party, so you can link up another craft!!
Instead of fabric I spray painted the letters and then modge podged scrapbook paper to the front face. They come out great and no hard corners / curves to cover.