So, this weekend I realized that I needed to come up with some new decor for my front door as Valentine’s day was Sunday. I love the Fabric Rose Wreath I made to celebrate Valentine’s day (found here) but I’ve decided it’s just too pretty to be hanging on my front door for so long. I thought I’d bring it indoors for some love-ly home decor, I think my living room could use it! That being said, I needed something fun for the door cause at this point a bare front door just doesn’t cut it for me.
I’m no where near Irish but as St. Patrick’s Day is the next holiday on the calendar I thought why not make a St. Patrick’s themed wreath. Not a crazy bright green shamrock wreath but something simple that I could change up in the future.
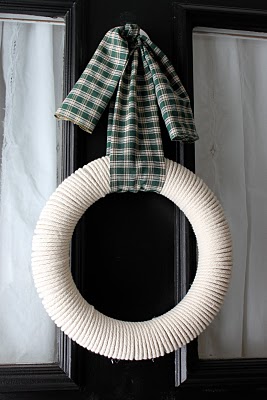
I found some clothesline at Home Depot and it totally reminded me of that nice thick fisherman’s yarn used for those great cable knit sweaters which then reminded me of Ireland for some reason…Hmm, maybe I had too much chocolate yesterday!?! Well, I added some green plaid fabric to hang the wreath and it totally spoke ‘Irish’ to me…yup, too much chocolate for sure but those chocolate covered strawberries were freakin’ delish!
But seriously, the greatest thing about making such a simple wreath is that you can change out the hanging fabric to something more colorful and Spring-y once all the snow melts 🙂 And, you can jazz up the clothesline wrapped part once there is actually some color outside to inspire you (insert jazz hands here).

See, simple and pretty!
(and Irish-looking, right!?! I wasn’t really all sugar-high crazy when I made this was I?)
Ok, so let’s get to making one for you!
Clothesline Wreath
1 foam circle (found mine at Joann’s)
1 skein of clothesline (bought mine at Home Depot, it’s about 100 feet..you’ll have some leftover to hang your clothes to dry too…if you live in a warm climate that is, there’s no way I’m drying clothes outside when it’s 20 degrees here!)
hot glue and gun
1/4 yard of fabric (I used green plaid for some St Patrick’s Day fun!)
rotary cutter and mat

The goods just waiting to be used! Can you feel the fun we’re about to have!?!
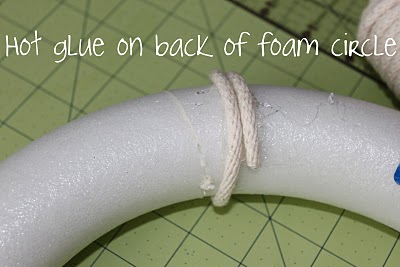
First, squirt hot glue on the backside of your foam circle only! This will allow you to be able to move the clothesline around the wreath so that it covers it nicely. Plus, it will help you get burned less…anyone else constantly burning their hands with hot glue?? Crikeys that hurts like a swear word!
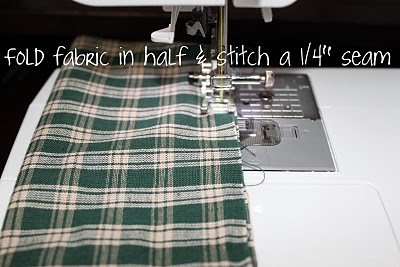 Cut your 1/4 yard of fabric to 7 1/2 inches in width, keeping the length the same. Then, fold the fabric in half lengthwise, right sides together and sew a 1/4 inch seam over the open edges. This will make a sleeve of fabric.
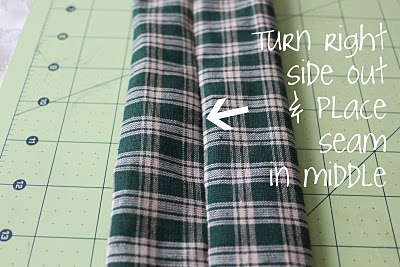 Next, turn your fabric right-side out. Place your seam in the middle and press with an iron if you’d like a crisper hanging ribbon for your wreath.
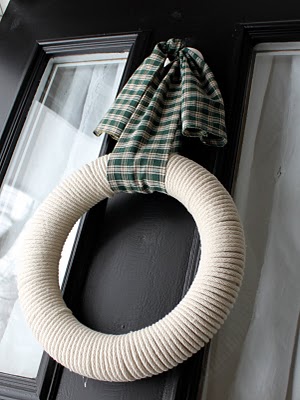
 Then, slide your fabric through the wreath and tie in a knot. Before you secure the knot nice and tight, make sure you like how much of the fabric is hanging down!


Continue hot glueing your clothesline until you get back to your starting point…got any good tunes on your ipod? You might want it for this!
 Cut your 1/4 yard of fabric to 7 1/2 inches in width, keeping the length the same. Then, fold the fabric in half lengthwise, right sides together and sew a 1/4 inch seam over the open edges. This will make a sleeve of fabric.
 Next, turn your fabric right-side out. Place your seam in the middle and press with an iron if you’d like a crisper hanging ribbon for your wreath.
 Then, slide your fabric through the wreath and tie in a knot. Before you secure the knot nice and tight, make sure you like how much of the fabric is hanging down!
Hang on your door and say, ‘Wow! That was the easiest wreath I ever made!’

Ooh, my front door is now all pretty and decorated for St. Paddy’s Day!!!

Totally Lucky Charm-ing!
Me Likey!


Wow! I really like it, it’s super cute. What a great idea, thanks!
Kaysi
What a cute idea! Simple and yet very cute!
Great idea. I love the clean, simple lines. Great job!
So pretty!!!! I made a ball out of that stuff:
http://www.thecountrychiccottage.net/2010/01/balling-in-love-with-jute-and-rope.html
Amazing what you think of isn’t it?? 🙂 I have some left too…hmmm….
Very cute! Maybe I will do a wreath too!
this is adorable!!!!
I’m in love with this one! I will feature it tomorrow at somedaycrafts.blogspot.com
I really love the clean lines of this. Lovely! I love the name of your blog too. So cute!
You’re the Macgyver of craftiness. Seriously! Where as I am the Macgruber…
I love your idea! Especially being able to change it for different holidays!!
Great job! So cute.
I really love this! I was actually thinking of doing this with yard but clothesline would be much faster.
wow…that’s a brilliant idea…i love it
Wow! I love this! Thanks for the tutorial!
Very simple and pretty! I’m imagining this with a little burlap added into it somehow. Thanks for sharing! I’ve posted a link.
I featured this today on my show-offs! Thanks for sharing with me!
http://makingtheworldcuter.blogspot.com/
very cute!
That is great! Simple, and it won’t clash with my ugly door (renting stinks sometimes!!)
Although looking at your door makes me dream of a black door!
i LOVE this! i can’t wait to try it! 🙂
-junesong
(lovejunesong.blogspot.com)
I love it Mommabear! I think I can do this! Thanks for sharing!
Totally loving your wreath!!! I want to decorate for St Pattys day, and I don’t like the typical blinding green stuff, so this will work PERFECTLY for me!! Thanks so much for the step-by-step!
Your blog is so neat, *followed*!!
Nice project with so many possibilities! Thanks so much for coming to Craft Schooling Sunday, hope to see you every week! All the best, Sara
great idea! I love the look the clothesline give it
This comment has been removed by the author.
Let’s try this again! I love this wreath. The color, the texture, the clean lines, Oh my! I featured it on my Fab Friday Favorites. I hope you can stop by, grab a button and stay to visit awhile.
http://blackkatsdesign.blogspot.com/2010/02/fab-friday-favorites.html
Thank you for sharing your awesome project at Thursday’s Treasures last week! Come share your crafty projects in this week’s Thursday’s Treasures too!
http://treasuresfortots.blogspot.com/2010/02/thursdays-treasures-week-11.html
I really like this! I’ll be making one of these for my front door…maybe for my DDs door too. She loves this look. Will show it to her. Thanks for making this tut and sharing it with us.