This just may be one of my most favorite posts because I find all the pictures in it so pretty and colorful…they just wash away all the stress of breaking up pulling and pinching fights from some cutie pie little ones in my life who shall remain nameless.
I have been wanting to show you a peek into my ‘studio’, the space where I create for a while and now I’m finally getting the pictures up to show you…YAY! This is the place in my home where I can go to relax and make fun things for the people I love…my Etsy shop customers included!
If you wanna see Part II of how I organize my studio click HERE now!


Yup, some bright and cheerful sights for sure!

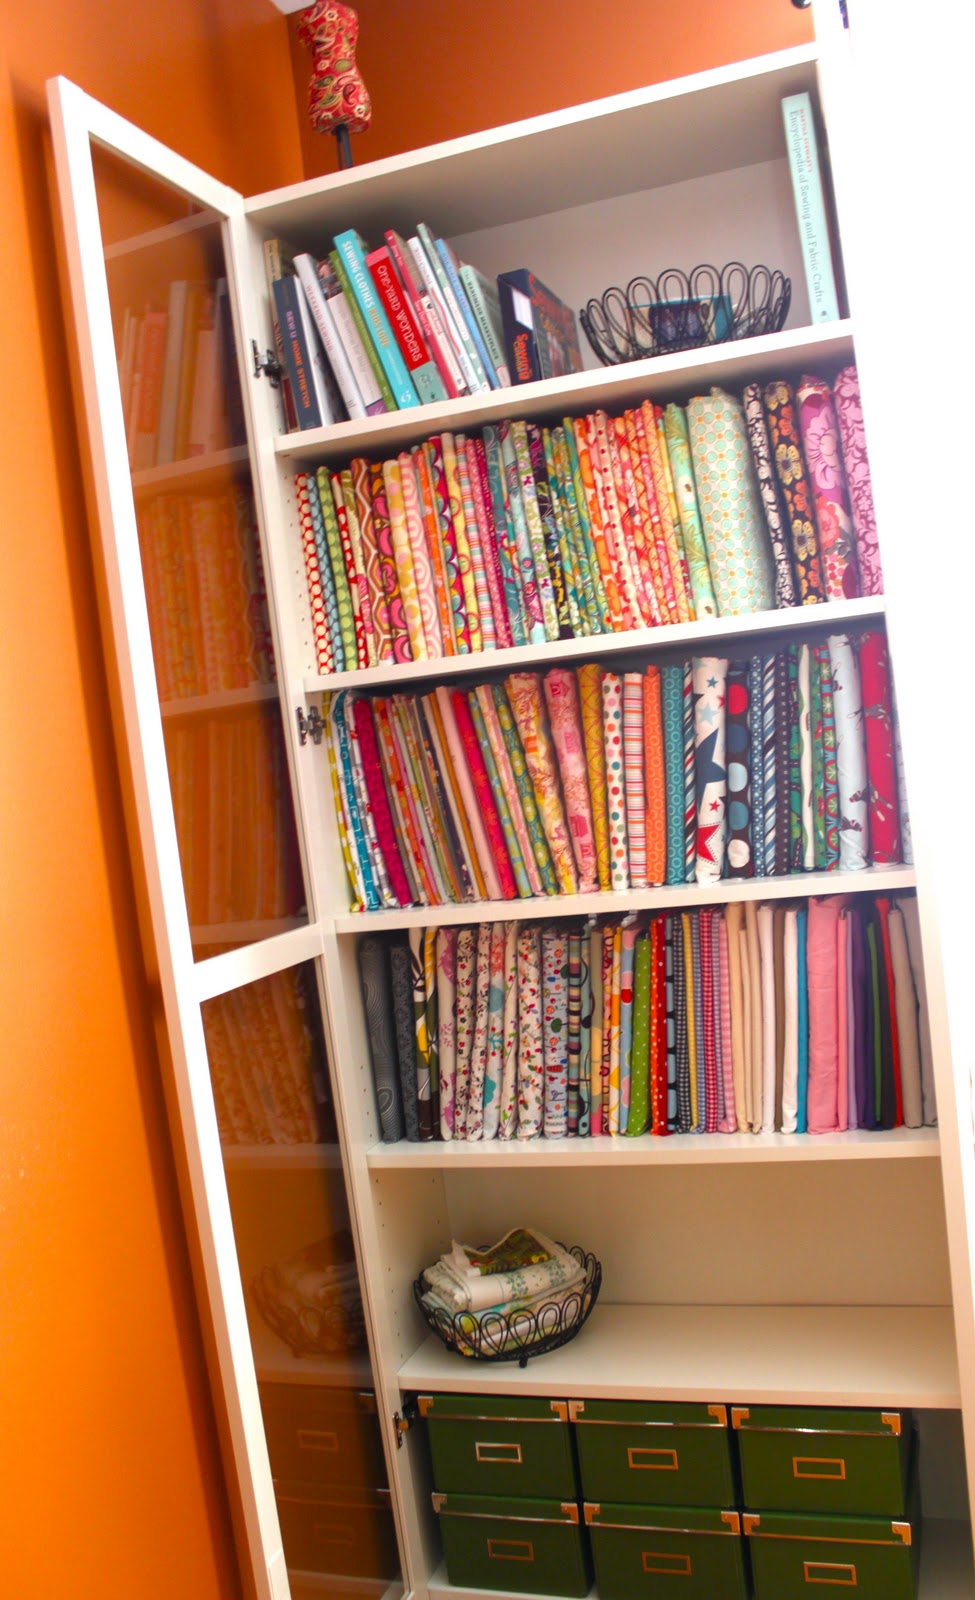
So, this is the area of my studio where I keep the majority of my lovely fabrics. I have this beautiful bookcase complete with glass doors so that I can see most of my fabrics to get inspiration but at the same time keep the peanut butter and jelly fingers off my goods! I used to have all of my fabric in plastic bins (and I still use them for minky, felt, fleece, etc) but I find I am much more creative when I can look at all my pretty fabrics and pick color combinations for projects when they are all there in front of my face 🙂

This is my ‘happy’ place for sure!

I organize my fabrics by designer and then in colorways within each line…told you I was Type A (although I held back on doing designers alphabetically, hah!)
Would you like to meet my friends? Amy Butler, Pat Bravo from Art Gallery, and Sandi Henderson…

And then there is my Monaluna, Heather Ross, Anna Maria Horner, Riley Blake and some Moda too…

This shelf is home to some Kona cotton, pretty linens and some fun gingham.

I have some of Anna Maria Horner’s new fabric, Innocent Crush, on the way as well as I’ve pre-ordered Amy Butler’s new line, Soul Blossoms, coming out in December. Can. Not. Wait. They both have space reserved on this shelf!!
In the wire basket I keep a stack of vintage pillowcases from some of my thrift shopping sprees!
And in the green boxes, I keep some of my notions…buttons, snaps, zippers, etc. It makes creating things easier when there’s easy access and they are easy to find!

I wanted to show you how I get my fabric all folded up so neatly. I make my mini bolts using those up there, Comic Book Boards!
I belong to a fabric group and one day a while back we got into a big discussion about how we organize our fabric. There were several ladies in the group that mentioned they used these boards and loved them. You can get a pack of about 100 for around $10-11 and for that price I just had to try them. Let me tell you I’m in LOVE! They work perfectly and because their true purpose is to maintain the quality of those pricey comic books they are perfect for fabric. They are archival and won’t mess with the colors or quality of your fabric…can I get a Woot Woot for that!!
I bought mine at a local comic book/collectibles store but you can also buy them online, I found some here at Amazon for not too much more than I paid. I buy the 7 1/2 x 10 1/2 inch boards and they fit most fabric perfectly. Let me show you how…
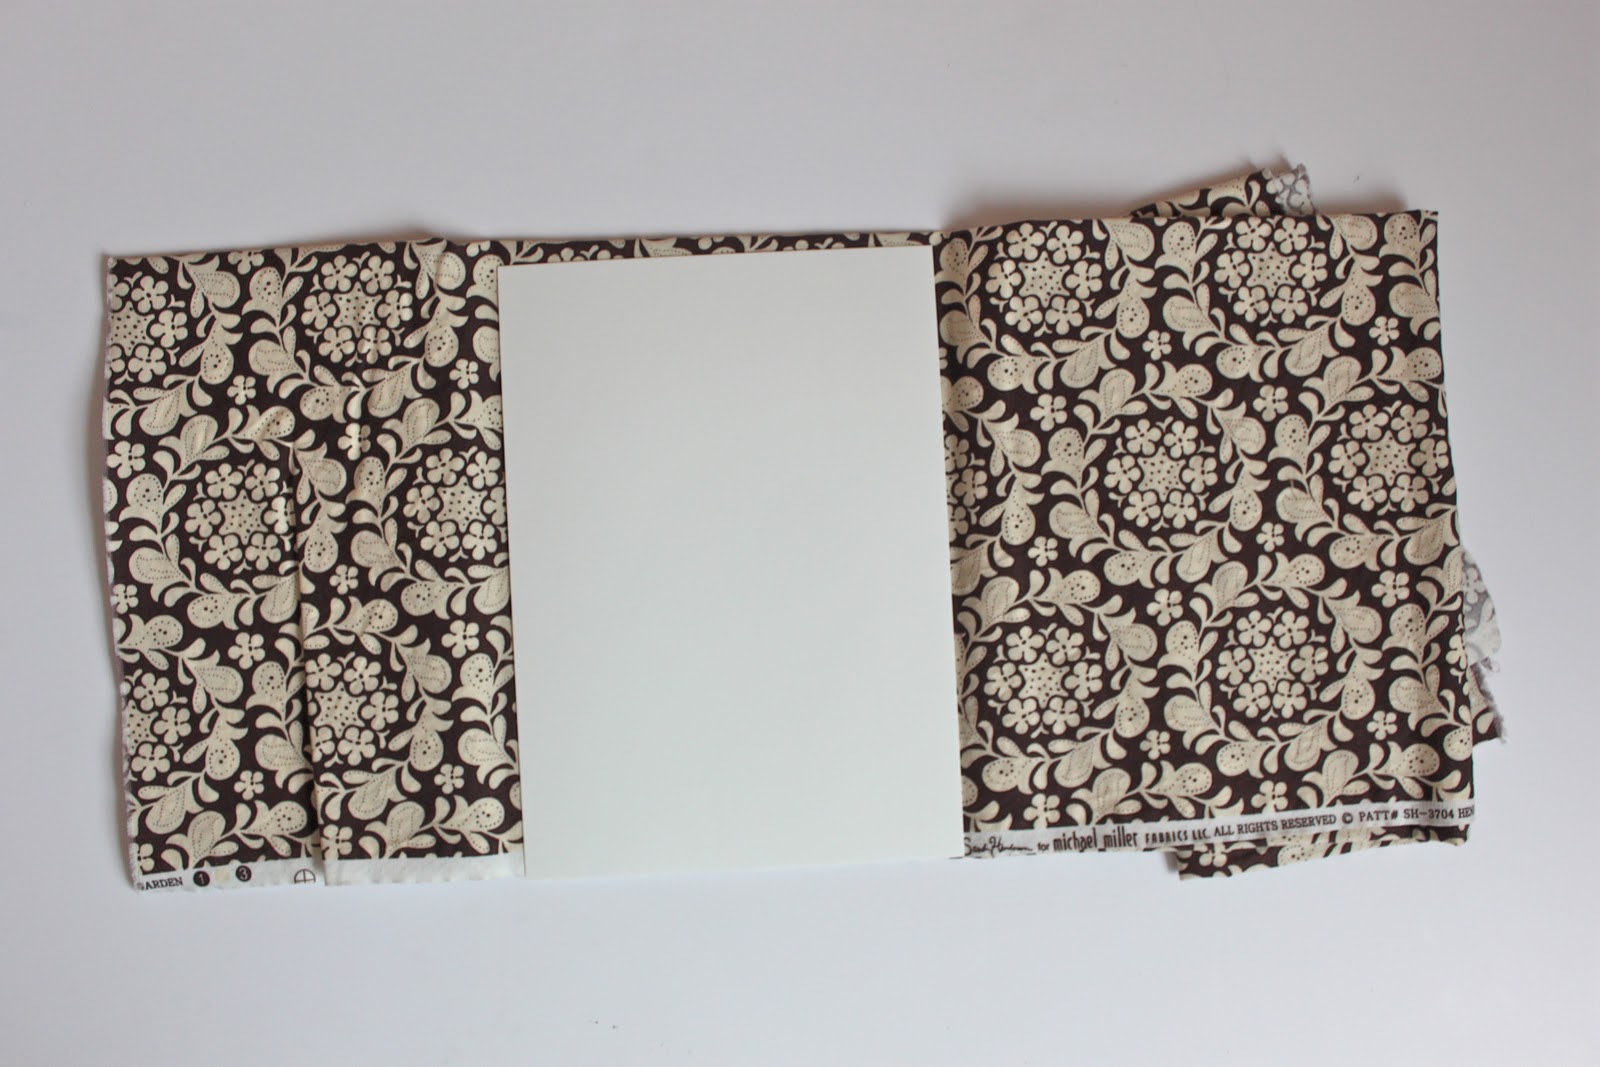
To fold your fabric up, all you do is fold your yardage selvedge to selvedge and then fold it once more in half lengthwise. Your fabric is essentially folded lengthwise in quarters. Then, just take your comic book board and place it at one end…
Fold the end of your fabric on top of the board and then continue folding over and over until you reach the end of your yardage.

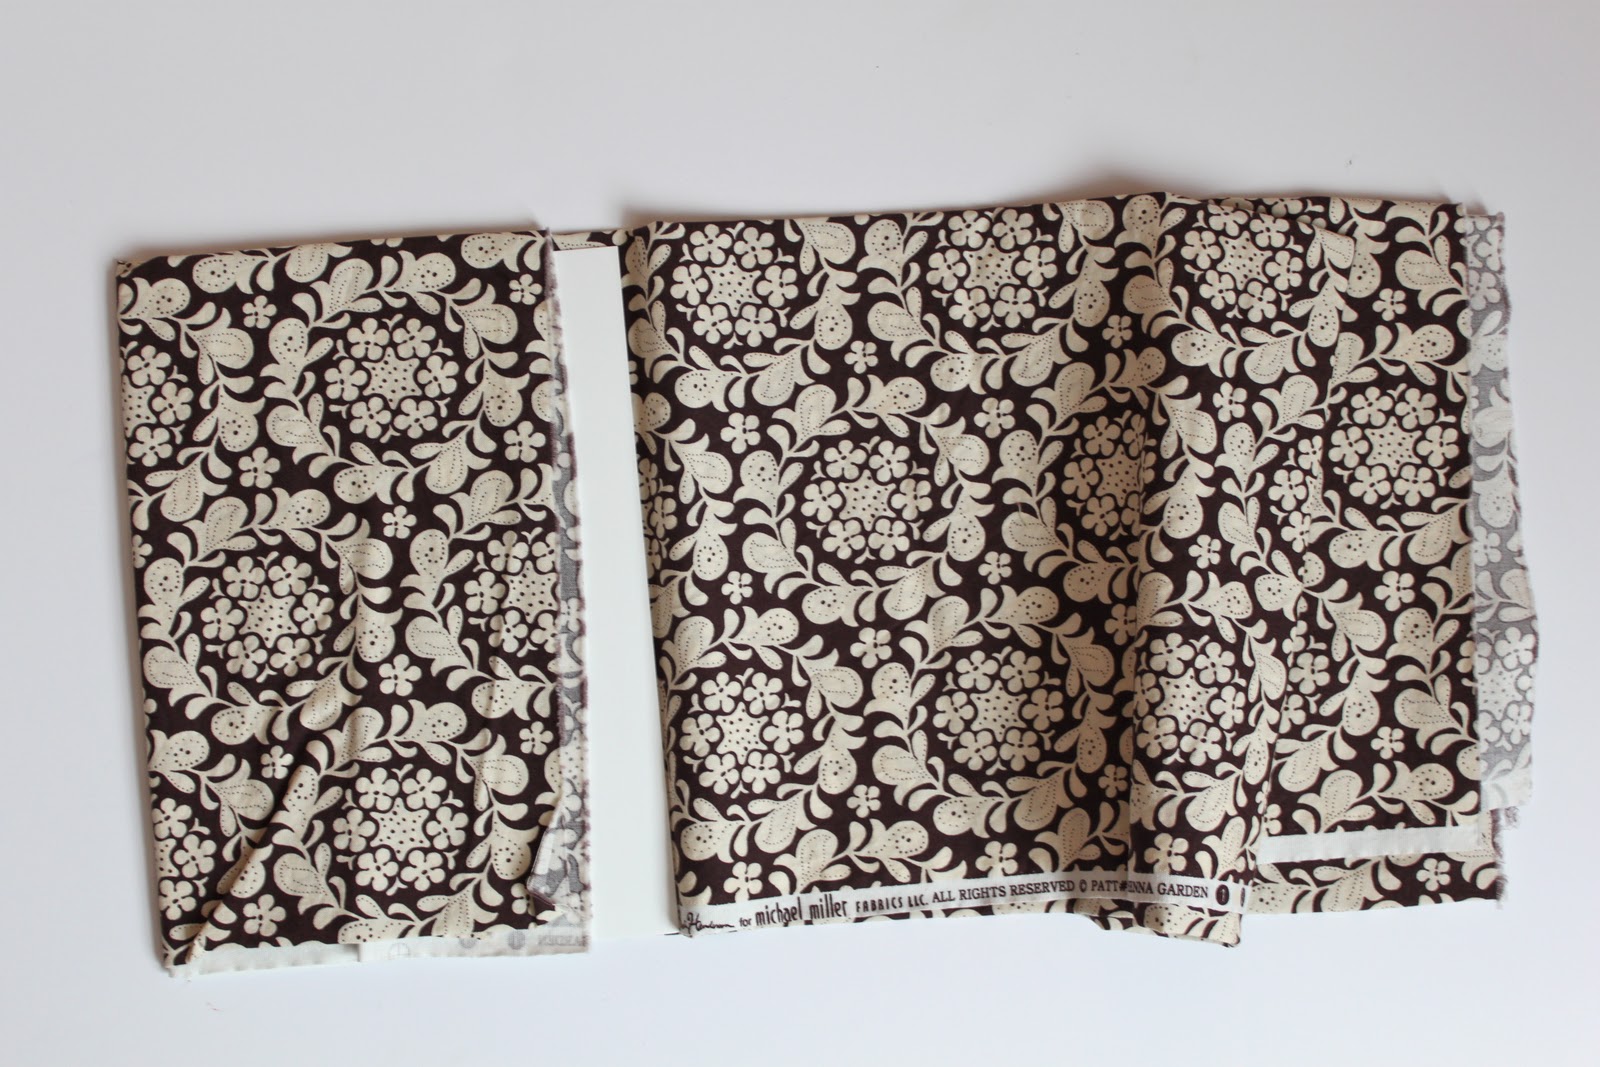
See how pretty and neat it looks!

I just leave the ends like this and place them on the shelf but if you want you could pin the ends with a needle or two to secure them in place.
I’ve found that these boards work great for up to 6 yards of fabric. If I have more than 4 yards I just use two boards at opposite ends of the length and fold them both inwards for some added strength.

Ahhh, lovely folded fabric in cute little mini bolts!!!

So neat and tidy…

Now can you see why I am just loving the pictures in this post?

Hope you enjoyed a peek into my studio!
And my goal is to get a few more posts about how I organize and decorate my creative space up soon. You know…in between work, and preschool, nursing Ellie and Thanksgiving, wish me luck!!
in the meantime…
Happy Tuesday!!

Very pretty!!! I can’t wait to have a space where I can do a bookcase like yours ~
~Kimberlee
http://www.TheSpunkyDiva.com
PS – I have an etsy link party going on Tuesday at my blog. Would love to have you over to link up!
Oh my gosh – this is gorgeous! Very inspirational! 🙂
oh my godh! this is my dream! so organized and tidy and the colors oh my!!!! i want! i want! i want! wow!!!! 🙂 where did you pick up that glass bookcase???!!
Wow … I have fabric envy. Serious, serious fabric envy. 🙂
This is how I am doing my fabric stash!!!! I love the idea of using 2 board for the bigger cuts too. I am going to have to do that. I am slowly getting my stash converted over…
So beautiful! I am jealous of your beautiful fabric!!!
This is so inspiring! I am in the process of getting ‘craft room’ ideas to transform a spare bedroom into MY room. This is so cool and pretty and organized and soothing and creative and……
I will be redoing my sewing room after the holidays and have been pricing storage solutions in the meantime. I’ve picked out some bookcases with doors like yours and was going to fold the fabric and stack the pieces. The mini bolts will work so much better!!! Thanks for the idea!!!
aren’t the comic books great! I am glad you found them useful and I love the brightness of your shelves 🙂 see you in the “fabricgroup”
happy sewing!
I also organize by designer!
Beautiful! I’m off to order some book boards so that I can arrange my fabric in such an efficient and colorful manner!
Que bonito!!! Me encanta tu armario, tan colorido, tan organizado, tan alegre..
Lovely
Núria
I also love your bookcase-perfect for keeping little hands from destroying a fabric stash! Did you get the comic book boards from a brick & mortar store? Would Hobby Lobby carry them?
Thank you, thank you! I’ve never known how to store fabric without it being buried in a box – this is perfect!!
What a fabulous way to organize fabric and know exactly what you have!! I’m so sharing this with my readers!
Delicious! I’m glad you included all the pictures. Glass doors are a fabulous idea. 🙂
Wonderful idea! Thanks so much for posting the info on this. Your fabrics are beautiful too.
VERY COOL! I am SO organizing my fabric this weekend! Thanks so much for the hot tip!
Hi (I think I found your blog through Craft Gossip…) – I love this idea! So much that at lunch I went to the comic book store and got the same storage boards ($10 + tax, first time I’ve seen a local shop beat amazon…)
Now I cannot wait to organize my stash- which is not nearly as impressive as yours. I’ll be subscribing to the blog now!
This is a great idea. I’m constantly having to refold all of my fabric / pull every piece off the shelf to find what I’m looking for. Thanks!
That is awesome! I would love for you to come link up at our Strut Your Stuff Party!
http://danajeanward.blogspot.com/2010/11/strut-your-stuff-link-party-and.html
love love that cabinet, perfect showcase!
Is it alright that I am lusting after your cabinet??? LOL. Oh it seriously takes another crafter to feel this much for someone else’s space. hahahh!!! Beautiful!!!!!
A.maz.ing. I love this idea, I love your fabrics, I love your cabinet and I love all the pictures! If that were my cabinet I think I would just be sitting in front of it all day everyday just staring at all the pretty patterns and colors! Thank you for sharing this idea…now all I have to do is find an amazing cabinet like that!
Love this idea! But I’m out of shelf space so…. hmm.. got to do some thinking. Maybe it would at least save space in the closet.
This is an amazing idea! Perfect because I do applique and have all fabrics in 1-2 yard pieces! Thank you – sharing on our FB wall today. 🙂
I want. Your stash!
What a great idea–mine are folded and stacked, but you know how that guys–pull one out and it gets all messed up. I love this idea!
xo,
Bethany
This is such a cute idea! What a great way to display our drooled over fabric collection!
Thanks for sharing.
Thanks for linking to TAke-A-Look Tuesday over at Sugar Bee Craft Edition – I featured you today! – – Mandy, http://www.craftedition.blogspot.com
I’m glad I’m not the only one that uses the comic boards for this reason… I did this about a year ago. Isn’t it wonderful to stand back and view it all neatly lined up so colorfull????
That is a fantastic idea. So much easier to pull off the shelf too. I hate trying to pull one piece out of a stack of folded fabric. You’ve inspired me and I never even knew about the cardboard for comics.
Thanks for sharing. Hugs…Tracy 🙂
Thanks ladies!! I have to say that I could really spend all day staring at my stash now, but probably shouldn’t 🙂 For those that have asked, I bought the bookcase at Ikea, they (along with everything else there) is super reasonably priced and the hubs and I put it together in 1 1/2 hours!!
XOXO,
Mags
I’ve got a new blog and this was featured today! I’d love if you stopped by and grabbed a button!
todaystoptwenty.blogspot.com
Your stash is just so darn pretty! 🙂
Amanda
This is a fantastic idea! I can’t believe I didn’t think of it with all the comics we have in our house!
I’m waiting to get a new shelf and organize all my stuff, this is definitely how I’ll be displaying my fabric.
I use bins now and it is more inspiring to gaze at the beautiful prints, not to mention it’s easy to find things! Thanks so much for sharing.
This is just fantastic! My cotton print collection is still tiny but better to get organized early ;D Thank you for posting this.
wow what a great idea to use the comic book storage boards! super duper smart!
-Sarah from Create Studio
http://www.createstudio.blogspot.com
Great idea! Now I’m all inspired to organize =P
This is exactly what I want and need to oranize my fabric (only in my dreams!)
Your stash looks very nicely organized, all wrapped around the boards. But that would not work for me. I have thousands of different pieces of fabric in my stash. I know because I recently refolded every one of the larger pieces and have been working on cutting up my scraps Bonnie Hunter style. I don’t classify my fabric by designer or company. The prints are sorted by color or by theme. The solids are separate and also sorted by color.
Gorgeous! I’d love to get my sewing space looking that beautiful!
Your fabric display is so beautiful! And your mini bolts are absolutely darling. What a fantastic idea.
Hi there…just stopping by to say how much I love your fabrics and tehy way they are organized. I featured them on my blog today. Hop on over.
Thanks! Taylor
Love this idea. I wish my stash looked like that! I am featuring this at somedaycrafts.blogspot.com
This is such a fantastic idea! I love that they are not getting wrinkled, easily accessed, easily viewed, and kept CLEAN!! This is the best idea I’ve seen in a while!
Saw this featured on another blog and had to come check it out. Love it!
So organized and pretty too! Also, if you need to know how much fabric you have, you could just measure before you fold it up and then add a piece of paper with a pin that says what yardage is left!
Such a great idea! thanks so much for sharing 🙂
I’ve been thinking of ways to organize my fabric and couldn’t’ decide what to do – I LOVE this idea! It looks so much nicer than the ugly plastic bins I have (which I’ve heard isn’t good for the fabric anyway), and you can see everything! To the comic book shop!
Sold, this type A would like to thank you!!! i am going to buy them on line right now!! You are wonderful!
Carol
This is one of those DUH! It’s so obvious ideas! I’ve been trying to figure out what to do with my storage bins of fabric so it is accessible enough to use it!
THANK YOU for sharing!!
this is just what I needed, my fabric is a mess! THANK YOU!
These are absolutely adorable! I wish I had space to do this with my fabric. I can see why this is your happy place. 🙂 Love it, thanks for sharing.
Amy @ The Happy Scraps
I can’t thank you enough for this wonderful Idea. I need to get my fabric out of the rubber bins I’ve been hiding them in and this is exactly what I needed to find. Thank you, Thank you, THANK YOU!!!
I think your bookcase is my happy place too!!
I LOVE the comic book boards — who knew those even existed and am totally getting some for my own stash.
My fabric is in a bunch of underbed boxes and it’s so frustrating because I never know what I have or where it is. This is awesome!!
Mama’s art studio is getting a mini makeover!
Thank you so much for sharing — I think this would be what Oprah calls an A-Ha or Lifechanging moment for me… and I’m being completely serious here.
Thank you.
xoxo
pink and green mama
MaryLea
I am off to get me some Comic Book Boards. I have a large collection getting larger and was looking for just this solution.
THANK YOU SO MUCH!!!
Such a great idea! And it’s something think will work for me, especially since I have more vertical space than floor space. Thanks for sharing. I’ll be following you now.
So organizied! Makes me wanna come over and sew at your house! 🙂
THANKS for the great idea!!
I want that bookshelf(including contents!). Much nicer than my piles of fabric crammed in the cupboard!
I’m totally drooling over this right now. When I move can you come to my house and make up my sewing room? Pretty please?
I Love this Idea and am working on doing mine in a slightly different way. I wish I could figure out a way to have my larger cuts vertical, my vintage ones, are huge cuts and are least 25 yards. If you have any ideas, please, please let me know!
Very lovely! It’s always inspiring when you can see your supplies in a beautiful setting! Just one question…what do you do about 54/55″ fabric widths?
Now off to see if I could pull this off in my fabric closet…
I cracked up when I saw that comic book boards were your secret weapon! My husband is an avid comic book collector so if he find his boards start disappearing… don’t look at me… :o)
I love the way of fabric storage! It is so practical and really nice too!
This is a great idea I’m going to be stealing this for sure.
so you said you belong to a fabric group. I’d love to know which one, because i was part of one too but the organizer decided she couldnt be taking care of it anymore, then she stopped with the group. I’ve been searching for a new one. I do a lot of sewing and it hurts that I have to pay retail price on my fabrics.
thank you so much
bekinhabsb@hotmail.com
Rebeca
Do you mind sharing where you got that gorgeous yet super simple bookcase?? I haven’t been able to find any with doors and I ADORE yours!!
This looks beautiful!!! Definitely something I want to do in the future, thanks for showing how it’s done!
How beautiful and what a fantastic idea!!! I would like to know about your cabinet. Is it IKEA?
What a great idea. So inspiring to be surrounded by colour! I had posted my ‘Organising my Fabric Stash’ blog back in July and I was very very pleased with it, but after seeing your mini fabric bolts I think I prefer yours!
http://www.SewHappy.Me
Brilliant! I’m on it!
WOW, I want one – LOL. It’s fabulous and thanks for sharing yor great idea.
Fantastic idea! Have to do this also with my fabric mass!
Thanks for sharing!
I am so glad i found your post! i was sure there must be a cheaper way to make mini bolts then buy those acid free plastic ones! and here it is!
I saw this post and went to the comic shop immediately!
what a space saver and already i can tell what i need more of, ha!
I just added these boards to my Christmas List!! I also would like to know where you got your book case with the glass doors… love it!!
Can I come shopping for fabric at your house!!! I LOVE LOVE LOVE what you did. I guess it is time for me to reorganize my stash.
I LOVE it! And I want that bookcase, but the only thing I can find at Ikea is this http://www.ikea.com/us/en/catalog/products/S59885951 I can’t find just the bookcase!! GRRRR!
Kayci
Mommy2MJs@cox.net
I may have run out and bought some as soon as I read your post…I am an organized FREAK, but always struggled with what to do with my fabric…THANK YOU!
Can I admit that I’m DROOLING over your fabric collection?! I saw your post weeks ago and loved it so much I put comic book boards on my list for Christmas, and got them today! I can’t wait to start on my fabric stash, though it’s not NEARLY as awesome as yours. Thanks for the how-to, now to just keep little fingers off of my stash! 🙂
LOVE THIS SO MUCH! I literally Googled “storing fabric stash vertically” and this is what I got! My dream come true! I immediately ordered the comic boards and went today and bought my Billy bookcase with glass doors (and boxes). Yes, I’m a total copycat–even my stash looks a LOT like yours (in terms of fave. designers), but that I didn’t “copy” per se….
A couple of questions: What color is that orange? LOVE IT! Such a cheerful color!!
What do you do with your scraps? I’m betting you have a nifty idea for that too (being type A)!
Can we see more of your space? How do you store your tools? Pegboard? Drawers? Boxes? Do you have a design wall where you display your ideas first? And finally, if you use them, how do you store your patterns?
Can you tell I’m doing a reorg. of my sewing room this week? 😀
Thanks for this awesome post! I have shared it far and wide with sewing pals, they LOVED it!
Hi Deb! Thanks for the questions!! My paint color is Tiger eye from Sherwin Williams! I am going to try to do some more posts about my space in this next month because so many of you have asked/emailed/commented about it!! So be on the look out! I will try to answer all of your questions there but to start I use CD baskets for my patterns (I keep them in their original sleeves) for bigger ones or ones that I have traced onto larger paper I use magazine boxes…pictures to come!!
Happy 2011!!
Maggie
This was such a fabulous idea that I had to do it. I posted it on my blog and gave you the credit for the idea. You can see it at:
http://sassystylz.blogspot.com/2011/01/fabric-mini-bolts.html
Maggie, check out my copycat set up! I did it this past weekend. It was a great exercise b/c it helped me see that my stash is ABSURDLY HUGE. Now you can see why I asked about wall color 😉 My room is so blah in this beige 🙁
http://www.flickr.com/photos/boonedoggle/5315314820/
I used this idea to organize my fabric and I think it’s awesome. I used a big box I originally kept fabric in but now I can actually find something in no time. I just cut some of the boxes I had to get the “board” to wrap fabric around. I didn’t even bother to get it all in the same size. I’ll replace it when I find something suitable, but for now it really does the trick.
This is how it looks:
http://1.bp.blogspot.com/_FsyWZ0iXebc/TSYxXJlUGiI/AAAAAAAAAjs/OpJXyszSXgw/s1600/PC302941.JPG
And I have two more boxes like that 🙂
Thaks again for a wonderful idea.
I wanted to organize my fabric like yours, but couldn’t find anyone within a 45 minute drive who sold comic backing boards. I scoured the internet and found this site with only $4.95 shipping. They sell six sizes of comic backing boards. I bought the magazine size which is 8 1/2 x 11 inches. Just thought some of your readers might like this info. I spent much precious time looking and this was the best price I could find.
http://www.sportsmemorabilia.com/search.php?q=comic+backing+board
Awesome LD!! Thanks for sharing and letting everyone know the deal you scored!!
XOXO,
Mags
wow that looks stunning! Just shared a link to this post on my blog as I’ve been blogging about reorganising my craft room. Why not pop over and grab yourself a featured button.
Leigh
It’s like you have a mini fabric store right in your home! I’m so doing this as soon as I figure out where to put my fabric~!
Oh my! Oh my! I love the fabric. Please don’t be sad but all of mine is from Joann’s. I didn’t know there was anywhere else unless I drive a little over an hour to the fabric district in LA (good traffic time). I have so many questions for you now. I am excited though because my comic book nerd husband has many boards!!! I hope he doesn’t miss them when they’re gone.
Wow that’s so beautiful! And what a great way to keep dirty little hands off the fabric while still being able to see it. I love great organization like this, it seriously gives me goosebumps (lol!)
So I read this on the morning of November 16 and by the afternoon that same day I was at the local comic store asking for the “cardboard thingys!” Loved this idea, the only draw back was my husband realizing how much fabric I have accumulated!!! Haha…GREAT IDEA!!!
Hi, I linked to your post on my blog http://miscellayneous.blogspot.com/2011/01/as-promised.html
before I saw the link to create a link. Thanks so much for sharing this idea. It has saved my fabric from the dark closet!
Droooooooooooooooooool!!
We are now in the process of converting from horizontal to vertical thanks to your great system. Thanks for getting us upright! So, here’s a question I didn’t see above… do you wash, iron and THEN fold it all onto the minibolts? Or do you just wash what you need before you cut your patterns? OR (GASP) tell me you don’t wash at all and you’ll absolutely make my day! Oh, and do you have a fabulous system for storing remnants & scraps too? I do a lot of applique, so I almost never throw away scraps ;D
@BaaBaaBabyBoutique-Hiya!! Awesome that you are going vertical, woot woot! In the past I have always washed my fabrics then as soon as they were out of the dryer I would fold them neatly to reduce wrinkles…ironing 3-5 yards of fabric per design is just too much for me! Lately though, I have just put them straight on the mini bolt without washing cause I am starting to try my hand at quilting and I have heard that you can get that nice crinkly look if you wash after the quilt is done. If I need a certain fabric for making clothes though I will wash it before using it to reduce shrinking!! I hate to get rid of scraps too but right now I just put them storage bin by color…nothing too special….yet 🙂
Maggie
I just love all the colors. Very nice and pretty. And they make everything look so alive.
I did the same thing but I used a huge foam board from home depot and cut it down to the size I needed. That way I can pin my fabric to the board easily 🙂
Storage is nice, but when you are working and auditioning sashing, etc., where do you work, sew, and cut? If I had a spare house for fabric rather than a 9′ x 10′ guest room for a studio, my husband wouldn’t be threatening to get a POD or self-storage unit!
Wow! Just what I’ve been lookinf for. Thanks for the info. on the comic book boards. The boards for Clotilde are just too pricey for organization purposes, but I can certainly live with this idea!
Thanks so much for this post. I’m vending at the Original Sewing & Quilt Expo in Cleveland for the first time. I’ve been struggling with the best way to display my hand dyes. You’ve solved my problem. Will send you a photo of my booth-you’ll be so proud of me!
WOW Love all those pretty fabrics. I design custom boutique dresses for girls.. check out my Etsy
COME FOLLOW ME ALL WHO LOVE BOUTIQUE AND PHOTO PROPS 🙂
http://www.artisticinclinations.com
Have visited from the Horizon group. Great tip – it all looks lovely x
Thank you so much for this post! I just ordered some boards from Amazon. I can’t wait til they get here! I also love your second post on organization. I used some of our jars that were empty and put all my notions and stuff in them. They look adorable, and now I actually know what I have! What a happy feeling. Thanks for the tips!
I loved this idea so much I did have to try it but found the comic book boards my local comic store showed me were too flimsy for my comfort, so used some left over cardboard from my Scrapbooking, it is scrap stuff from Creative memories supplies and the 12 x 12 makes fabric length easier for yardage calculation. You can also cut them down if you need a smaller size like 8 1/2 x 11.
WOW I love the mini bolts I’m so jealous I can’t contain myself! I’m going to see if I can get this card in the UK! I NEED to sort my stuff out like this too!!!
Thanks for the great idea! I really appreciate the fact that you share how much fabric will fit on a mini bolt. Thanks so much for sharing!
WOW! I found my way to your blog from The Happy Housewife and WOW!! You’ve made my day or really year! I can’t wait to transform my fabric mess into something functionally and yet so very pretty. I plan to work on it after I get married next month. Thanks!!!
Just transferred my fabric stash to this method tonight! Love it!! It’s like my own private fabric store in my house.
Thank you, thank you, thank you! I’ve been looking for something to use for my fabric and organize it “bookcase style”!
Thank you so much for sharing this fabulous idea! I have been trying to figure out how to store my fabric for quite sometime. It usually ends up in boxes and I forget I have it.
Thank you for this idea! I bought my boards on Amazon and have started to bolt my fabrics!
I love this idea, and linked from my blog to this post. I added a tip for organizing jelly roll strips using tie hangers that I love. Thanks for the inspiration!
I ran across your website a couple of months ago, and now I and all my friends are so organized! I’ve gone through 500 of the comic book boards, and have another 100 coming…..have to keep some on hand for new purchases. I can actually go find exactly what I want now! Thank you so much for this idea and your tips.
LOVE the mini bolts! Thanks for sharing. You have a beautiful studio! 🙂
How amazing!!!
I just love human beings who are soooooooo creative! Thanks for making my life easier! Oh and my husband wants to thank you too! lol.
I just reorganized all of my fabric last summer like this, but I went to the Dollar Tree and bought several form core boards (the size of poster board, but foam board is much thicker). I cut each of them with my rotary cutter and ruler(does not take long)into 6 rectangles. I now have hundreds of “mini bolts” and love it!
I really can’t thank you enough for this post or whoever put it on pinterest!
I just started on my fabric last nite & I so giddy with how it will turn out! I think I will need a few mods to my cabinet now, but I’m so happy I will be able to see & appreciate my stash.
I doubt I will get to the sorting by designer any time soon though!
So happy you are enjoying this organization tip!! Have fun! 🙂
Thanks for this great idea….I just linked this in my blog post!
http://4you-withlove.blogspot.com/2012/03/fabric-stashgetting-it-under.html
I bet you inspire others!
Marilyn
I’ve seen this idea before, but the original blog I read it on has since disappeared…I came across your blog post via Jess @ http://www.craftinessisnotoptional.com, whom I found via Laurie @ http://www.TipJunkie.com I am now at the point of needing to start doing my storage vertically, and am curious about the type of boards. They are only coated on one side…do you double them up, back-to-back? Or do you not worry about the fact that they are only coated on one side? Also, how sturdy are the single boards? If the coating is not of concern, are they sturdy enough to handle standing on end, with a 6 yard cut on them, as well as the wear and tear of pulling them out of the shelf and shoving them back in? Would love to know before I select a quantity! 🙂 Thanks!
Nope Ali I do not double them up and I have had no problems with them at all! A single board can easily wrap 6 yards, many of my cuts are 4-7 yards. have fun!
BEST IDEA!! I love it!Thanks so much! Kristy from www,apronsandapples.blogspot.com my crafty healthy blog. SO excited to find you here! I will be back for the tutorials!
This is beautiful. I do have a question, how much fabric do you buy at time? And where do you like to buy your fabrics from? Great blog and tutorials, love them all.
It depends, I buy bolts for my shop and up to 5 yards at a time for personal items for my kids and family depending on the project! I love Fat Quarter Shop and Fabric.com!!
Just added this to my to-do list!
I’d like to win Magnolia, Just beautiful!
Thank you so much for this post. I am really struggling with my fabric stash ..even in clear boxes. I’ve been racking my brain for a better solution and You Have It! Yay! I totally dig your stash… could have a lot of fun.
If you have fabric larger than fat quarters (45″ or 60″ wide) go to your local fabric store and see if they will give you the cardboard forms from used up bolts.
I LOVE this idea–and I agree your shelf looks beautiful! Can you tell me where you got that shelf? How deep is it? I can’t wait to check out your other posts.
dreaming of a lovely studio like this.. one day!! Such a great & beautiful idea!
~Amy
http://www.LadyMockingbird.com
i’m getting a sewing room–due to a renovation project being completed–and i LOVED this idea. my fabric is anywhere and everywhere currently. thanks for the great idea!
Where did you get the glass door cabinet?
OMG! This is Brilliant! I saw this on Pinterest, and showed it to my Dad, he was like it will never work–long story short, my Mom passed away last fall 🙁 and we cleaned and organized her sewing room about a month ago, she had ALOT of fabric and we donated some and still have a lot, so we started to fold the fabric like you did and it is just a thing of beauty, my Dad is blown away too, great idea! I love your blog and you have an adorable family! Cheers!
I totally started doing this and my fabric is so much more organized. It’s easy to find it all and best yet….my cat doesn’t make a bed out of it anymore. However, i need to get a bookcase for it. But, it’s all wrapped and easy to use without wasting too much! Thanks for the awesome idea!
I’m getting ready to clean out a spare room to make into my quilting area… I just went to Amazon and bought the boards. Love this idea. So often I forget about what fabrics I have because they are buried in bags. Thanks for the detailed post!
Love this!! Thanks so much for the mini fabric bolt idea! I just did this for my own fabric storage and loved the way it turned out! (here is a link: http://www.mommybydaycrafterbynight.com/2012/08/sewing-storage-ideas.html) You are a genius!! xoxo, Ashley
Love love love!! Thank you so much the idea!!!
Loved this so much I immediately incorporated into my new sewing room overhaul. Here’s a link to the blog post: http://quiltandcook.blogspot.com/2012/09/new-sewing-room.html
Linked to this in mine.
Thanks for posting about the idea!
I came to your sight through Pinterest and even used the pin as my inspiration for the latest Pinterest Challenge hosted by younghouselove.com and others. I’m so happy getting all of my fabric out. I just can’t wait until I’m done!
http://www.peaceandplastic.com/2012/10/pinterest-challange-orderly-fabric.html
Genius! I cannot tell you how long I’ve been looking for a good way to store my fabric. I’m so excited to try this!
Thank you for this post – for now I took your ideas and made my own temporary fabric holders from my shelve measurements out of random cardboard boxes I cut up. It looks so nice & tidy.
Great idea! Thank you!
Hi Maggie! Since everyone else has been raving about your genius idea for years, I thought I’d give it a try too. It changed my sewing life! Thank you!!! I blogged about it, and linked to you, and I also made up a printable to tuck inside my mini bolts, to help me remember what each line is called, who designed it, and where I purchased it. You can see it here 🙂 http://www.familyeverafterblog.com/2013/03/organizing-your-fabric-stash-free.html
LOVED this and boy did it inspire me. My fabric is now totally organized and so fun to look at as I pass by! Very inspiring. Thank you.
Thank you SO much for the Amazon link! I almost spend $100+ on some plastic boards. These are way more affordable. 🙂 I can’t wait till mine come in.
I’m on love…. these are so dang cute and I have a fabric stash and cabinets that would choke a horse… so to speak. I’m all over this. Thanks so incredibly much for sharing. I’ll try to remember to share pic’s when I’m done! ! ! BIG SMILE. 🙂
I see from looking at Amazon.com that some of these boards are narrower than the ones you used. Just an FYI to check the measurements when shopping.
Thank you!! And thank you for the link! I couldn’t find anything to use as fabric bolts except to cut my own until I found your post! The instructions are super helpful! Awesome!! TY!!
Wow, an amazing discovery. I have just ordered the last pack on Amazon in the UK for the comic book boards. Ages ago I had a similar idea and used cardboard, it took me 3 hours to make 20 of them and cutting cardboard with scissors squished my fingers too. Even though I loved the finished result, I didn’t have the time to waste cutting up more, so the cardboard went in the bin and my fabric stash ended up messy. These are perfect, I can’t wait for them to arrive.
Thanks Again!!!
Also linked up your blog on my Facebook page too 🙂 Wanted to share the world of this wonderful idea. The pack in the UK cost around £14.99 with delivery included.
Love the bookcases and the comic board fabric idea! Just added these to my to do list for my craftroom organization. Thanks for the inspiration!!
Chriss
Wanted to say thanks for the inspiration! I just started quilting, but have been sewing for years, have boxes of fabric, and lots of scraps. I went one step further with the comic boards. Bought the size you suggested and cut in half for large odd shaped scraps. Pieces that might be big enough for a collar, or cuffs etc. Works out great so far. I’ve got about 4 tubs to go through yet. Just got 3, large/tall bookshelves and am anxious to fill with all the colorful mini bolts. LOL I have a candy tin that was my Grandmother’s my Mom used to keep odd snaps, tools and sewing stuff in. I also have some darning eggs that were my Grandmother’s. We have an L shaped family-room and I’m taking over a leg of it. So all of this stuff that has been hidden away in closets and cupboards is going to see the light of day. That is why I mentioned my Grandmother’s tools. Can’t wait to make things presentable and show off a few antiques.
Wow! You received so many goodies that were your Grandmother’s, how wonderful!!! I hope you continue to have so much fun organizing and showing off your supplies!!
xo,
Maggie