Smashed Peas & Carrots

Inspiration For Living Creatively - DIY Crafts, Sewing, Recipes, Crafts & More

  • Press
  • Disclosure
  • Collaborate
  • Contact
  • Facebook
  • Twitter
  • Pinterest
  • Instagram
  • Dots
  • Google Plus

Become a Subscriber

never miss a thing!

  • Home
  • About
    • Advertising
    • Disclosure & Safety Disclaimer
    • Privacy Policy
  • Recipes
    • Appetizers
    • Bento Lunch
    • Beverages
    • Smoothies
    • Breads
    • Breakfast
    • Casserole
    • Crockpot
      • Visual Library
    • Dairy Free
    • Dessert
    • Gluten Free
    • Main Course
    • Holiday
    • Instant Pot
    • Paleo
    • Party Food
    • Salad
    • Side Dish
    • Soup
    • All Recipes
  • Tutorials
    • Children
    • Adult
    • Home Decor
    • No Sew
    • Sewing
      • Children Sewing
      • Adult Sewing
      • Home Decor Sewing
      • Sewing Basics
    • Sewing Studio
    • Knitting
    • Kids Crafts
    • Bento
    • Holiday
    • Parties
    • Gift Ideas
    • Natural Living
    • All Tutorials
  • shop
You are here: Home / Tutorials / Sewing / Adult Sewing / DIY Beginner Sewing Kit Gift Idea-TUTORIAL
Aug
6

DIY Beginner Sewing Kit Gift Idea-TUTORIAL

| Filed Under: Adult Sewing, Gift Ideas, Home Decor, Sewing, Sewing Basics, Sewing Studio, Tutorials

This weekend I had the privilege of helping one of my amazing neighbors learn how to sew (insert happy face).  Does anybody else get giddy at the idea of turning another person on to the awesomely wide world of sewing and DIY?  Ya’ll know I love to teach, so I jumped at the chance to get my teacher on and show her how to wind her bobbin, thread her machine, and take that (kinda scary) first stitch into learning how to sew!  You Can Do It! 
For her first foray into sewing I brought along a Beginner’s Sewing Kit that I made for her thinking that if you are new to sewing there may be a few essentials that you might not have around.  My “must have” sewing items if you will.
Want to make a kit for a beginner sewist in your life?  How about a college-bound freshman?  Or maybe you just want to make a few fun, personalized gifts for friends and family before the holidays arrive.  I hear ya loud clear.  Let’s get started then, shall we?
DIY Beginner Sewing Kits
small mason jar
spray paint
piece of cardboard
x-acto knife
scrap of fabric
small portion of fiberfil, cotton batting, or cotton balls
hot glue gun
pen/pencil for tracing
scissors
sewing necessities (see below for my list!)
I love me some mason jars so of course that is what I used to make this gift.  Specifically, I used the Ball Elite collection pint jars…so cute, plump and square!
This step is optional but I think it is totally what makes this sewing kit so dang cute!  Take the ring off the mason jar and spray paint just the outside and top of it with the color of your choice.  If you can coordinate the paint with your fabric, it makes for a super cute gift!  PS. Try your hardest not to paint the inside of the ring as it will make it a bit more difficult to twist back on the mason jar.
Next grab your scrap of fabric and place the lid of the mason jar on top of it.  Cut so that 1 inch of fabric remains around the lid like the picture above.
Then grab your piece of cardboard and trace around it with your pen or pencil.  Using your x-acto knife, cut 1/4 to 1/2 inch inside this circle so that your circle of cardboard is slightly smaller than the mason jar lid.  Doing this will help the pincushion lid sit more tightly on top of the jar once you twist the ring on.

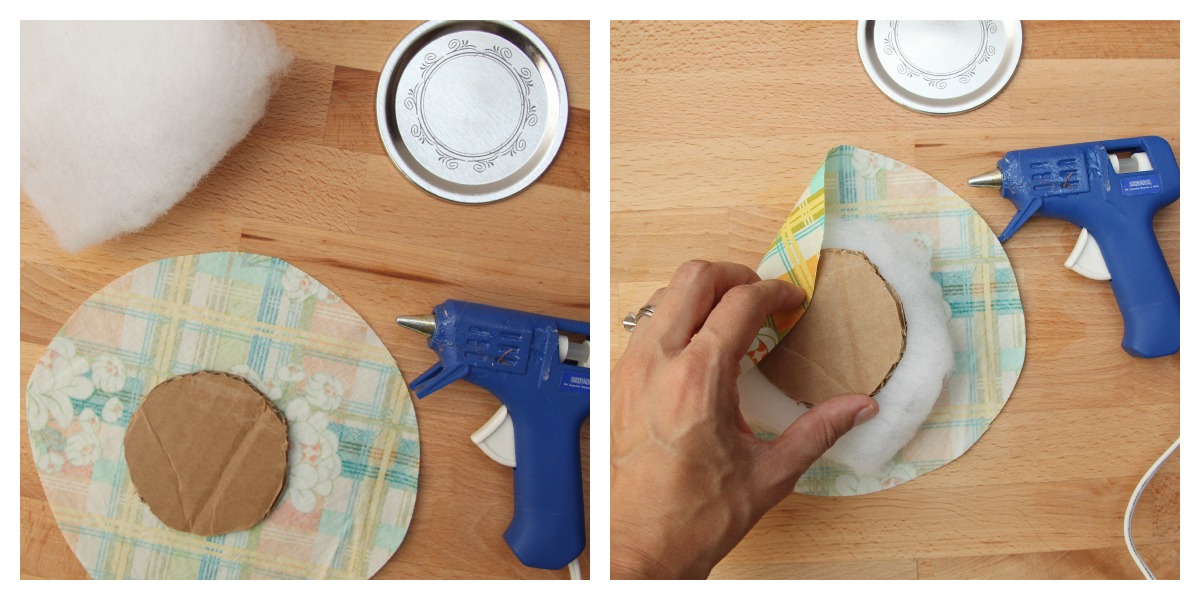
Now we are going to make a sandwich of sorts.  Place your fabric right side down, then place a handful of fiberfil or other puffy material on top and lastly the cardboard circle on top of that.  Get your hot glue gun out and run a strip of glue around the cardboard circle pressing the edges of the fabric over it as you go.  You want to make the fabric pretty tight over top the fiberfil so you get a nice puffy pincushion.

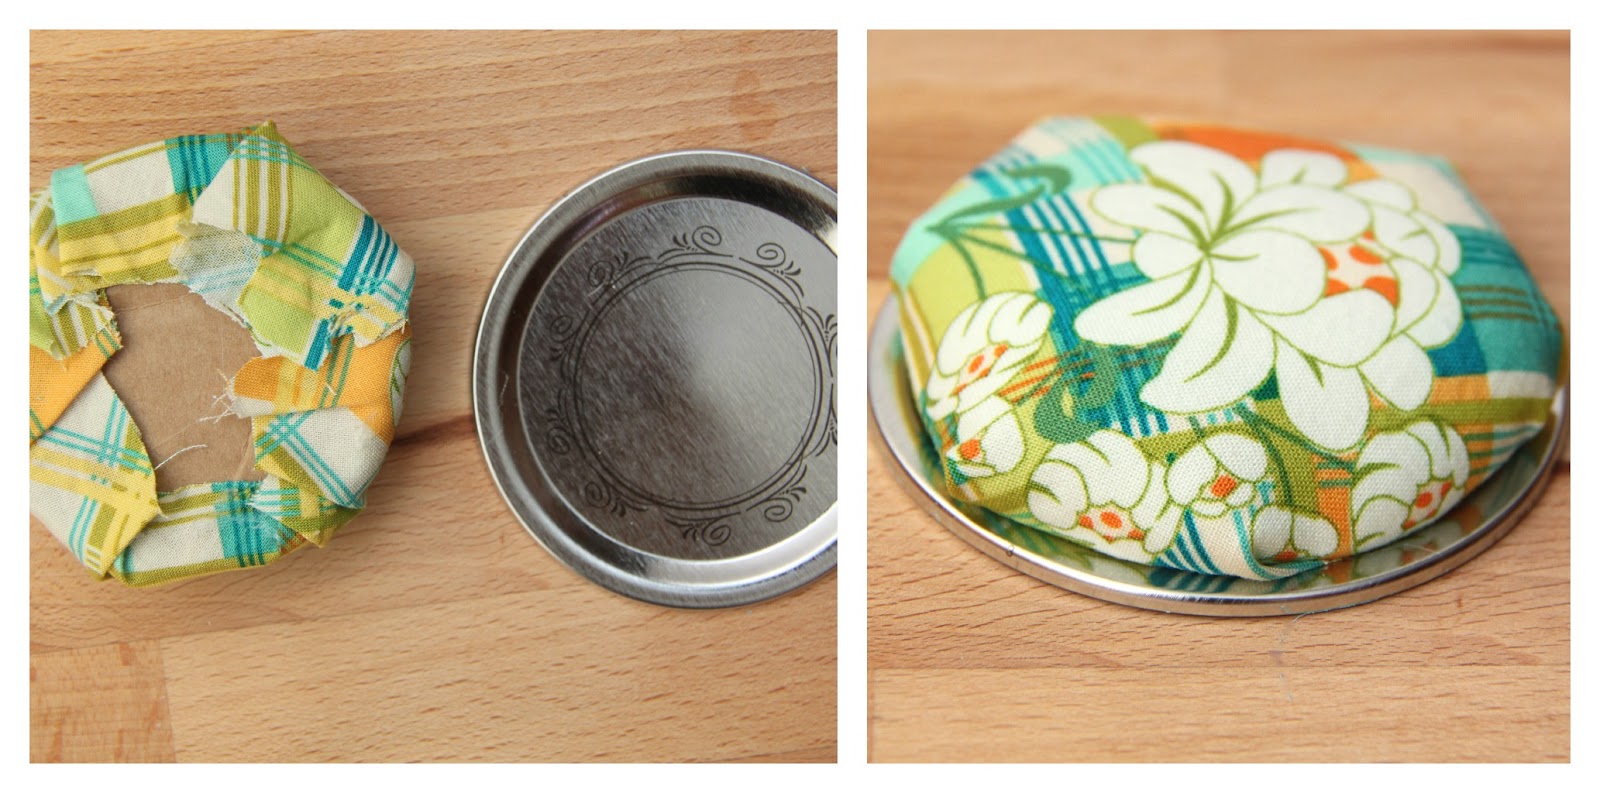
It should look like this now (picture on the left!).  Then just hot glue all over the top (metal part) of the lid and press your pin cushion (cardboard side down) on it.  Let it cool to dry.

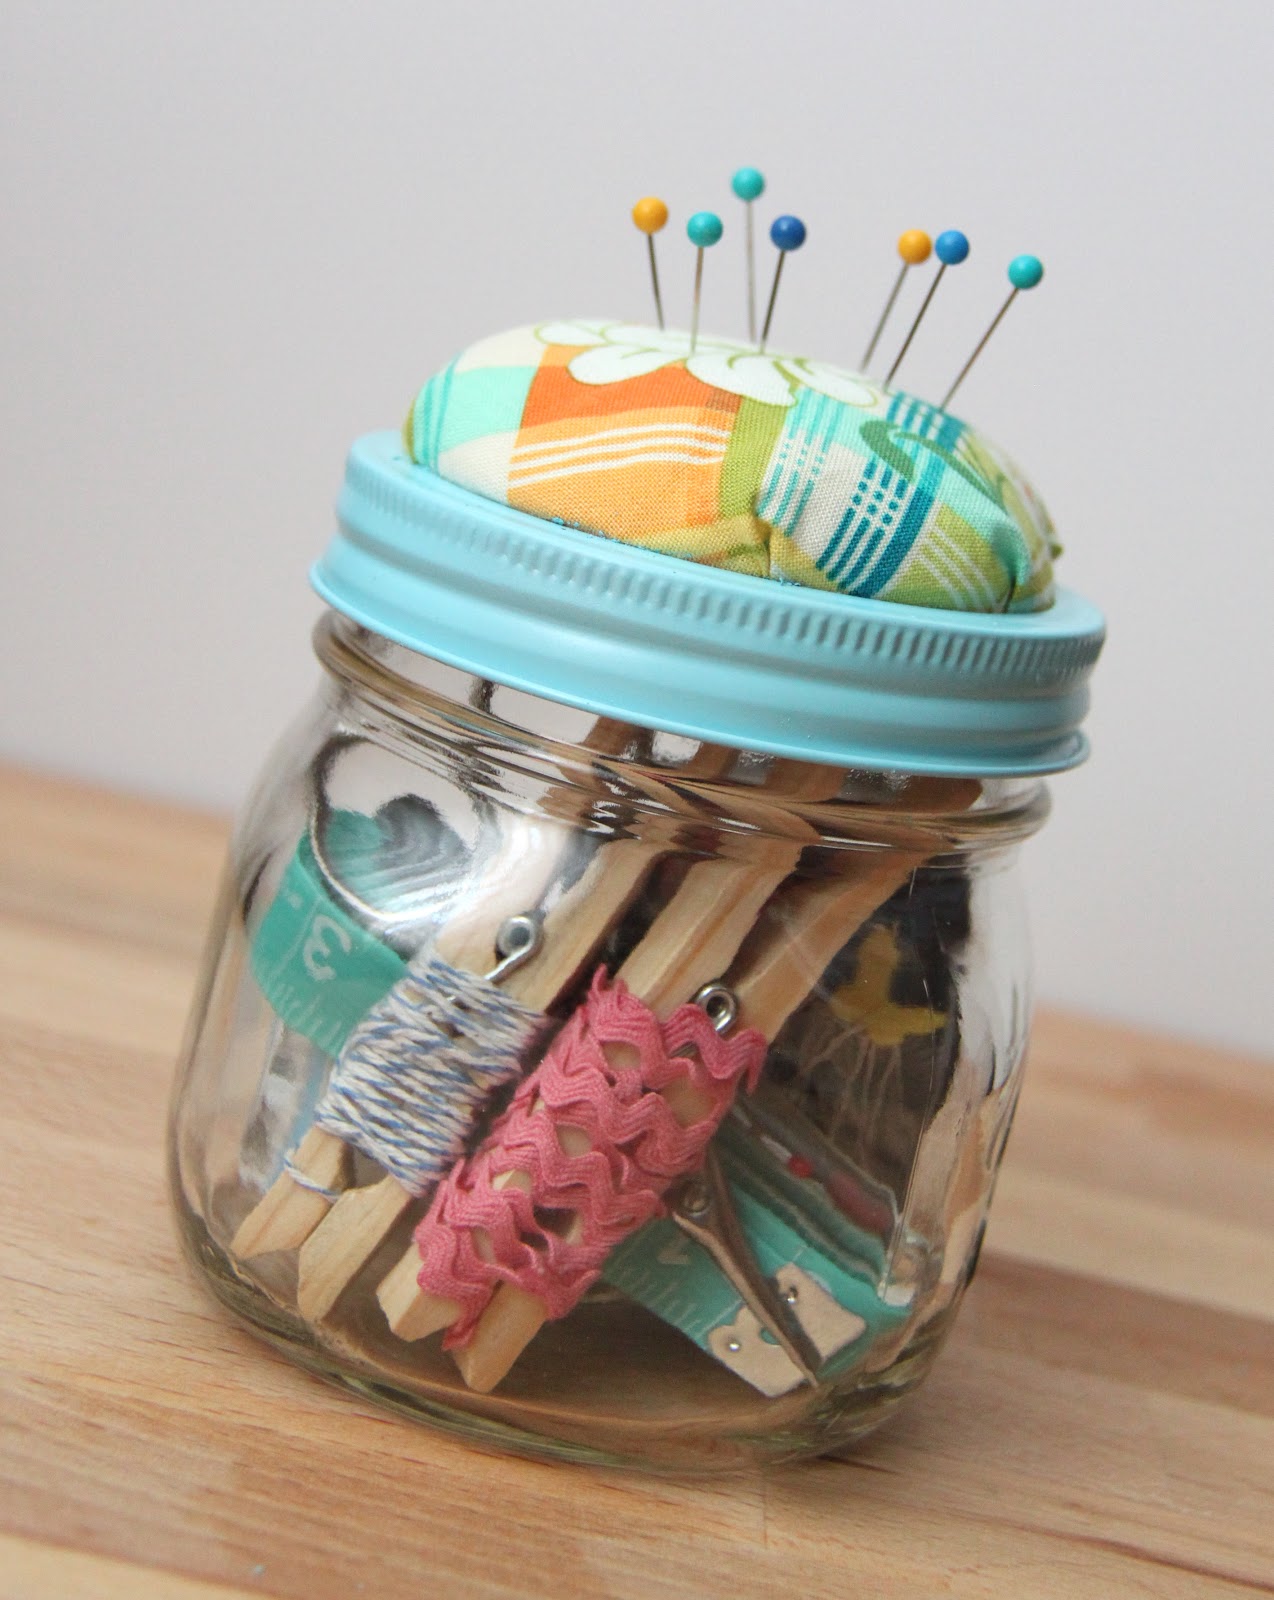
Then just slide the pincushion into the painted ring and twist it back on to your mason jar!

Find some pretty pins to pin on it…color coordinating them if you are nerdy like me 😉
And now you are ready to fill’er up…want to see my list of sewing essentials?


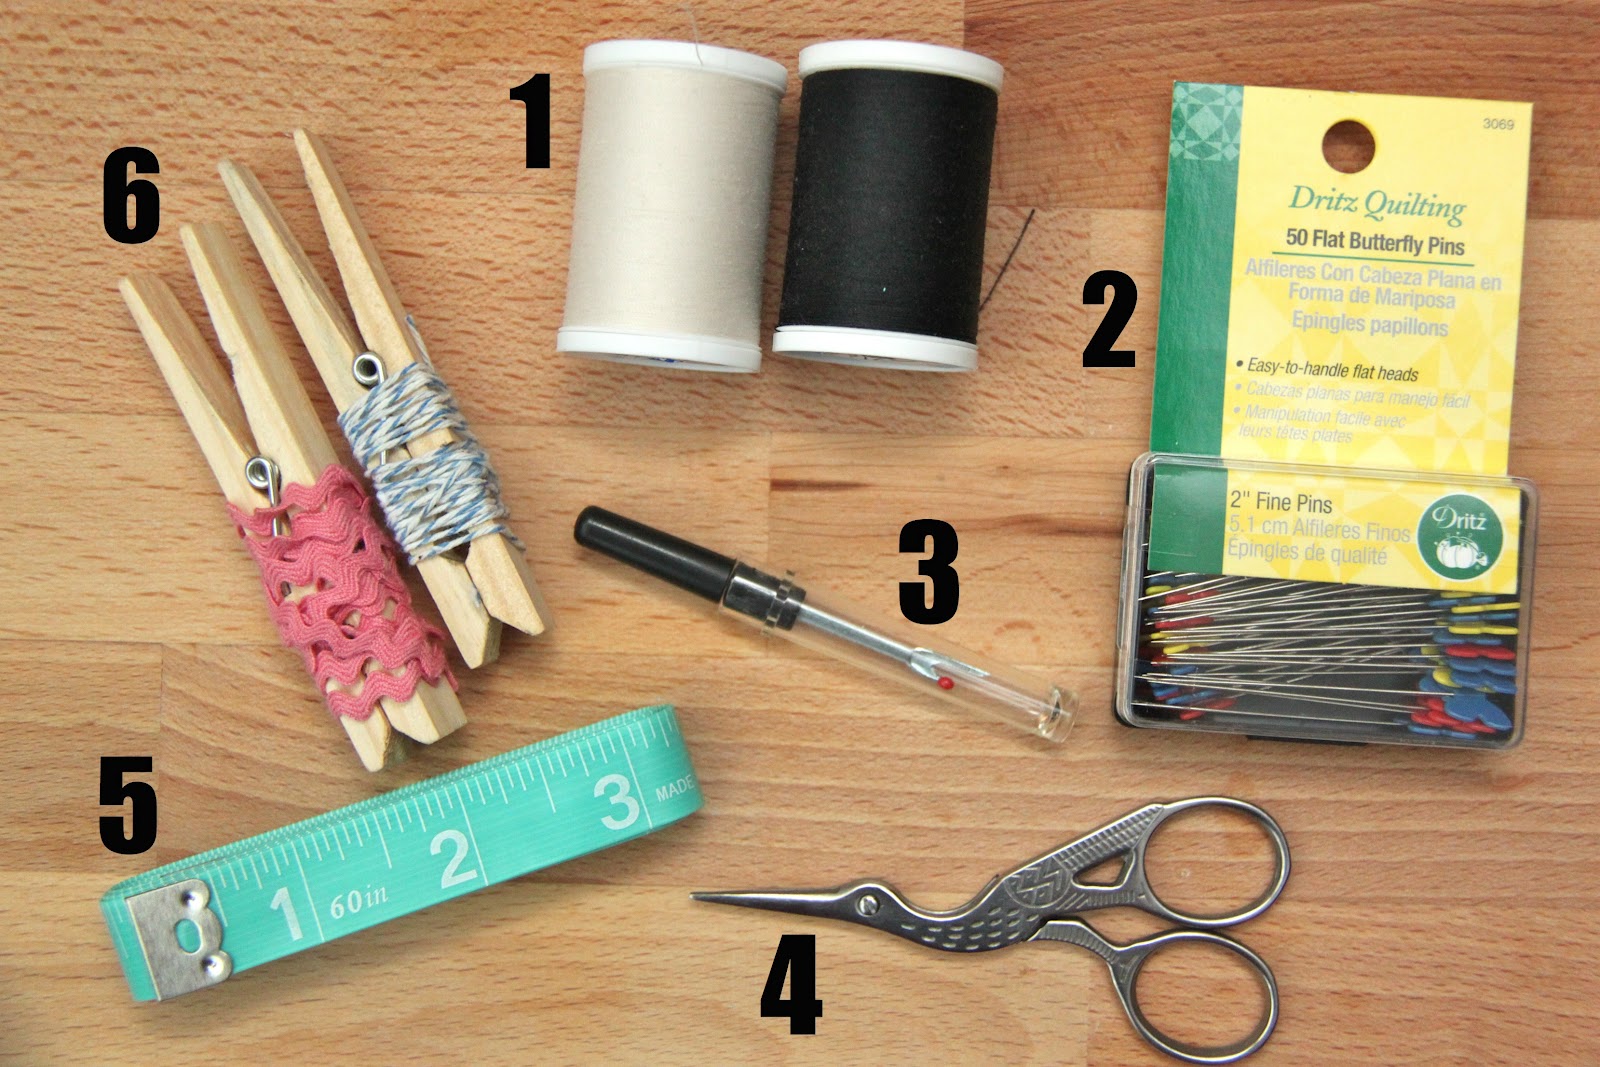
  1. Thread.  I LOVE cream colored thread and so much more so than white.  I use it in so many projects and probably buy it 10x more than any other color.  I also gave a spool of black thread as it is handy to have color opposites!
  2. Straight Pins.  Every sewist needs straight pins to help keep layers of fabric in place while sewing to help you achieve a nice straight line.  These also work wonders as visual markers for when you need to remember where an opening is in a project so that you don’t sew it shut!
  3. Seam Ripper.  Need I say more?  No matter how much you sew or how good you are, you will always need a seam ripper for the oopsies we all make.  This may just be a seamstress’s best friend.
  4. Scissors.  So important!  You will need a small pair of scissors to trim fabric, for cutting threads at the beginning and ends of your stitches as well as to cut those pesky stray threads that always seem to pop up everywhere.
  5. Tape Measure.  Super handy to help you figure out where on your machine certain seam allowances are located.  Also good to have on hand to measure fabric widths and lengths.  A flexible tape measure is great to get body measurements!
  6. Trim, Twine or Buttons.  Colorful ric rac, vintage trim, buttons, or twine are always good bets to add to beginner sewists kit for a touch of color and fun.  These are not only useful as decoration on some sewing projects but are also nice to have on hand to use as ties or tags on gifts.  I wrapped mine around clothespins as they are handy to have as well!


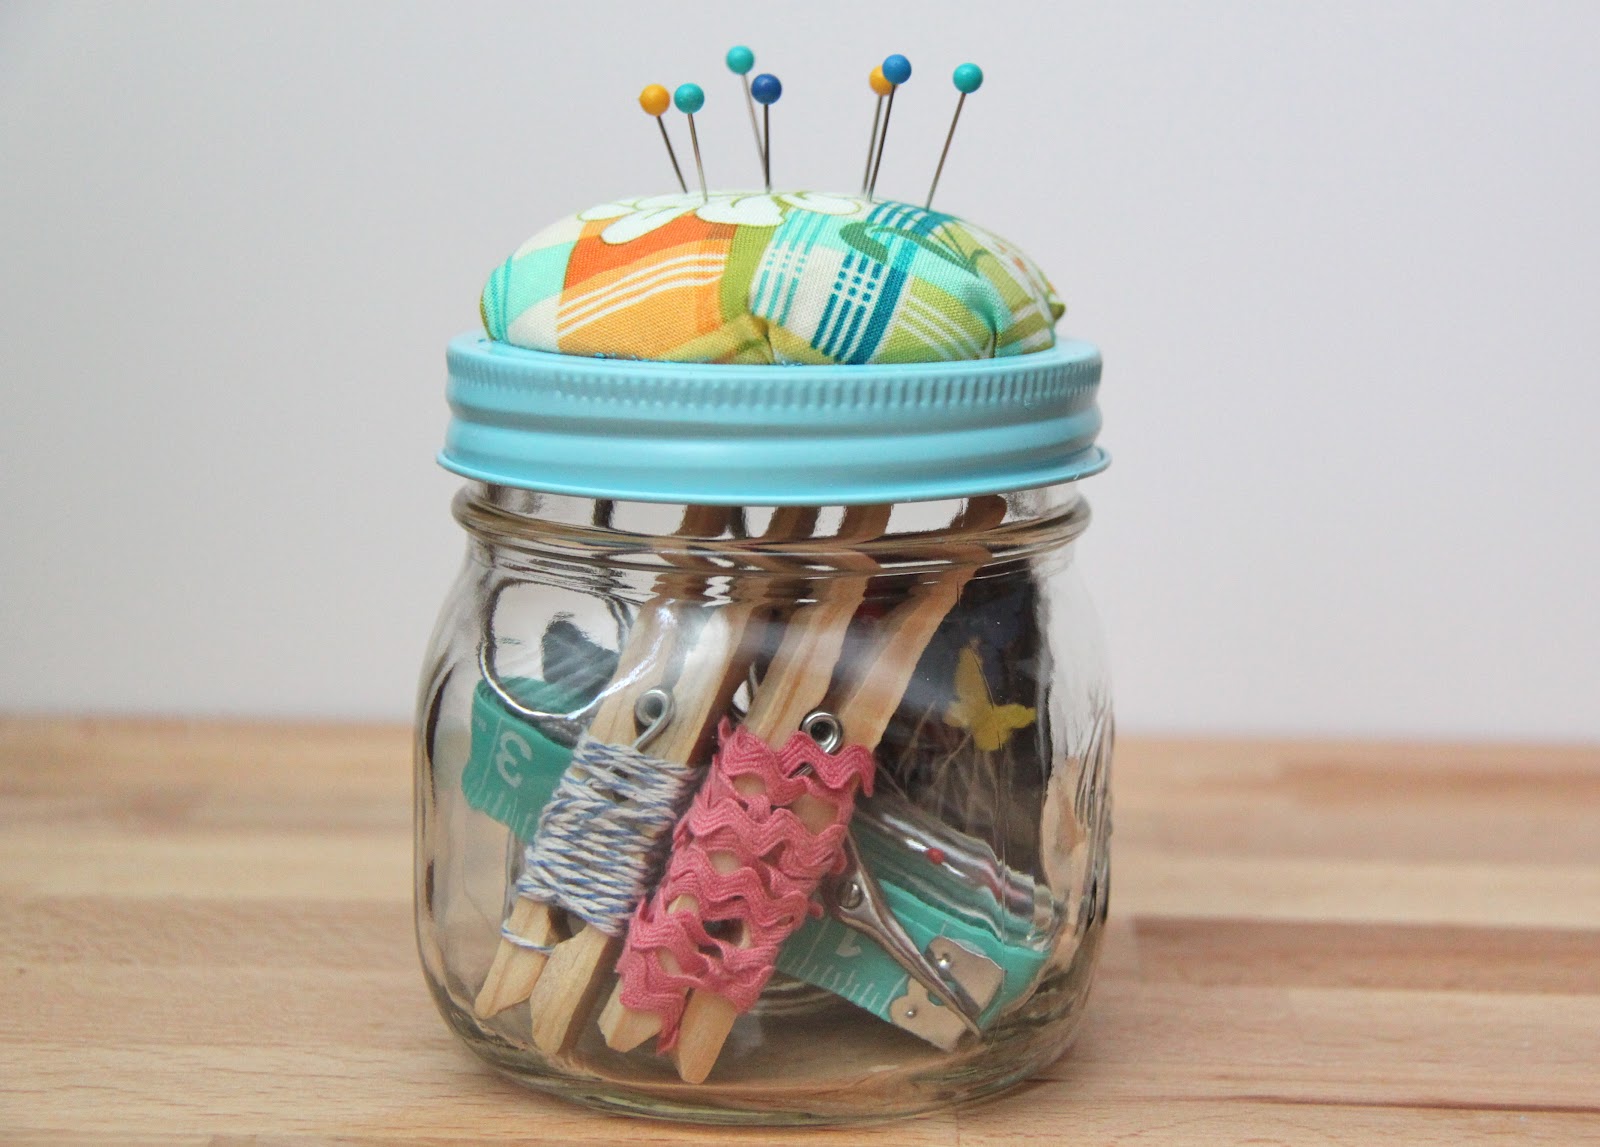
So now you should have your sewing kit all filled up and ready to give…HOORAY!

So tell me, what is on your list of sewing essentials?  I’d love to hear!

Thanks for stopping by and reading today!!

XOXO,

    You may also like -

    Gnome Felt Finger Puppet TutorialGnome Felt Finger Puppet TutorialFelt Hedgehog Ornaments // SmashedPeasandCarrots.comFelt Hedgehog Ornament TutorialGhostbusters Family Costumes // SmashedPeasandCarrots.comHappy Halloween 2016How to Make a Lanyard // SmashedPeasandCarrots.comRiley Blake Design Team: How to Make a LanyardModKid Travel Art Folio // SmashedPeasandCarrots.comBlog Tour: Acorn Valley by Patty Young

    Become a Subscriber

    never miss a thing!

    Comments

    1. Suzanne says

      August 6, 2012 at 12:37 pm

      How cute, love the color! Martha Stewart did these about 20 years ago, part of her “good things” segment. I made them for Christmas gifts one year–like 50 of them! People tell me they still have them and use them:-) She did the lids different with the pin cushion and a larger jar. It was a fun craft, may have to revisit that one. I just blogged about DIY Subway Art. Those are fun! Have a great day:-)

    2. Ginger says

      August 6, 2012 at 1:37 pm

      Ok, now I really want to make these for my new-to-sewing friends. I’ve been sewing for around 20 yrs and I’ve never used a clothespin, so please tell me what you use them for. Am I missing out?

      • Maggie says

        August 7, 2012 at 2:06 pm

        LOL, nope Ginger! I just use them from time to time to hold thicker fabric pieces together like minky and flannel for when I am making baby blankets, I find they are easier to use than pins sometimes. They are also nice to have on hand to clip papers or patterns and to keep trims, etc on!

        • Nancy says

          May 25, 2016 at 3:10 pm

          Clothespins are a great idea. I use binder clips. They come in an assortment of sizes and in decorator colors too. And, bonus, there’s a flat side to label!

    3. Carolyn Y says

      August 6, 2012 at 1:40 pm

      These are fabulous. I’ve just started sewing again, and have these items so apparently I’m on the right track!
      Next up for me is to tackle a zipper. I’m scared!

    4. Melanie says

      August 6, 2012 at 2:13 pm

      I love it! Such a sweet (and useful!) little gift!!

    5. Chelsea Malone says

      August 6, 2012 at 2:49 pm

      Very cute!!!! Great job!

    6. MaryLeeZA says

      August 6, 2012 at 3:17 pm

      I love this idea! Where do you get those cute Mason jars?

      • Maggie says

        August 11, 2012 at 2:14 pm

        You can get them at Target!

      • donna kimball says

        November 2, 2013 at 2:18 pm

        Also at Jo Ann’s or Michaels. Any hardware store.

    7. Atelier Mama Bee says

      August 6, 2012 at 7:08 pm

      L-O-V-E it!!!!

    8. Pip says

      August 13, 2012 at 2:18 am

      This was the opening craft to 4h sewing when I was 10-11yrs old, the sewing teacher was my grama. Thanks for the trip down memory lane! Love the fabric!

    9. Blaine says

      August 18, 2012 at 11:30 am

      Oh thats gorgeous! Just what I was looking for!

    10. momto5 says

      August 19, 2012 at 1:54 am

      i found this on pintrest! this is such an amazing idea. i was wondering where you got those super cute scissors?

      • Maggie says

        August 20, 2012 at 6:02 pm

        I bought those scissors at Jo-Ann’s! I love the vintage feel to them…one of my favs for sure!

        • Nancy says

          May 25, 2016 at 3:13 pm

          I also saw a pair in Walmart

    11. Just Margaret says

      August 22, 2012 at 9:18 pm

      Came here via BlogHer–so glad I did! I *love* this, it is adorable, and the perfect little gift to give someone to keep in their desk at work, too, with spare buttons and such tucked in.

      Thanks!

    12. Bev Feldman says

      August 24, 2012 at 6:22 pm

      This is such an adorable project (and I love how practical it is). I think I am going to make one for myself!

    13. CBH says

      August 29, 2012 at 2:07 pm

      Thank you so much for this post. I want to let you know that I posted a link to your blog in Creative Busy Bee Craft Inspirations, under the Page 4 post on Aug. 29, 2012. Thanks again.

    14. Sara says

      April 23, 2013 at 2:24 am

      I can’t wait to try this! It’s so unbelievably cute!

    15. Rory says

      July 8, 2013 at 1:58 am

      These are great! Such a cute and simple idea!!

    16. Anonymous says

      October 22, 2013 at 5:10 pm

      I found this on Pinterest. I like your tutorial the best of any I have seen. Thanks so much!

    17. Tammy O'Brine says

      November 14, 2014 at 3:04 am

      I would add sharp hand needles, safety pins, and a needle threader.

    18. Janu says

      November 6, 2015 at 5:36 am

      A small chalk pencil will be useful too.like the idea.simple an d sweet

    19. clare rooney says

      June 3, 2016 at 10:37 pm

      i MADE THESE FOR A WEDDING SHOWER FAVOR. i ADDED A LITTLE CARD THAT READ “THANKS SEW MUCH” FOR COMING TO (TURN CARD)

      NAME OF BRIDE’S SHOWER AND THE DATE

      i PUNCHED A HOLE IN THE CARD AND TIED IT TO THE JAR WITH BAKERS TWINE. THEY REALLY WERE CUTE AND A BIG HIT. i DID ADD A COUPLE OF SEWING NEEDLES AND THREADER ALONG WITH THE THINGS THAT YOU HAVE SHOWN. i LOVE YOUR IDEA WITH THE CLOTHESPINS.

    20. Karen Colton says

      August 21, 2016 at 3:37 am

      I have been sewing since I was 11 but I would make these for every project that way,if it is a gift for someone give it to them like a bow I could find what I used to make more Or if it needed mending I do so much I rented a bigger apartment a 2 bedroom There is not a bed in that room 3 sewing machines and an ironing board Oh I am 68

    21. Diane Loy says

      December 11, 2016 at 12:40 pm

      They used to use clean hair in pin cushions. It will sharpen your sharps…lol. These are cute.

    Trackbacks

    1. 30+ Mother's Day Gift Ideas & Fun Facts : My Pinterventures says:
      April 30, 2014 at 8:30 am

      […] DIY Beginner Sewing Kit @Smashed Peas & Carrots. You could even fill the bottom of this with some candy. […]

    2. Beginner Sewing Kit Tutorial | Go To Sew says:
      July 8, 2014 at 8:25 pm

      […] You’ll find the full tutorial over at Smashed Peas and Carrots! […]

    3. Saying NOPE to Black Friday: Sanity Saving Alternatives says:
      November 14, 2016 at 11:05 am

      […] My pick: Sewing Kit in a Jar […]

    Welcome to Smashed Peas and Carrots. You can read more about me HERE
     photo designTeam.png
    Follow on Bloglovin

    Popular Tutorials

    Highlighter Valentine Card with Free Printable

    Highlighter Valentine Card with Free Printable…

    Play Doh Valentine Card Free Printable

    Play Doh Valentine Card Free Printable…

    Elderberry Syrup Recipe

    Elderberry Syrup Recipe: Natural Cold and Flu…

    Teacher Survival Kit

    Teacher Survival Kit with FREE Printable…

    Notebook Paper Pencil Pouch Teacher Gift Idea

    Notebook Paper Pencil Pouch Teacher Gift Idea…

    Free Silhouette File Teacher Canvas Bag Gift Idea

    Free Silhouette File: Teacher Canvas Bag Gift…

    Popular Recipes

    No Bake Energy Bites Recipe…

    Chocolate Coconut Cups {Gluten and Dairy Free}…

    DIY Taco Seasoning Recipe…

    Sugar. Cookie. Icing. {The Recipe}…

    French Dip..Crockpot Style!…

    Crockpot Banana Bread…for Real!…

    My Sponsors

     photo FatQuarterShop-175x175.png

     photo cdf15248-e6f8-4276-abc0-c145e2451c35.jpg


    Blog Archives

    Posts by Topic

    Stay Connected

    • Facebook
    • Twitter
    • Pinterest
    • Instagram
    • Dots
    • Google Plus

    Join me on Facebook

    Copyright Smashed Peas and Carrots © 2025 · All rights reserved · Design by Emily White Designs

    Copyright © 2025 · Smashed Peas & Carrots Custom on Genesis Framework · WordPress · Log in