Do you ever have those times when you go to a restaurant with the kids and you forgot to bring a bib? Tell me about it!! Since my little boy no longer wears bibs as a daily occurence, I usually just need to bring one for Penelope. But, since I don’t have to bring one for Noah, I usually forget to bring one for her…seriously, right?! Napkins by themselves just never seem to work, you just have to have a clip component. I wanted something beefy for Penelope who seems to have crazy strong arms. I mean, this girl can rip off a bib with snaps mere moments after she claims to be done with her meal. I needed something substantial for my bib clip…two fabrics sewn together and a really strong clip, substantial enough for me…and my kids!
Maybe you need one too? My Penny cannot be the only baby with superhuman strength and the power of the Hulk all pent up in those little baby arms. These clips also work great for Noah since they don’t look like a bib. I mean c’mon, you can use a napkin, papertowel, or a small wash cloth…the art of deception in one very small package! Try it, I bet you’ll love the results at all meals you dare to eat outside of your home. They are just small enough to fit in your bag and be left there so you’ll never leave home without a bib again. Lovely!

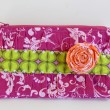
A BIB CLIP…so neat and small. So nice (and stylish too) to have in your bag for those meals out where a bib would be too bulky and eventually end up getting waaay to dirty to want to put back in there!
For this bib clip all you need are the following:
1 package of Suspender/Mitten Clips (I bought mine at Hancock Fabrics for a couple dollars)
4 strips of 1 1/2 inch wide by 10 inches long fabric. (I used two strips of one fabric and two strips of a contrasting fabric)
Coordinating Thread
Iron, Ironing board, Sewing Machine, etc.

This is all you need…simplicity at it’s best!
 To start, fold over 1/4 inch of fabric on the long side to the wrong side of the fabric and press with your iron. Do this on both long sides.

A view of the fabric strips with the 1/4 inch fold pressed on each long side. This is two sets of strips for two sets of bib clips!
 Then, fold the end of each fabric strip over 1/4 inch to the wrong side and press. Do this on both ends.
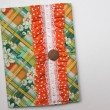
 Now, place one strip of fabric on top of the other with their folded sides meeting. Be sure to keep the folded ends tucked to the inside, like the picture above. I used contrasting fabric on top and bottom but you don’t have to!
 Now, straight stitch down both long sides of the two fabrics you put together with an 1/8 inch seam, backstitching both beginning and ends. Like the picture above!

This is the what I call the “top” side of the mitten clip.

And, this is what I call the “bottom” side of the mitten clip.
 Now, fold over the ends of the two fabrics you just sewed together about 1 inch and iron for a nice pressed fold. Bring this folded end through the mitten clip’s loop, like above.
 Make sure that the fold is on the “bottom” side of the mitten clip!
 Use a straight stitch and sew the fold shut, backstitching at the beginning and ends. Make sure you stitch on top of the ends of the fabric that you first folded over in the beginning of the instructions! I did this twice to make it extra secure.
That’s it…just do the same thing on the other end and you, my friend, are DONE! Hooray for another easy project to do while the kidlets nap!

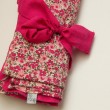
The finished product…soooo easy…now, go make more!

This will fit around the neck of a 2 1/2 year old as well as a much younger baby…this is not a “bib” so he wears them with a smile (ssshh…just don’t tell him the truth…our little secret, ok?!)

Or, now that the weather is getting chillier (Yay for Fall weather!)…use them as mitten clips for those trips to the apple orchard!

great idea, I saw something similar for clipping binkies, thanks for sharing.
I love this idea for my 1 year old. But instead of fabric I think I’m going to try using ribbon since that’s what I have. Thank you for all of your inspiration.
I make these for my 4 kidos. I use the heavy duty (woven) 5/8 in ribbon and hot glue instead of a sewing machine and fabric. They still hold up well. I have used them for about 3 years now. They are GREAT! I will never put a nasty dirty bib in my purse to get stinky and moldy before I remember it is there again! LOL. Especially at ribs joints and pasta resturants!!! Love your blog…
I have been making my 4 messy boys wear a large paper napkin secured around their necks during meal times for many years. My boys are ages 8,10,11, and 12. I was tired of all the food stains on their shirts and my husband instructed the boys to tuck their napkins in their shirt collar during meals. The problem was that the paper napkins did not always stay tucked in, so after a trip to the dentist, I purchased several sets of bib clips which solved the problem of the paper napkin not staying securely around the neck. We use them at home and at restaurants. I keep several sets in my purse so they are available when needed.
I just bought clips today after I saw this done to make a quick nursing cover out of a blanket. Just need to make the ribbon long enough to go around the mommy’s neck 🙂 I like your method better than the other tutorial I saw, this lets me play with two fabrics!
this my dear is AWESOME! I got this idea from a product recommendation out of a magazine (they were charging $12 for one and I said ” I can MAKE that! lol) but was to lazy and short on time to come up with all the detes. I thought, I bet someone has a tutorial on this, and Wham! you sure did. THANK you for taking the time to share with us other mamas! I will make a few of these for my diaper bag!!
I am 14 and I my mum also makes me to wear a napkin fixed with clips during any meal. At school, our teacher tells us to tuck the napkins in, but I am the only one who does so. I think its important to run around with a clean shirt (I wear ties and tucked in dress shirts on nearly every day) and not to feel embarrassed because of stains!! At home, the whole family (exept the adults) tucks napkins, and mum gave me and my brother those clips for Christmas!! What a great present!