Smashed Peas & Carrots

Inspiration For Living Creatively - DIY Crafts, Sewing, Recipes, Crafts & More

  • Press
  • Disclosure
  • Collaborate
  • Contact
  • Facebook
  • Twitter
  • Pinterest
  • Instagram
  • Dots
  • Google Plus

Become a Subscriber

never miss a thing!

  • Home
  • About
    • Advertising
    • Disclosure & Safety Disclaimer
    • Privacy Policy
  • Recipes
    • Appetizers
    • Bento Lunch
    • Beverages
    • Smoothies
    • Breads
    • Breakfast
    • Casserole
    • Crockpot
      • Visual Library
    • Dairy Free
    • Dessert
    • Gluten Free
    • Main Course
    • Holiday
    • Instant Pot
    • Paleo
    • Party Food
    • Salad
    • Side Dish
    • Soup
    • All Recipes
  • Tutorials
    • Children
    • Adult
    • Home Decor
    • No Sew
    • Sewing
      • Children Sewing
      • Adult Sewing
      • Home Decor Sewing
      • Sewing Basics
    • Sewing Studio
    • Knitting
    • Kids Crafts
    • Bento
    • Holiday
    • Parties
    • Gift Ideas
    • Natural Living
    • All Tutorials
  • shop
You are here: Home / Recipes / Breakfast / Easy Peasy Breakfast Danish
Feb
19

Easy Peasy Breakfast Danish

| Filed Under: Breakfast, Recipes

I love danish for breakfast…or a snack…really aren’t they good any time of the day!?! If you like…or love…danish like I do then you will love this super easy recipe. It is really nice to make because it truly can be popped out in 30 minutes…crazy awesome for a nice piece of yummy danish!
This is also a super star recipe in my book because you can totally change it up, and I love the change up. Cream cheese danish not your thing? Then, maybe you want to dollop some cherry pie filling or lemon curd in the centers to make a different, just as yummy in my eyes, danish! I love them all, what can I say, I am an equal opportunity danish eater!
Want to see what my family has been enjoying lately?
Little bites of heaven!
 
So…what are you waiting for??? Want the recipe???
 
Then, scroll down for that bad boy!
 
Easy Peasy Breakfast Danish
Recipe Type: Breakfast
Prep time: 10 mins
Cook time: 15 mins
Total time: 25 mins
Serves: 24
Ingredients
  • 2 10 oz cans of refrigerated crescent rolls
  • 1 8oz block of cream cheese, softened
  • 1/2 cup sugar
  • 1 tsp lemon juice
  • 1 tsp vanilla
  • 1 tbsp sour cream
  • Icing
  • 1 cup powdered sugar
  • 1 tbsp butter, softened
  • 1 -2 tbsp milk
  • 1/4 tsp almond extract
Instructions
  1. Preheat your oven to 350 degrees and grease a cookie sheet or jelly roll pan.
  2. In a large bowl, mix together the cream cheese, sugar, lemon juice, vanilla and sour cream…set aside.
  3. Open your cans of crescent rolls and DO NOT unroll.
  4. Slice the “tubes” of crescent rolls into 1/4 inch disks.
  5. Flatten and place on your prepared jelly roll pan.
  6. Indent the center of each disk with your finger and place a dollop of the cream cheese mixture on it.
  7. Bake for 15-20 minutes or until just starting to turn golden.
  8. Let cool on a cooling rack.
  9. While cooling, make your icing. Mix the powdered sugar, butter and 1 tbsp of milk together. Slowly, add a little bit more milk until the icing is thick but runny in consistency…make sense? Once danish are cool, drizzle with icing.
3.2.2265

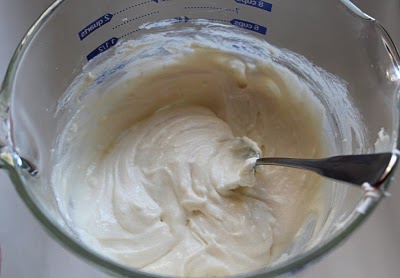
First, mix up all the ingredients for your cream cheese middles and set aside.
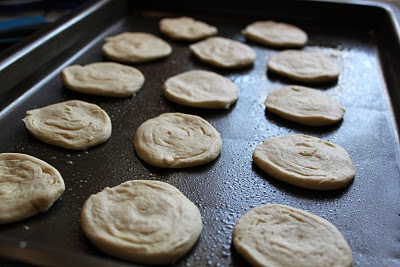
Keep your crescent rolls in the tube shape they come in and cut into 1/4 inch disks.
Then just flatten each disk and place onto a greased cookie sheet.
I just used the CLEAN palm of my hand but a rolling pin is a nicer option…yup, I admit it, I’m lazy!

Use your finger to make a small indentation in the center of your flattened disks.
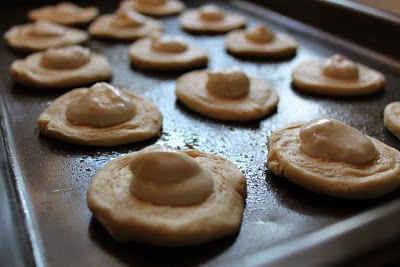
Dollop the centers with your cream cheese mixture.

Bake at 350 degrees for 15-20 minutes…mine were ready at the 17 minute mark.
Hmm…these need a little something…
ah, yes…ICING!

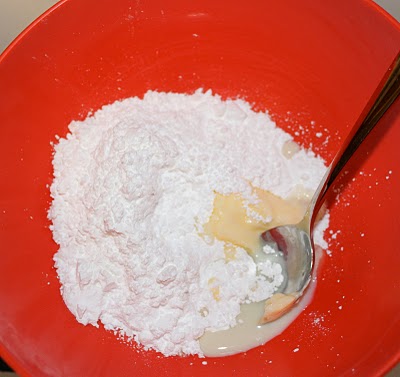
So let’s mix up the powdered sugar, softened butter, almond extract and 1 tbsp of milk…

Add just teeny additional splashes of milk until you get a nice runny but thick icing consistency…
And drizzle over your danish once they are cooled.
Uh huh, that looks better!
Now, wasn’t that Easy!?!
YUM-MERS!
And remember, be nice…don’t forget to share!!

    You may also like -

    Mint Chocolate LasagnaEasy No Bake Mint Chocolate LasagnaArtichoke DipThe Best Warm and Creamy Artichoke DipMinion Reindeer Oreo BallsMinion Reindeer Oreo BallsOreo Cookie BallsEasy 3 Ingredient Oreo Cookie BallsEasy Fiesta Roll Up AppetizerMexican Tortilla Pinwheels

    Become a Subscriber

    never miss a thing!

    Comments

    1. Martha says

      February 19, 2010 at 4:07 pm

      those look awesome!

    2. abucketofsunshine says

      February 19, 2010 at 5:53 pm

      YUMMERS is right! I’ll be whipping these up tomorrow for sure…thanks for posting for us 🙂

    3. Stephanie says

      February 19, 2010 at 10:39 pm

      wow… these look so delicious!! i can’t wait to make my own!! 🙂

      -junesong

      lovejunesong.blogspot.com

    4. Carla S says

      February 20, 2010 at 5:25 am

      oh i love you! i love cream cheese danish and those look divine! i am certainly trying that!

    5. thetoddlerwhisperer says

      February 21, 2010 at 5:14 am

      nice. thanks for posting this, i modified today because all i had was canned biscuits…but evenso…they were awesome!!

    6. Sandra says

      February 21, 2010 at 8:13 pm

      these look great–we LOVE cream cheese here, especially in baked goods. Thanks so much for stopping by my blog. I’ve lurked on yours (adore it) for ages, so it was a real treat to see your comment pop up!! Made me smile all day :).

    7. Carla S says

      March 1, 2010 at 2:52 am

      So I made these for a playdate tomorrow. YUMMY! I can’t wait to serve them!

    8. Stacie says

      April 2, 2010 at 8:56 pm

      These look good and I am thinking about taking them to an Easter breakfast. About how many does this recipe yield?

    9. Anonymous says

      January 15, 2012 at 4:08 pm

      Could you use jelly

    10. Maggie says

      January 18, 2012 at 10:42 pm

      The recipe makes about 2 dozen or so…and you can totally use jelly if you prefer!

    11. Jamie M. says

      March 8, 2012 at 8:48 pm

      These look so good- and super easy! I am thinking of using apple or cherry pie filling, too.

    12. Anonymous says

      October 15, 2013 at 7:55 am

      Minced apples and apple butter, same frosting

    Welcome to Smashed Peas and Carrots. You can read more about me HERE
     photo designTeam.png
    Follow on Bloglovin

    Popular Tutorials

    Highlighter Valentine Card with Free Printable

    Highlighter Valentine Card with Free Printable…

    Play Doh Valentine Card Free Printable

    Play Doh Valentine Card Free Printable…

    Elderberry Syrup Recipe

    Elderberry Syrup Recipe: Natural Cold and Flu…

    Teacher Survival Kit

    Teacher Survival Kit with FREE Printable…

    Notebook Paper Pencil Pouch Teacher Gift Idea

    Notebook Paper Pencil Pouch Teacher Gift Idea…

    Free Silhouette File Teacher Canvas Bag Gift Idea

    Free Silhouette File: Teacher Canvas Bag Gift…

    Popular Recipes

    No Bake Energy Bites Recipe…

    Chocolate Coconut Cups {Gluten and Dairy Free}…

    DIY Taco Seasoning Recipe…

    Sugar. Cookie. Icing. {The Recipe}…

    French Dip..Crockpot Style!…

    Crockpot Banana Bread…for Real!…

    My Sponsors

     photo FatQuarterShop-175x175.png

     photo cdf15248-e6f8-4276-abc0-c145e2451c35.jpg


    Blog Archives

    Posts by Topic

    Stay Connected

    • Facebook
    • Twitter
    • Pinterest
    • Instagram
    • Dots
    • Google Plus

    Join me on Facebook

    Copyright Smashed Peas and Carrots © 2025 · All rights reserved · Design by Emily White Designs

    Copyright © 2025 · Smashed Peas & Carrots Custom on Genesis Framework · WordPress · Log in