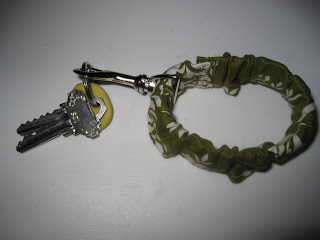
Have you seen those fabric keychains that are all over the blogworld these days? Aren’t they adorable? I just love them and the idea of having something so darn cute to hang my keys from makes me totally want to make one. I have been really wanting to get rid of the elastic coil-y keychains that we use at my house when we take the kids on a walk. It has just the two house keys on it and nothing more…perfect for quick trips around the block. I love the functionality of these keychains, the elastic-iness is perfect for gripping to my arm or wrist and I can feel it so I always know it’s on me. Unfortunately, they just aren’t the cutest looking things. Case in point:

Yeah, it’s ugly, I know…but it totally does the job.
The thing is, I just can’t do the wristloop ever since this past Christmas’ wristloop debacle. You see, I lost my lovely little zip wallet with a wristloop three days before Christmas…and the crappy thing is I didn’t even feel it fall off my wrist! I was so mad, especially because I had credit cards, my bank card and not to mention my driver’s license in it and then we had to cancel everything right before Christmas!!! So incredibly sucky!!!! Not to worry though, this story ends well…some wonderful angel out there found it covered in the muck and snow slush of what would be the Meijer grocery store parking lot in a midwestern winter and returned it to me the next day…THANK YOU! It was a panicky 24 hours at our house though before that angel had called with my most incredible news…lost and then found…yay! Well, if you haven’t already guessed, this is exactly why I just can’t do the wristloop anymore…sigh! So in drooling over this latest sewing blog craze I had to come up with a plan B. Then I saw the glorious light coming down from the heavens…what, what was that I saw? It was the idea for an elasticized fabric keychain…functional and fashionable, yes, I could do that for sure! I figured out how to make one while my littles were sleeping one afternoon…maybe you would like to make one too? And then you would be able to get rid of your ugly coil-y keychain forever, who’s with me!!
Here is what you’ll need:
Some scrap fabric measuring at least 3 inches wide (the length will depend on your individual measurements)
3/4 inch non roll elastic
1 swivel hook
Thread, sewing machine, iron, ironing table…the usual suspects

Here is everything you need…another easy one to finish in record time!
First off, you will need to wrap the elastic around your wrist so it is nice and comfy. Not too tight. You can pin what you think is a nice length and then try stretching it over your hand to see if you can get it on and off nicely.
Once you have your elastic measurement, you can go ahead and cut it to the that length, mine was 7 1/2 inches long. After you have cut your elastic stretch it out over your fabric scrap. You want your scrap of fabric to be 1 inch longer on each end of the elastic, lengthwise. Your fabric should also be cut to be 3 inches in width for a 3/4 inch elastic, my fabric length measured to be 12 inches long by 3 inches wide.
 Once your fabric is cut go ahead and press a 1/2 inch seam toward the wrong side of the fabric on both short ends. Like the picture above.
  Then, go ahead and press the long sides in toward the wrong side a 1/4 inch. Like the picture above.
 Now, take the fabric and fold it in half lengthwise with wrong sides together, making sure to keep all the folds you just pressed tucked in. Press the folded in half fabric. See above.
 Now, straight stitch lengthwise down the fabric, using a 1/8 inch seam. Be sure to backstitch at the beginning and ends of your stitch. DO NOT sew the short ends, this will be the casing for the elastic.
  Go ahead and find a safety pin. Pin it to one end of your elastic like the picture above. Push and pull the elastic through the casing you just made via tugging on the safety pin.
  When the end of the elastic without the safety pin gets just inside of the end of the casing, pin the elastic about an inch from the end, like the picture above. The pin is there to secure the elastic to the end while you sew…so the elastic doesn’t escape from you and you end up missing the elastic while you sew the end shut.
It should look like this when sewn closed. I did a set of straight stitches to secure the end.
 Now, go back to the other end of the casing, the one that has the other end of the elastic with the safety pin attached to it. Pin the elastic with a straight pin about an inch from the end, like you did before, making sure that the elastic is just inside the casing. Remove the safety pin and straight stitch the end closed, remembering to backstitch the beginning and end.
This is what the casing should look like with one end sewn up and the safety pin sticking out of the other end. The fabric should be all bunched up like this.

This is what the end should look like. Again, I did two rows of straight stitches for extra strength.
 Now, take the loop of your swivel hook and thread the fabric through it. It doesn’t matter about a top and bottom since the hook swivels!
Then, overlap the two ends and sew closed. I used a zig zag stitch to make it extra secure but you could just as easily sew two lines of straight stitches if you would like. And that’s it folks…finito! You are officially done!! Now all you have to do is attach your keys and you are set to hit the road.
Another easy project finished during the kidlets naptime, sweet!

See, all done! You just made something not only fashionable but functional too…who says you can’t have both!?

Hooray…now I can get rid of that ugly keychain and use my new stylish keychain in it’s place, all without worrying that it’s going to slip off my arm! Get to making yours now, so you too can look stylish on your walks around the block or around town, WooHoo!
Oh, and on another note, the FEDEX guy just brought my dressform today while I was posting this blog! YAY! That was fast, it only took about a week, gotta love fast shipping especially when it’s free! Now, I have to get to putting it together tonight while the littles sleep! Wish me luck, I hope it’s easy!


I love this!! I’m going to make myself one right now.
[b]Hello everyone.[/b] I’m a new member. Looking hurry to erudition from this valuable resource.
Choice do my shred by means of donating and sharing from repeatedly to time.
Thanks.
http://www.laser-tech.org/
gravura
I must make me one of these now! I have one of those “ugly” plastic ones and it is sooo ugly, but I love the stretch. Thanks