So, it seems as of late I have been making loads of Car Cozies for some birthday gifts for my friends’ little boys and as baby gifts (for the older sibling gift, can’t forget them!) I made Noah one too, of course, but then realized I was leaving Penny out of all the toy-toting fun…and nobody wants to be left out of all the fun, right?. Plus, she is at an age where she wants whatever Noah has, a big fight then ensues, and this momma is NOT happy pulling two little ones apart for the millionth time in what was that, yup, just one day. Aaargh!!
This is where the Fold-n-Go Pony Farm comes into play. Wanna take a peak and see what I’m talking about?

Cute and Pink and Girlified!
I’m lovin’ how stylin’ a barn can be!

Last Easter Little Miss P got a whole slew of these itty bitty My Little Ponies in her Easter basket and now she is raring to play with them since Noah is hoarding all his cars and trains these days…yay for girl-y pony fun!
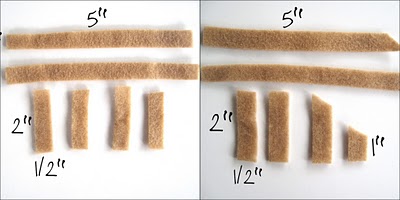 Then, cut your light brown felt into strips for the fence and posts. see picture above. All strips are 1/2 inch wide and varying lengths…the longest strip you will need is 7 inches in length and one of it’s ends is cut on the bias (sorry, I left it out of the picture on the right, it’s the second strip!)
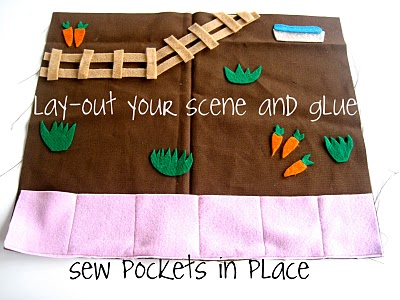 Arrange your shapes around the duck cloth and glue down with your fabric glue so it is easier to sew them on without all the moving around! Or, just glue them down and forget the sewing step, that fabric glue rocks I tell you, me likey A LOT!
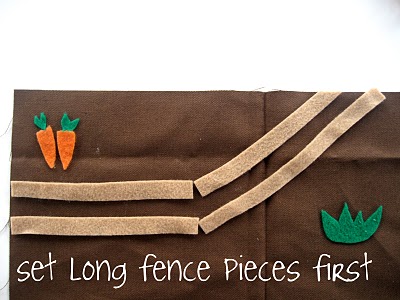 To make the fence, place your strips of light brown felt like so.
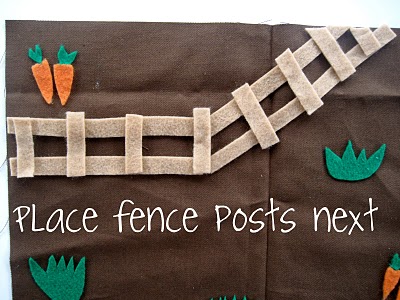 Then, put your posts on top making them spaced nice and evenly.
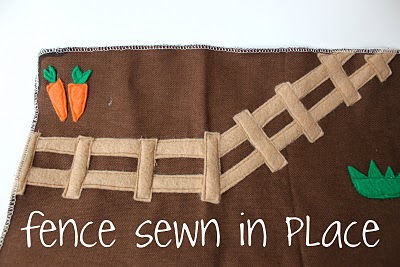 Sew the fence in place…and sew around your carrots, grass, water trough, and hay bales too if you want that is!
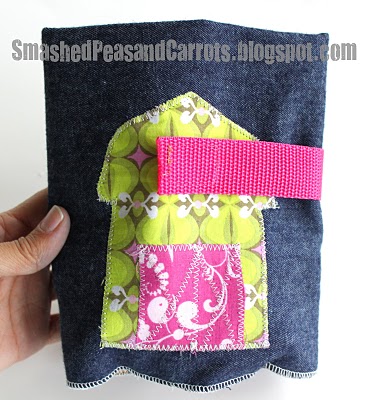
 The applique will go on the bottom middle section of the denim. That way when you fold the Pony Farm up it will be on the front middle section.
So I made this little puppy for her to play with:

A horsey farm, or in this case, a My Little Pony farm!
Now, she can have her own little toy carrying case to take with when we head out to restaurants …and midwife visits (since those are going to be getting a bit more frequent in the near future…Eek, can I just say 3 months to go!!)
Wanna make one for the little lady in your life? It’s a pretty easy project, made even easier if you own a serger. I used Homemade by Jill’s tutorial and put my own little spin on it to make it nice and girl-y…easy peasy!! OK, let’s get to it.
Fold-n-Go Pony Farm
Two 14 x 17 inch pieces of fabric (I used a denim for the outside and duck cloth for the inside)
One 3 x 17 inch piece of felt (mine was girly pink)
Light brown, green, orange, blue, yellow and oatmeal felt (mainly scraps!)
Scrap fabric for the applique on the front
7 inch piece of belting
1 inch piece of velcro
Sewing machine and coordinating thread
Rotary cutter and mat
Fabri-Tac glue or other fabric glue
Serger
 Cut your main pieces like above…the denim and duck cloth are 14 x 17 inches and the felt is 3 x 17 inches.
 Then, cut your light brown felt into strips for the fence and posts. see picture above. All strips are 1/2 inch wide and varying lengths…the longest strip you will need is 7 inches in length and one of it’s ends is cut on the bias (sorry, I left it out of the picture on the right, it’s the second strip!)
Then, cut the rest of the felt to make little carrot shapes, grassy areas, a water trough and hay bales (not pictured here but you can see it a few pictures up).
 Arrange your shapes around the duck cloth and glue down with your fabric glue so it is easier to sew them on without all the moving around! Or, just glue them down and forget the sewing step, that fabric glue rocks I tell you, me likey A LOT!
Sew your pockets in place, I just used Jill’s guide of sewing the pocket lines every 2.75 inches…why mess with perfection, right? I also didn’t sew the ends in place cause I was going to serge around the whole thing in the end.
 To make the fence, place your strips of light brown felt like so.
 Then, put your posts on top making them spaced nice and evenly.
 Sew the fence in place…and sew around your carrots, grass, water trough, and hay bales too if you want that is!
 The applique will go on the bottom middle section of the denim. That way when you fold the Pony Farm up it will be on the front middle section.
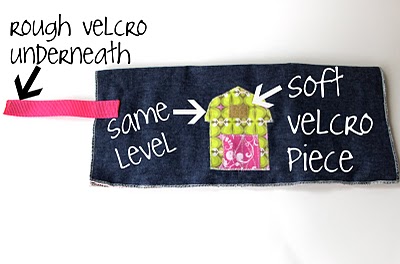
 I just free-handed the barn applique, I did the whole barn with one scrap piece of fabric and then the barn door in a small square of another (the pink). I place the soft side of the velcro in the middle top of the barn so it looked like a little loft door.
I sewed the rough piece of velcro to one end of the 7 inch piece of belting and then sewed the belting onto the denim a the same level I place the soft-side of velcro.
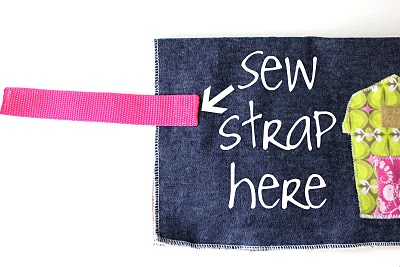 When you sew the strap (belting) on the denim, do it in a ‘box’ pattern with an ‘X’ in it for extra strength. Do this about 3/4 inch from the edge so you can still fit it through your serger when you go to serge the two larger pieces together.
 When you sew the strap (belting) on the denim, do it in a ‘box’ pattern with an ‘X’ in it for extra strength. Do this about 3/4 inch from the edge so you can still fit it through your serger when you go to serge the two larger pieces together.
 Then, just match up your denim and duck cloth and serge the edges all the way around.

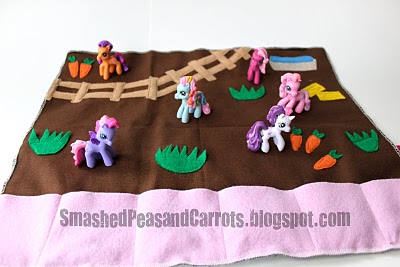
So now your little girl can grab her Pony Farm…

Unfold it like so…

And then again, like so…

Then, open that baby up

and play, play and…
PLAY!
(neigh!!)
Waaay fun!

MY daughter is going to flip. So cool! love love lvoe
Ooh I love this! I’ve seen a million car roll ups out here in blog land, but this is the first girly version that I’ve come across! I will definetly be making this for my little girl! (who also happened to get a bunch of those little ponies in her easter basket!)
i loooovvveee it, i WILL make one for my missy. i just need those ponies!!!!
you really explained that so well maggie…well you explain everything so well.
goodluck with your antenatal apps.
thanks becky
Love this. Very cute.
Oh, that is adorable! How cute. My girls would LOVE this. Great tutorial, too. Thanks for the info!
I just found a gift for my nieces 5th birthday. Thanks!!
That’s so cute I can hardly stand it! Your so creative!
This is so awesome! Great job mama!
cute as can be! so sweet and full of charm! …and a great tutorial, too! I have become a follower and would be honored if you choose to do the same!
Oh man! I want a girl! 🙁
I might have to make one just for me. And yes I’ll be buying the cute ponies to go with it. 🙂
this is so cool! just saw it on one pretty thing-my two younger girls will love it and it will be perfect for all the sporting events they have to go to for their bigger sisters!! no more ponies all over the place!!
Love it, My little one is into Little Pet Shops, so I think I will make one with a differnt take to accomodate her ever growing collection of animals! Thanks for sharing.
This is the bees knees! Love it!
My munchkin would LOVE that. Thanks so much for the inspiration and the great tutorial!!!
I love it! My daughter would love something like that.
Lucky little girl.
this is absolutley adorable. ADOREABLE!!!
If I have a little girl one day i’ll be making this (or if my baby boy likes ponys when he’s older!)
So. Cute!!!! I just had (okay, it was 8 months ago, but that still counts as just, right? lol)my first girl after two boys and have been having fun making “girly” things…this one will definitely be added to the list. Thanks for the tut!
I made this! Its on my blog!
http://creativedarkside.blogspot.com/2010/04/pony-farm.html
I really need to learn to sew, my daughter would love this!
My daughter will love this! She’s My Little Pony obsessed!
I featured this project on my blog – http://www.campslop.blogspot.com. Be sure to stop by for a “Featured On” button.
Thank you for sharing!!
Oh my!!!! This is soooo cute!! I must find the time to make one for my daughter, she has a bunch of these ponies too. Thanks for the tutorial!
Good fill someone in on and this mail helped me alot in my college assignement. Say thank you you for your information.
I just saw this on parenting.com under 18 easy christmas crafts!! 🙂 I don’t have a little girl but I so wanna make this for the girl I babysit.
this is the link where I saw it :):
http://www.parenting.com/gallery/diy-crafts?pnid=447753
I made a version as well! My little niece loved it for Christmas.
http://www.jenniferkramer.ca/2012/01/09/pony-playland/
That’s so cute! I’ve been looking for a project like this for awhile and think I’ll try a variation on it…thank for the inspiration! 🙂
What a great idea! Will definitely try it with my little one.
Thanks for sharing!
http://www.ellaplays.wordpress.com