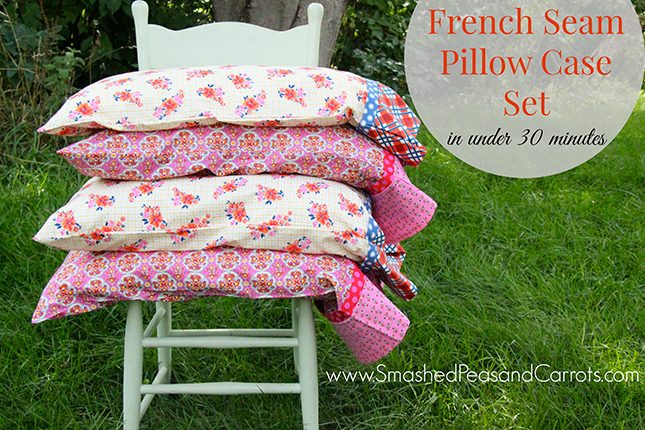
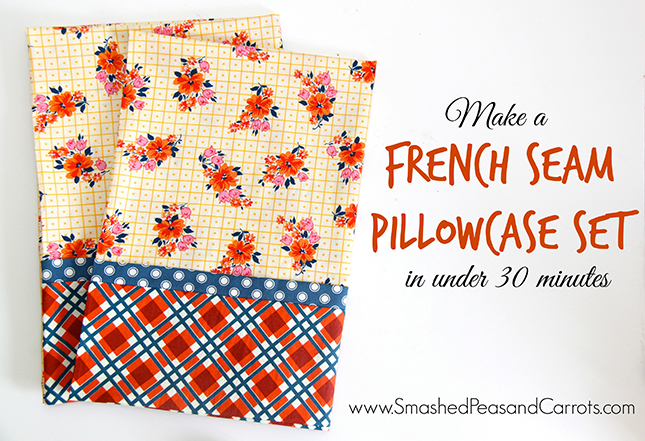
So I finally did a little selfish sewing. I whipped up a bunch of gorgeous pillowcases for our master bedroom and for the girls’ room as it has been a while since I updated each room. I made these pillowcases using french seams so that there are no exposed seams inside the pillowcase…ahhh the insides are now just as pretty as the outsides! The other bonus of making these pillowcases isthat each one will take you about 15 minutes. Yup, I said 15 minutes! That means you can make a pair in less than 30 minutes!!!!! How’s that for a fast sewing project!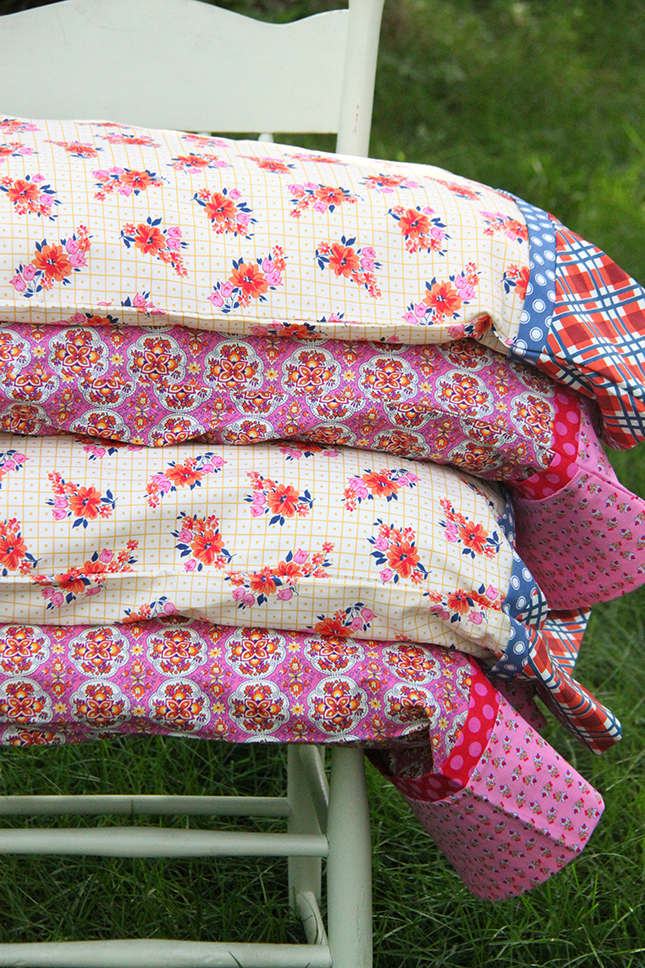
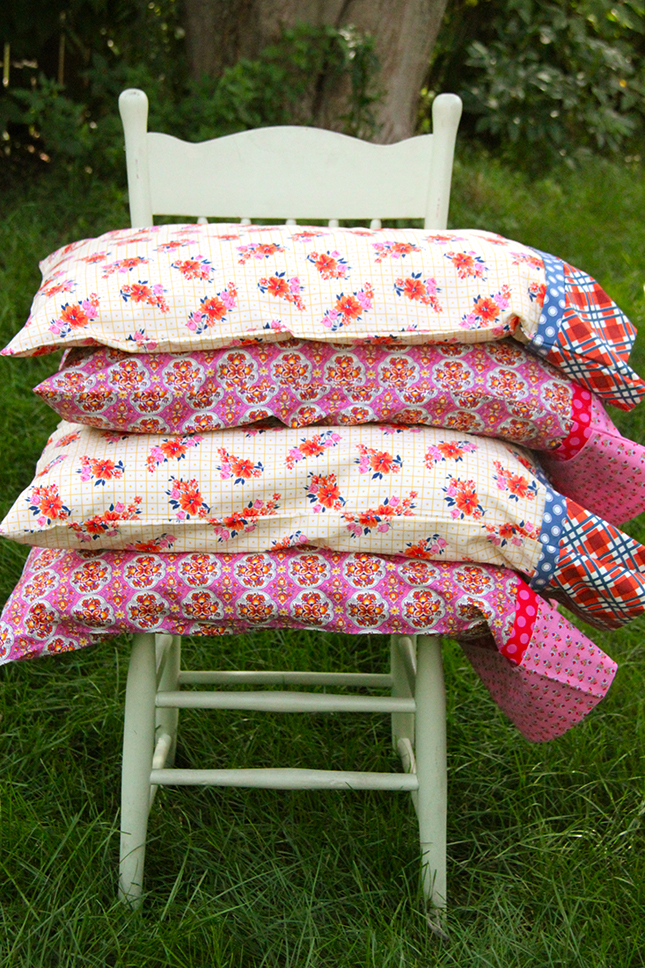 In case you are wondering, I found these beautiful Denyse Schmidt quilting fabrics at Joann’s, I just love the vintage look of many of her fabric lines. As part of National Sewing Month, Joann’s and Pellon are having a contest called #SewYourStyle where all month customers will be encouraged to create non-traditional projects with quilt fabric, such as apparel, pencil cases, purses, etc.. You can enter a photo of your project HERE for a chance to win $1000 cash along with a few other pretty sweet prizes. This tutorial for these beautiful French Seam Pillowcases will show you one way you can use quilting cottons for a project that is not a quilt!
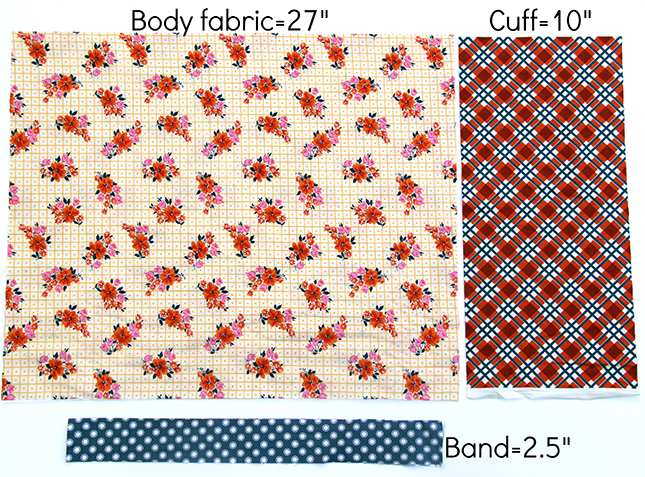 French Seam Pillowcases (per one standard pillowcase)
27″ x 42/44″ piece of fabric for the body of the pillowcase
10″ x 42/44″ piece of fabric for the cuff of the pillowcase
2.5″ x 42/44″ piece of fabric for the for the band of the pillowcase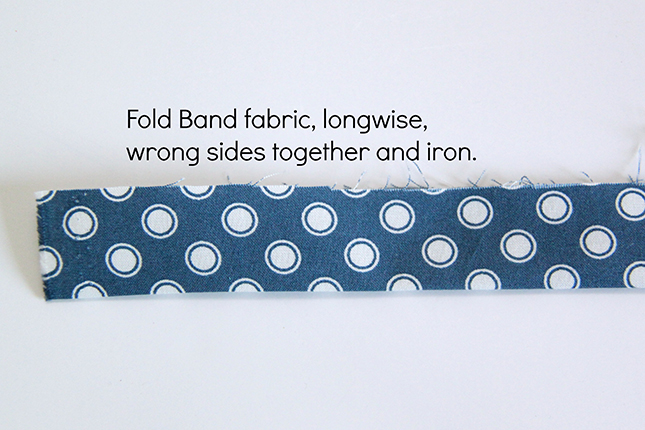 The first thing you want to do is fold the band fabric in half lengthwise (the 42 or 44″ side) with wrong sides together and press with an iron, then set aside.
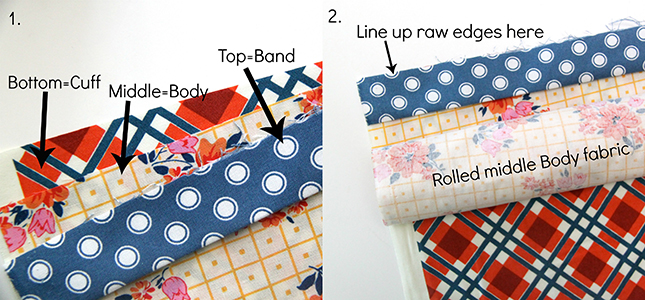
 Next you will do the following steps in this order:
1.Place the fabrics one on top of the other in this order with the right sides up: Bottom Cuff on the bottom, the Body fabric in the middle, and the Band fabric on the top all with their long (42/44″ inch side) raw edges together.
2. Next, roll of the Body fabric until it is about an inch from the folded edge of the Band fabric. It should be rolled about halfway into the Cuff fabric underneath at this point.
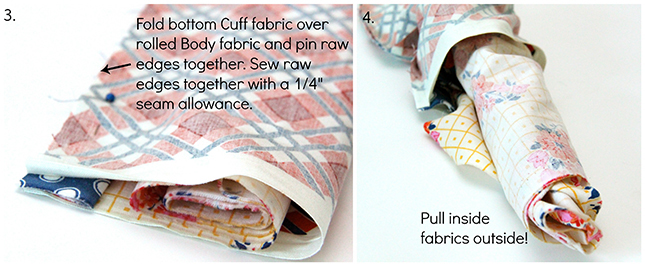
3. Next fold the Cuff fabric over top the like you are making a taco, so the right sides will be facing into the center. Make sure the raw edges are all lined up together and pin them all in place to keep them there. Sew down the raw edges using a 1/4 inch seam allowance.
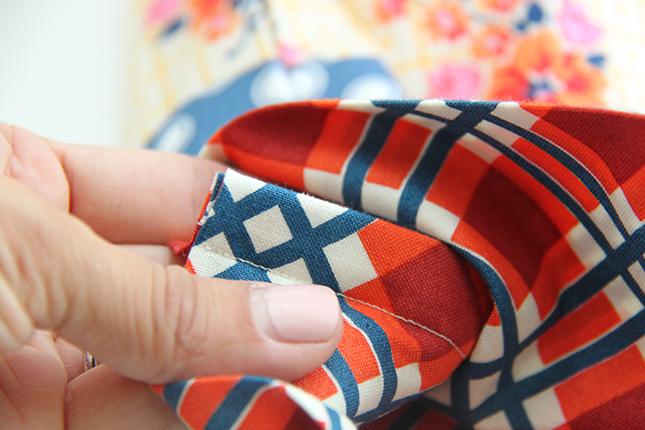
4. Lastly, pull the inside fabrics outside. It will seem like an odd thing to do but it totally works! It’s a fun little magic trick that make a neat little Cuff and Band for the pillowcase!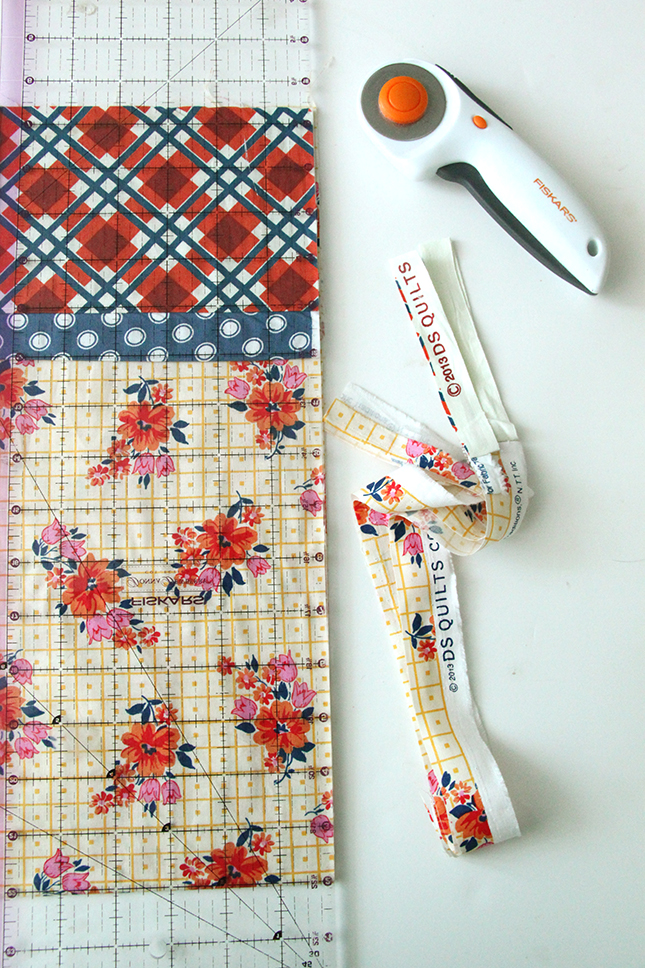 Next, press the pillowcase and fold it in half so that the Cuff, Band and Body fabrics are laying wrong sides together, with right sides of the pillowcase out. Then fold the pillowcase in half again bringing the bottom of the pillowcase up to the top (note: you can just square off the raw edges without this last step but if you fold the pillowcase up it takes less space on your rotary mat!) Then grab a ruler and square off the raw edges of the fabric so you have a nice clean edge on the side and bottom to sew together.
 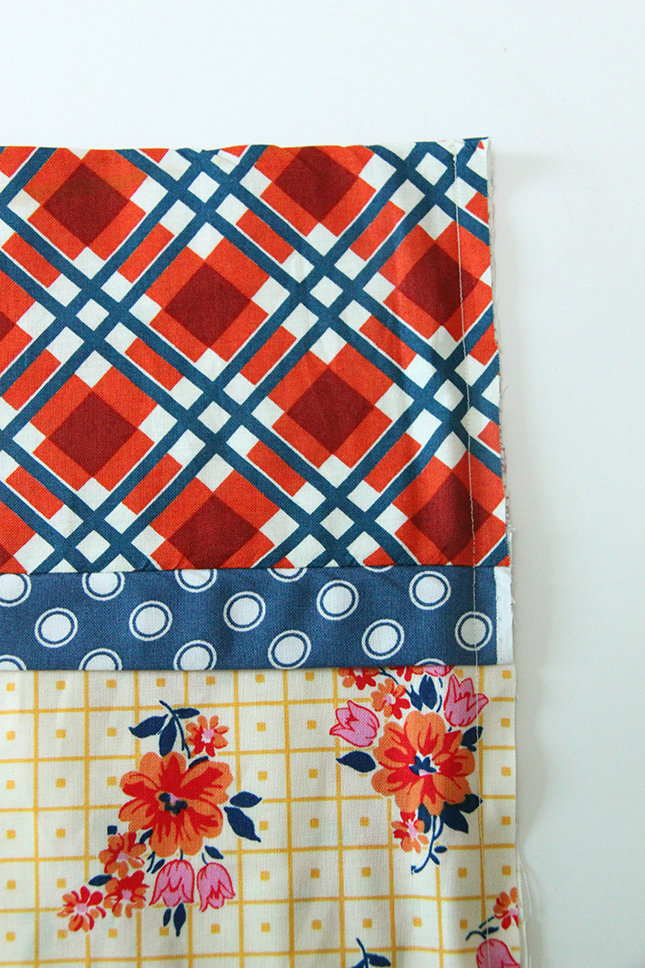 Next, starting at the top of the Cuff, sew down the side of the pillowcase and along the bottom using a 1/4 inch seam allowance. Clip the bottom two corners carefully and then turn the pillowcase wrong side out making sure to push out each corner. Sew down the edge and bottom of the pillowcase again starting at the Cuff. Use a 1/2 seam allowance this time making sure to enclose the last seam you just made. This finished seam is called a French Seam and when you flip your pillowcase right side out and press it you will have a lovely pillowcase with a nice and neat hidden seam inside!
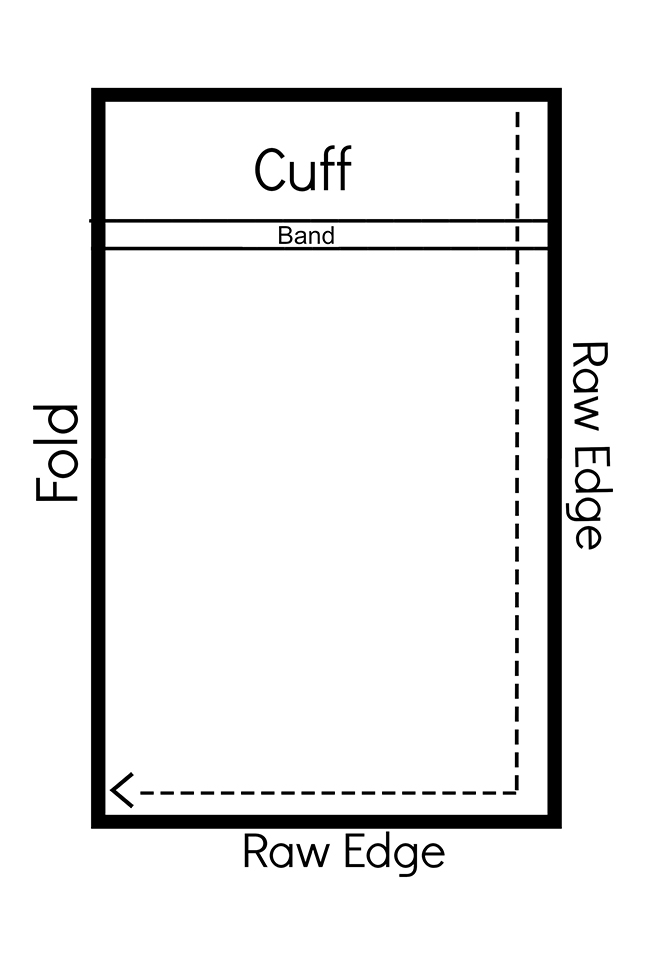
Below is a diagram to help you see how you will sew down the raw edge of the side and bottom of the pillowcase.
 And here is what your French Seam should look like! Hooray, no need for a serger, the seam is not exposed so it looks nice and clean!!!
 I hope this tutorial inspires you to do a little selfish sewing too! There is nothing like having new, pretty bedroom linens!!
Thanks for stopping by today!
Love,
Maggie


I made these for my grandchildren for the holidays. They currently have a pillowcase for Halloween, Valentine’s Day and Christmas. They love them and they are so easy to make!
Great share!! Adding to my must try folder 🙂
This is great. Love your images!
Aww! Thank you Marni! Hope you have a lovely rest of your day!
Love,
Maggie
I like you tutorial. Is has great pictures and directions. The picture of the pillowcase rolled up in the cuff was especially helpful. I will be making some of these for gifts.
Thank you, Teri! That part seemed pretty confusing and I am glad you think the picture helped out!!
xo,
Maggie
Have tried other pillowcase tutorials but yours has lots of pictures and I will give it another go! Thanks for sharing:)
I hope you have fun making these, they are really soooo easy!!!
xo,
Maggie
Totally loving these and your fabric selection! I am going to have to make me a pair now!
So glad you enjoyed this tutorial! Happy Sewing, Meg!
xo,
Maggie
This was very helpful, thank you
Zoe
http://zoeshappylife.blogspot.co.uk/
Thanks for sharing this method! The pictures were great… I was able to better understand the whole roll it up, pin, and sew process from the pictures. I’ve made 6 and will be making more.
Awesome. I’ve been trying to find how to do these to make pillow cases for my kids, and all the instructions are so confusing. Yours actually make sense! Thank you!! I should be able to whip them out in time for Christmas 🙂
Hooray! I am glad this tutorial is helpful to you!! Happy sewing!!!
Love,
Maggie
What a great idea to roll it up – thank you for posting! I tried this with one-directional fabric (hello, beautiful Michael Miller Wee Wander fabrics!) and after cutting it at 27″ I realized it was longer than it was wide, which I figured wasn’t ideal for pillowcases. So I wondered, is that why you recommend quilting fabric — b/c it’s 2-directional and you can use the length of your cut, i.e. 27″, as the width of your [body fabric of the] pillowcase?
In case anyone else finds my experience helpful, I’ll just say using my one-directional fabric (i.e. it doesn’t look the same if you turn it 90 degrees), I ended up (1) cutting the body fabric down to about 22″ [or whatever your desired height of pillowcase]. (2) Stitched its one seam (‘top’ or ‘bottom,’ doesn’t matter; just remember if you want these fully french-seamed, you would need to stitch this from the outside first, then inside) before opening it back up and using that full length end of fabric in the fabric-sandwich. (3) Made conservative french seams, at 1/8 inch on the top side, and 3/8 inch on the inside. With this method, my pillowcases are certainly less wide than those in the tutorial; but they totally suffice for me. They fit comfortably around my standard-sized, fluffy pillow.
For anyone on a budget, it might be nice to know I used only a 0.5 yard of fabric for the cuff. With having used only 44 inches for the body, I could have cut that order down to 1.25 yards, instead of the 1.5 yards I ordered. And like I said, despite these compromises, I’m totally satisfied and happy with what I made!
Thanks again for making this project ultimately quite easy!
Ok, you need 3/4 yd of 42-44″ wide fabric. If the pattern is directional and you want it to run the other way when the case is finished, you will need 1 1/4 yds of the fanric and will cut the 27″ across the width of the fabric. I use 1/3 yd for the cuff. I like a generous cuff. And the piping i use 1 1/2″ and put 42″ of cording in the small. Strip of fabric. When sewing it nto the mix instead of the flat fold i pull avout and 1″ of the cording out of each end of the piping to cut down on bulk in the french seam. Very pretty look. Finish as shown. Then i dont have to iron the flat fold piping.
I also do travel size pillow cases for the kids or for pilate pillows. I do 17 x 26″ for the mainbody, 9″ x26″ for the cuff, and. 11/2 ” for piping x 26″.. Sewn the same.
Hi Maggie, thank you for sharing this tutorial with us. I have tried to print it out to take with me to my sewing machine as I do not have a computer close by. The images that you supplied do not load on the page which I need as I am definitely a visual learner. Maybe it is due to this being a tutorial that you’ve had up for 2 or 3 years, I’m not sure. I would love to be able to see the photos load so I can print it for sitting at my machine. I’ve tried in Safari, Firefox and Chrome and most of the images do not load on the webpage. I’m hoping you have an answer??
Thank you again for what sounds like a great tutorial.
Michelle
in Seattle
Hi Michelle! Thank you for commenting about this issue. I am having my web designer look into why the pictures are not showing up…hopefully it will be a quick fix!!!
xo,
Maggie
I am on my MacBook Air and was able to print it out as a pdf . . . all the pictures show up in the thumbnails, the document takes 10 pages or so, but the entire tutorial is intact. Can’t wait to get the sewing machine out and make a couple pair of these darling pillowcases!
How much total fabric I need to buy for a set of pillow cases?
Hi Carole!
Just double each measurement…body, cuff, band…to figure out how much you will need to make two pillowcases!
Thanks, Maggie for this wonderful and easy tutorial! I just finished a large quilt for my sister, and have made two sets of pillowcases with the extra material. And sets of “Broncos” and “Montana GRIZ” pillowcases, which are the hit in this athletic family!
Oh yay! I am so happy to hear that this tutorial was helpful to you! Everything you made sounds wonderful!!!!
thanks so much for this easy method for making pillowcases! I need to make some king size ones and am attempting to adjust. Any suggestions ?
Back in the days when girls learned to sew at school, I was taught to make a pillowcase with French seams and even though that was 60 years ago, I’ve never forgotten it.
Thank you for teaching this new generation!
Aww, thank you Gina! I am glad to hear that some things stay with us!!! <3
How much fabric would I need for a King size pillow case? Thanks!!!
I am having a problem with the French seam. When I am finished with the second seam and turn it out to press it, I have some of the first seam showing. I can’t figure out what I am doing wrong. Any help would be appreciated. Thanks for the tutorial. I enjoy making pillowcases for my grandchildren so they do not have to be perfect but I just can’t think what I am doing wrong:)
I am not totally sure what you might be doing wrong but it sounds like you may not be sewing the second seam far enough out so that you encompass the first seam within.
Hi Maggie…your pillow tutorial is the best one I’ve seen, and I’ve looked at a few! But I didn’t want to print out all ten pages. I wound up pinning the photos to Pinterest, and copied the text parts with Greenshot. My only wish is that you had put all the written directions together, perhaps at the end, and also maybe thumbnails of the photos in the same place. Thanks for a great, simple tutorial anyway!!
So glad you liked the tutorial!!!
Thank you for this tutorial, I’ve just finished 4 and boy they sew up quickly. Love the pattern!
Does anyone have easier directions than this this is confusing
What are you confused by?
Would this work for king size pillows? Does anyone know what those fabric measurements would be?
Are there measurements for king size pillows?
I am thrilled at the results of the pillow cases. And yes. Just over 30 minutes to complete. I love method ingenious. Thank you for the pattern.
So glad to find this! Made some a few years ago… forgot the specifics. Your neat turn method is quite nifty! Thanks!!
Can you tell me what the final pillowcase measurements are? My mom brain isn’t allowing me to do the math and I’m trying to make it for a 24″ x 18″ kids pillow. Thanks for the tutorial!
It makes a standard pillowcase 20×26 inches approximately.
I made two this weekend and my sons were thrilled! Your directions were very clear, easy to understand, and so helpful! Thank you for taking the time to write this up! I wish I could post a picture- they are sooooo cute!
Hello……I am excited. I just spent the last hour making 2 sets of your pillowcases. (LOL)! I have had so much fun learning this “FRENCH SEAM” pillowcases. Your tutorials are so perfect that absolutely no one could mess up. They fit my Queen Pillows Perfectly.
Tip: I did a pair for King size for my King pillows that are on my bed. Add 3″ to the body material to have a perfectly layed case on your pillow.
Thank you so much for allowing the public to view and pin your projects. You do beautiful work. Hope to see more.
Hi Debbie!
I am so happy to hear that you enjoyed this tutorial!! Thank you for sharing your sizing for a King size pillow as well!!
Have a great day!!
Really cool idea and used it in FACS class!!!
Love your tutorial. I am wanting to appliqué a name on the cuff. Would I do it on the part that I first pin with the letters facing the edge or on the cuff that I fold over with bottom of letters facing the edge? Thanks
I usually buy a little extra fabric when making quilts and make a matching pillow case. It makes a great gift wrapping for the quilt (or you an store the quilt in it when not in use, keeping it dust free).
This was really, really a wonderful tutorial. The pictures and instructions were really clear. I didn’t quite understand everything, but decided to just follow your instructions exactly. I’m so glad I did. I get it now! The band wasn’t making sense, but it works and really adds to the whole project. This is really awesome. My husband thinks I should just make all our pillow cases from now on 😉 Thank you for taking the time and for putting together such a clear project. These will now be part of gifts for Christmas. Thank you!!!!
I am so happy to hear that this tutorial was helpful for you! Thank you so much for your sweet words!! Hope you make many many more!!
xo,
Maggie
I completed 7 pillow cases for Christmas gifts and just now completed 6 more for us (my husband will be thrilled!). It takes me longer than 30 minutes per set (I stop and iron along the way), but they have turned out so awesome!! Thank you again!!!
Keep up the good work. I stop to iron also and when you’re finished sewing, your project is ready to do. It’s the way my Grandmother taught me and works out great!
The best way to sew!! 🙂
I’ve been sewing nearly 50 years, this was a new idea for me. Found it in the wee early morning hours and just had to try it. It was super fun… will be making more for my grand kids. Now back to bed!!!
Oh how fun! I am glad you found my blog and this fun tutorial!
These directions were very easy to follow. Thank you so much. Great pattern!
Is there a “printable” version of these instruction? If so, I can’t seem to find it ??
Thanks, Glenda
Sorry Glenda, no printable version unless you copy and past the text!
I am new to sewing…very new! I made one of the pillowcases today and it turned out just great! Thank you so much for user friendly instructions.
Hooray! Glad this tutorial was helpful to you!
Love your blog. At the beginning of the summer I went through my fabric stash and have been making lots of new pillowcases. Some for my grandchildren, friends, and of course myself. Best part is seeing the smiles from everyone and getting to replenish my stash!! Lots of fun all around. ?
The smiles and getting to shop for more fabric are definitely worth it!!
convert for queen and king pillows?
I made ten pillowcases and most turned out great but on a couple of them I didn’t catch all the layers of the fabric sandwich with my stitching. I didn’t realize this until I pulled the fabric out and ironed. Is there a neat way I can fix this?
Oh no! I think it would be best if you seam ripped it…as yucky as that sounds! 🙁
Oh brilliant, now I get it. Your great at writing up tutorials clearly. I’ve actually watched videos on how to make them and still not understood. Thanks so much for sharing. You have a new subscriber. Doreen
Wonderful!! So glad to hear this was helpful to you!!! Happy sewing, Doreen!!!