So, we went and had our Christmas pictures taken yesterday. Yes, I know, I am super extremely late on getting those done this year. We may be sending New Year’s cards out instead of Christmas cards. I have even contemplated sending a Christmas card/picture via email but thought, ‘Now really? Am I THAT person? What would Martha Stewart do in this situation?‘ I think we all know she would just get those darn pictures done and those darn cards sent out. Humrph…but really, to tell you the truth, I haven’t done a whole lot of Christmas-y things around our house at all. Tree up? Nope. Fall decorations down? Nope. And it’s killing me! But I have just been soooooo tired lately and sooooo not feeling myself. Hopefully that all changes soon as I have a bunch of Christmas presents I was planning on making the kidlets and they are all about half done…not good.
Well, since I haven’t been doing much around my house, you all know I haven’t been crafting as much lately either…as in complete lack of posts and projects…SORRY! To make up for it, I have a super cute Christmas/Winter bow hair clip that you can whip up in no time for your little princess. Please accept my apology!
I realized the morning of our Christmas pictures (read: yesterday morning) that Penny had no little bow for her hair that was Christmas-y or really that nice deep winter-y red. Lots of pinks and purples but not RED!!! So, I quickly came up with this and had it done in less than 30 minutes! Sweet, considering our appointment was at 11:45 AM!

A sweet bow for a sweet little girl!
You likey?
Ready to make this adorable little clip? Ok, here is what you’ll need:
Little Girl’s Hair Bow Clip
one roll of 3/8 inch wide ribbon (grosgain works best for non-slippage in the hair)
lighter or candle (to singe the ends of ribbon so they won’t fray)
metal prong single clips (you can buy a giant box at Sally Beauty Supply for cheap!)
fabri-tac adhesive or your hot glue gun
4mm round pearl white jewelry decorations
rotary cutter or scissors (to cut ribbon)

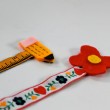
Here are your partners in crime for this project.
First off, cut one 7 inch piece of your ribbon and 3 smaller 2 1/2 inch pieces of ribbon. Singe the all ends with a lighter to prevent fraying.
 Next, go ahead and cover your clip with the 7 inch ribbon. I used polka dot red ribbon out of my stash (I was just a little too lazy and this idea was just a little last minute to go and buy plain red!) and just put the polka dot design facing inwards.
I like to start the ribbon gluing at the bottom half of the clip on the inside and work my way around the to the outside, then up and over the top, then ending at the inside top half of the clip…make sense? This way you won’t glue your clip shut so it won’t open. Hopefully the picture above will help get you started.
**Side note** Always use VERY small amounts of glue!! A little glue goes a LONG way!!!! Trust me!
 Now, you have the whole clip covered…Mah-velous, just mah-velous!

Next, glue the two ends of the small strips of ribbon together using a VERY small dab of glue. Since I used polka dot ribbon I made sure my polka dots were in the inside. You can see in the picture above how the glue gets stringy like hot glue. That’s OK, since we’ll be pressing the center together anyways…you won’t even notice the stringy-ness 🙂
 Then, just add a VERY small dab of glue to the inside center of the loop. Press together for a minute and let the glue dry.
 Now, just layer the loops on top of each other to form a bow with a dab of glue each. I did one straight up and down and then the other two crosswise.
 Then, just add some little pearls to the center of your bow with a teeny tiny dab of glue and you’re set…all ready for some of the cutest Christmas pictures EVER!

My model…wearing her new bow and trying to bust into a clementine.
Happy picture taking to you!

Very cute! And your model is adorable too
These are so cute. I haven’t seen this style. I will have to make my daughter some of these!!!
These are fabulous! Jcrew has something the same, but they were a little out of my price range. Thank you!
Such a cute and easy tutorial! Thank you for sharing.
I’ve shared at as a part of Handmade Holiday project (http://sas-does.blogspot.com/2011/11/b-is-for-bows.html) – hope it’s OK with you.