Ok, since many of you wanted to know how to make the giraffe/llama taggie family from yesterday’s post I am going to show you how! You ask and you shall receive! It just feels so American Idol, doesn’t it? (I really don’t watch that show, OK, well not after the first season anyways!)

Remember these cute little buggers!?

Awww, that’s right, a momma and her baby!
It really is a great project that you can finish in no time at all. Stuffed animals are super fun to sew, even a beginner sewer with the most basic of skills can make one with ease…hey, I consider myself a beginner sewer and I can make them pretty quickly! Once you make a few you can try to draw out your own patterns…the possibilities are endless! Therein is lies the beauty of sewing…aren’t you so glad to have this skill!? Ok, in the words of the super-sweet-sewing music-making Black Eyed Peas…Let’s Get It Started!
Giraffe/Llama Taggie
1/4 yard of fabric (or try two different fabrics for the front and back, a fuzzy fabric is great if you want to make it more of a llama!)
coordinating ribbon (for a baby it’s fun to use shiny, grosgrain, or velvet…lots of different textures)
thread, sewing machine, etc (or you could do this by hand too!)
poly-fil
 Free-hand your pattern to look like a giraffe (or llama)…don’t forget the little bump at the top of the head for it’s ears or horn thingies…that makes it look more giraffe-y if you know what I mean! My pattern was 7 1/2 inches wide from nose to bum and 10 inches tall, this includes my 1/4 inch seam allowance. To make a family (or a momma and baby) just scale down your pattern an inch or two!
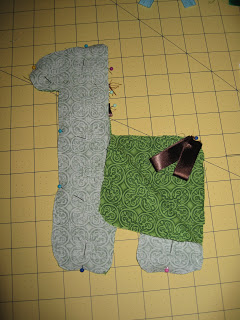
 Fold your fabric in half with the wrong sides together…this way the front and back match up nicely when it’s time to sew. Cut out your pattern.
  Now, place your two pieces wrong sides together.
  Next, take your ribbon and fold them into loops.
Now, fold the top piece of fabric back a bit and take your ribbons you folded into loops and pin them at the non-looped end onto the right side of fabric of the backside of your giraffe (WOW, does that even make sense!?) Do this along the neck and at the tail end. Like the picture above!
 Cover those ribbons with the top piece of fabric. Sew all along the edge of the giraffe with a nice and strong zig zag stitch. Make sure to leave an opening for you to flip the giraffe inside out and also to stuff with the poly-fil.
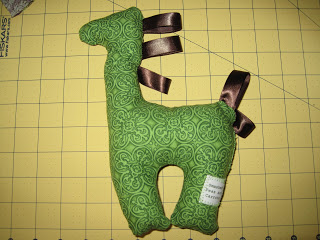 And, that my friends, is how you make your very own giraffe or llama taggie. Use your own artistic license to add whatever you would like to make it perfect for your little one. I loved using the pink furry fabric here or a corduroy would be fun too! You could also just use the ribbon without looping it and do a bunch of crazy colors down the neck. Or use felt instead of ribbon. Or, you could add button eyes for an older child…I could go on and on and on…
 Cover those ribbons with the top piece of fabric. Sew all along the edge of the giraffe with a nice and strong zig zag stitch. Make sure to leave an opening for you to flip the giraffe inside out and also to stuff with the poly-fil.
After you have stuffed your giraffe/llama, go ahead and hand stitch the opening closed.
 And, that my friends, is how you make your very own giraffe or llama taggie. Use your own artistic license to add whatever you would like to make it perfect for your little one. I loved using the pink furry fabric here or a corduroy would be fun too! You could also just use the ribbon without looping it and do a bunch of crazy colors down the neck. Or use felt instead of ribbon. Or, you could add button eyes for an older child…I could go on and on and on…
I hope you enjoy making these…let me know what you come up with…I’d love to see the results!

Thank you so much for this tutorial! I want to make these, I just need to get some ribbon first!
I don’t have the best sewing skills and have hardly touched my sewing machine in two years, but hopefully I will be able to pop out a few decent-looking ones! 😀
Adorable!
Anjeanette
Very cute project!
I’ve awarded you the One Lovely Blog Award. You can find info, and the rules of the award at almostunschoolers(dot)blogspot(dot)com.
These are so cute. I made tag toys once just making fabric blocks and sewing ribbons into the sides. I love tag toys! I love that yours is a giraffe! My little boy loves ribbon toys! I will have to make one of these.
Anne
adorable! thanks so much!
I’m making taggie giraffes – or maybe llamas 😉 – at the moment to sell at a fund-raiser. I saw them made a while back on another blog – http://chasingcheerios.blogspot.com/2009/07/taggie-giraffe-softie-tutorial.html
I am going to make one of these for my neighbors daughter 🙂 And I love both giraffes and llamas so I am on the go for it. I just need to find the perfect material for it. Thanks so much for the tutorial!
super freaking cute. may have to try my hand at this. we’ll see.
These are so adorable! And how easy, too! Thanks for sharing~
Absolutely precious—such a good idea to have on hand for baby and shower gifts–of just cause I love you presents…..
I love these! What a great present to have on hand for baby showers or for just cause I love you presents!
so cute! perfect for odds & ends scrap fabric!