Alright folks, here is a super fun and mind you extremely easy piece of jewelry to make if you are a little scared of making jewelry like I am. A fabric button ring that can be customized with your favorite fabric scraps to match that perfect outfit or loved one! The best part is that it has a thick coat of glaze on the top so the fabric won’t get all wet and wonky after you wash your hands all those times during your hardworking day..it’s protected fabric, how great is that!?!
I always love seeing all the cool fabric or felt flower rings out there (basically the only piece of jewelry I wear since I have two little ones that love to pull on necklaces and earrings) but the fabric part freaks me out…stinky, wet, moldy breeding grounds comes to mind…EEW! I finally figured out that if you paint some glaze on top of the fabric it becomes ceramic-like and all protected. Plus, it ends up with a nice shiny look to it too…Sweet!!
Ok, let’s see what it looks like on me, the worst hand model on earth:

Pretty and shiny, eh? (Seriously, what is with my hands?)

Ooooh, lovin’ all the fabric color choices…the possibilities are endless!!
Ok, so let’s make some shall we!?!
Fabric Button Rings
Your favorite fabric scraps in 2 x2 inch pieces
7/8 inch cover button kit
Adjustable ring blanks WITH pads
Paint brush
Pliers
Rotary cutter and mat

Your accomplices for this project…well, some of them anyways!

First, pull the hooks for the back part of the buttons with a pair of pliers

To pull the hook off, squeeze and pull the hook with your pliers…they should pop right out.
Then, follow the instructions on the back of the button package to cover your button.
Easy peasy lemon squeezy!!

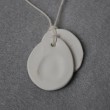
Then, get your Triple Thick Glaze out and paint one coat on your fabric. Wait 10 minutes and then do a second coat…then let dry for 24 hours before you finish putting your ring together.

I put some toothpicks in a styrofoam ball to hang my buttons to dry.

See, the empty hook holes make the perfect toothpick holders!!

After 24 hours of drying time, take your ring blank and dab some hot glue on the ring pad. Press your button on top and let dry till nice and tight.

Yup, right there on the ring pad…glue it up folks!

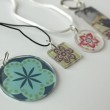
So pretty…

And customizable…

What a great gift idea…
For Me!
andthankyouverymuch!


cute and easy! Just the way I like it!
Oh, SO cute! And your hands are just what mom hands should look like! They are workin’ busy hands. Just right! Love this idea, thanks for sharing. 🙂
Great idea! I love these rings.
love this…guess what all the women folk in my family are getting for Christmas???
Love this!
Lovely idea! You rock!!
Coming out of lurk to say — these are really cool! Would it be possible to use a fancy/pretty button as the embellishment (ie. glue the button to the ring form)?
ps. Your “tagalong” cookie recipe was a serious smash hit in this household. We had to ration them…
Oh, I love this. Oh, I love this so much. You are a fabric lover’s best friend!
http://www.classiccampbell.blogspot.com
That looks so fun and easy! And what a great way to use up tiny bits of fabric scraps!
what a great idea, found my way here via One Pretty Thing
LoVe those!! So CuTe and Simple! I would LoVe to feature these on my blog: The CrEaTiVe CraTe…if it’s ok with you 🙂
THanks for sharing!
stacie4@q.com
So cute! Great idea!! =)
So cute!
just a lovely idea. seems easy and quick too. I’m definitely going to try this out next time I get a craving for some new accessories.
Way awesome. Thanks for a great idea!
Wow, fab idea! I love that you can get them wet! Thank you very very much for the tutorial! 🙂
LOVE these!!! I’m really stunted when it comes to accessorizing, and I’ve resolved to get better at it. Thanks so much for your help!!
I am IN LOVE with these! These would make adorable gifts for girlfriends and of course I wouldn’t mind having some myself! I’m usually a little intimidated by crafting certain things too but this I will HAVE to try! Thanks for sharing!
Saw you on One Pretty Thing. This is such an awesome idea! Especially since I sew and have the buttons in my stash. Now I can make rings that match my outfits. TOO AWESOME!
This looks like so much fun! I’m hoping to find some cute St. Patrick’s Day fabric and make these as favors for an upcoming Patty’s Day party! Can’t wait to give it a trial run this weekend!
Love LOVE this idea! Where do you find your adjustable rings — craft store or online? Thanks for this awesome idea – -can’t wait to make some!!!
What a fantastic idea! Thanks so much for sharing. Oh, your hands look just fine. You should see mine, I never wear gloves & I teach mosaics so I am in grout a lot. Totally dries out hands. No pics allowed of my hands.
So great. This is such a fun and easy idea. Thanks!
Aww, thanks so much for all the love on the rings!! To answer some questions…yes, you could use buttons, just be careful of the glue coming out of the button holes!! And, I bought my ring blanks at Hobby Lobby and Joann’s. Both were found in the jewelry making section!!
Have fun!!!
-Mags
These are so cute and would also work good with the fabric flowers that require buttons for a center. They are at http://cuegly.blogspot.com/2010/03/craft-concoction-friday-burlap-ish.html if anyone is intersted in.
Just going through my reader tonight and enjoying it.
Take care and have a blessed weekend.
I’ve got just the thing for your hands. 🙂 I’ll e-mail you.
Thank you for sharing your awesome project at Thursday’s Treasures last week! Come share your crafty projects in this week’s Thursday’s Treasures too!
http://treasuresfortots.blogspot.com/2010/03/thursdays-treasures-week-13.html
I absolutely love this post! Loved it so much, I put a link on my blog: http://ificould-ificould.blogspot.com/2010/03/fabric-button-ring.html
If you want, grab a button saying you were featured: http://ificould-ificould.blogspot.com/p/featured-sites.html
Thanks for the great idea! Love your blog!
Missy
LOVE these! Where did you buy the rings and buttons? Could I find those at walmart…I’m in Puerto Rico-probably not, LOL, but I love’em 🙂
You might be able to find cover buttons at wal-mart although I’m not sure abour ring blanks…maybe, they seem to sell everything these days 🙂
That is SUPER cute. I love the fabric for each ring too. Now I have another thing I need to try and make asap.
Oh, I love these!! Found your link via whipup.net… love all your crafty stuff and tutorials. Thanks for sharing… I want to make some of these rings now- I’m in the process of making plastic button rings but these are awesome 🙂
Love them…they are so cute!!! I made a whole bunch for my friends that were fun green for St. Patricks Day. THEY WERE A HUGE HIT. Thanks so much!!!!
I love this idea and your tutorials are easy to follow and understand.
Great blog. Thanks for sharing more than your ideas. Your enthusiasm came through and made me smile. Btw, Happy Mother’s Day 2010
Lovely idea! Thanks!!
Caroline White
hormone imbalance symptoms
Love this idea!! I’m going to link to it on my “projects I want to attempt list.” Super Duper Cute!
-Sarah from Create Studio
http://www.createstudio.blogspot.com
HI!
Wanted you to know I posted a link to this tutorial on my blog today.
Nancy Ward
http://www.nancywardcrafts.com
These are so cute! Thanks for sharing!
I make one of these to go with (practically!) EVERY outfit, accessory or ANYTHING I make. These are super cute and fun! Thanks for the idea 🙂 I have your tutorial & site linked to my blog 🙂
<3 Anngela
http://anngelasprettylittlethings.blogspot.com/2010/08/go-handmade.html
I have loved looking at your blog today. You are so gifted! I am posting a link on my blog ziggycrafts.blogspot.com of your cute ring idea. I can’t wait to make my own. Thanks for sharing!!
Thanks for sharing! I am a crafter myself and I would love to feature your design at
http://www.handmade-jewelry-club.com/
Would this be okay with you?
Thanks!
diylessonsassistant
http://diylessons.org/
Of course!! You can always link to any of my projects just be sure to give credit, that’s all!! Have a super day!!
XOXO,
Mags
Stopping by from SITS. Just became a follower. Love the blog.
Also, thanks for the post. I was just looking for a tutorial on this.
Your blog never ceases to amaze me and I love stopping by daily!! Have a wonderful weekend and thanks so much for always making my day!!!
These are so awesome Maggie!! I’m featuring jewelry ideas all day today on Ucreate and I’ll be sending my readers your way! Thanks so much!
Hi there! Found this tutorial from UCreate a few weeks ago…LOVE THEM DEARLY!! I had never used a cover button kit before, now I’m soooo glad I have! Thanks for such an awesome idea…here’s my blog post about mine, of course, linking up to you!
http://mejiamamma.blogspot.com/2011/06/button-ring-crafting.html
Can’t seem to get the fabric on the button cover. Don’t know what I’m doing wring. My Hubby even tried and can’t! Ugh so frustrated!
what is the point of the pads with the ring blanks? (I couldn’t find ring blanks with the pads) Is it just to give the button a rougher surface to attach to?
I’m a huge fan of these rings and have made them with photos printed onto printable fabric – but having trouble with the glue – hot glue’s not strong enough to stand up to the knocks – have tried another “industrial strength bonds metal to metal” glue and also not strong enough… any ideas?
This is a brilliant idea! They’re so cute and fun, you’ve made my day! Can’t wait to try it out for myself 🙂