Oh, poor Noah! He gets crap these days! I feel so bad…I am just waaay more into making little girl items than boy items lately…well, since I started sewing really, but we won’t tell him that! His birthday is coming up in about 3 weeks so I really do need to get a move on with making him something. Ok, maybe that will be what I do tonight…maybe! Anyhoo, here is my latest sewing project I did last night...A Bubble Skirt! Have you seen how these are all the rage these days!?! I just love them, not necessarily for me but for little girls. They are just so sweet! If you make it yourself it cost about $5…no lie (well, I guess it depends on what type of fabric you use and 40% off coupons always help too!) Now, why pay children’s store prices when you have your trusty sewing machine and a mad set of skills!?! Want to whip one up for your little princess tonight? Here is all you need:
Bubble Skirt Tutorial
1 piece of 12 1/2 wide x 40 inch long piece of fabric for the outer of the skirt
1 piece of 6 1/2 wide x 40 inch long piece of knit fabric for the lining
19 inches of 3/4 inch wide non-roll elastic
the usual sewing suspects…thread, needle, sewing machine, etc

Sweet and poof-y…just perfect!
Ok, so first off this skirt can fit a nice range of sizes, anywhere from a 12 month to a 2T/3T size. My Penny (who is almost 15 months, Wowza, my baby is getting so big!) is a chunk but my Noah (who is almost 3) is as skinny as can be and wouldn’t you know it they have the same waist size…20 inches…sad isn’t it!
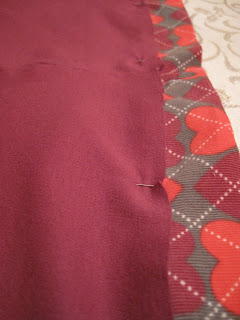
That being said, take your outer fabric, mine has hearts on it, and fold it in half length wise with your right sides together. Then, sew the short edges together using a straight stitch. I know I say this a lot but don’t forget to backstitch your beginning and ends if you use a straight stitch! Now you will have a continuous loop of fabric, or the beginnings of a skirt…Neat-O huh?
Now, we are going to make our hems and such. Fold the bottom edge of your fabric about a 1/2 inch toward the wrong side of your fabric and press with your iron and then do one more fold and press. Now hem it with a straight stitch...Oooh, done with the bottom hem…Holla!
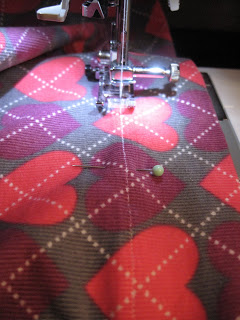
Next, time to make the casing for the elastic waist band! Fold the top edge over about 1/2 inch to the wrong side of the fabric and press. Then fold it over again but this time about 1 inch and press. See, if we are using 3/4 inch wide elastic we need to make our casing about 1 inch in width so that it fits in there nicely, get it?

Now, sew the casing up with a straight stitch. Make sure to leave an opening of about an inch for the elastic to be pulled through!

Here is a view of the bottom edge hem and the casing at the top of the fabric.

Another view of the casing you just made…WITH an opening for the elastic to go through…we’ll do the elastic part a bit later!

A view of the bottom hem
 Now, take your knit fabric…mine is purple…and fold it in half length wise. There is really no right or wrong side with knit…if there is no pattern on it that it! Also, you don’t need to hem it because knit doesn’t fray…Woot Woot! Zig zag stitch the two raw short edges together so that you have one continuous circle of fabric (an inner skirt lining).
 Now, with your outer fabric (remember mine is the heart fabric) wrong side out place your knit skirt lining around it lining up the seams.
So basically, just line up the knit seam with the outer fabric seam, wrong sides together. Then, pull up the knit fabric so it is just above that seam at the bottom of the casing!
 You just need to overlap the knit edge just above the seam you just stitched at the bottom of the casing and pin from the FRONT of the fabric, like the picture above! Make sure to pin on the front of your fabric because you are going to sew on the front and this will make it easier for you to take your pins out! YES, there is a reason for the madness!!
 See, told you! If you click on the picture you can see that I am pinning it this way so that I can sew right on top of the line I stitched for the bottom of the casing! Just follow the seam you already made…Super Easy!
 Now, just sew on the right side of the skirt following the stitch line you made earlier. Make sure NOT to sew closed the opening you made for the elastic…that would be bad, very bad…because then you would need to use my friend/enemy the seam ripper. And quite possibly some naughty words might come out of your mouth as well…just sayin’.
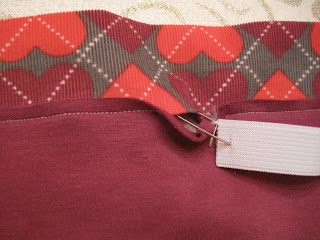 Now, pin a safety needle to one end of your elastic and start feeding it through the casing you made. Once you get to the opening again, overlap the ends about one inch. Then, just zig zag stitch them together a few times to secure the loop. The straight stitch the opening closed.
Lastly, go to the bottom hem and turn it under to the wrong side of the fabric pulling it up until it meets the bottom edge of the knit fabric. I hand-stitched the the bottom hem to the rough edge of the purple knit fabric. Since the purple knit lining is shorter in length than the hemmed outer fabric you will get a nice poof in you skirt which is where the bubble comes from! Forgive me but I forgot to take pictures of this last step… I think I was so excited to see how it was going to look that I completely forgot! So Sorry! As always, if you have any questions just comment or email me!
In hind sight, I think it would probably have been just as easy to do this last step before you stitch the top of the knit to the top of the skirt…it would completely take out the hand-stitching aspect. Meh, for the next one!

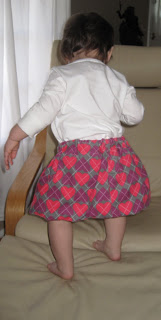
Ok, so here’s the finished product…BUBBLE SKIRT!!

The back view

the front view

The ‘going to ride my horsey’ view


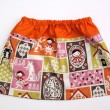
Adorable!
I think my 2-year-old needs one of these!! Very cute
she looks so cute!
I love that these are coming back. I had one of these when I was in 6th grade and loved it. I was so cool!!!! Great tute. (I tried your cream cheese/black bean/corn/salsa recipe and my family loved it!!!) I don’t see an email for you. Would you want to guest post at somedaycrafts.blogspot.com someday? You have a great blog and I’d love to try to get you more traffic and followers. If you do, email me at michellejohnnie@gmail.com
Oh…now that’s too precious! I just love it. So perfect for a little one!
That is so sweet. I’m so jealous of your sewing skills. Cute skirt and the model is adorable!
pk @ Room Remix
So cute! I’m a sewing novice, but this looks do-able. Thanks for sharing!
I just found this tutorial (I see that it’s from back in 2009) and made my daughter her own bubble skirt out of a recycled bedsheet and an old white t-shirt. It turned out absolutely adorable! I’d like you to see the finished product so if you can send me your email I can send it to you! Thanks for the great instructions; I was able to complete in about an hour:) little_a98@yahoo.com
I love the “going to ride my horsey” view! Going to try this for my daughter’s first birthday outfit. 🙂
Tooo cute!
Is there a pattern for this bubble skirt ?