Ok, so here is Part II of the Girl’s Shirt Repurpose, turning that shirt into a Toddler Girl’s Dress!!! This is a super easy way to make a dress for a little girl and because you’re using an older girl’s shirt there isn’t lots of fabric to deal with like there would be with a men’s or ladies shirt, hip hip hooray!
Also, make sure you check out yesterday’s post here for a how-to on taking the sleeves and turning them into legwarmers! These two tutorials will show you how to use the complete shirt to make a whole new outfit for your little girl! I just love this repurpose because you use every piece of this shirt to make the cutest little outfit…a dress and legwarmers combo. No excess amounts of fabric leftover, what could be better than that!!

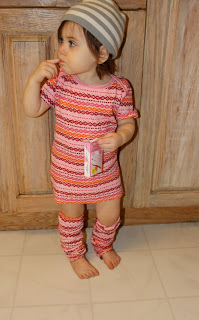
My little lady…I think she looks so ‘ski bunny’ in this outfit!
Ok, so let’s get on with the tutorial, shall we?
Girl’s Shirt to Toddler’s Dress
1 Girl’s shirt (ages 6-14 from the pre-tee-teen sections…mine was a thermal shirt!)
rotary cutter and mat
thread and sewing machine
pins or fabric marker

Again, here is the Target clearance shirt I bought for $2.48!!!
 Ok, so get out your scissors or rotary cutter and cut off the sleeves and some of the bottom hem. I wanted short sleeves for the dress so I cut my sleeves off accordingly. Then, I just took a dress for Penny’s closest and used that length to figure how much of the bottom hem I should cut off.
*I contemplated making Penny’s dress without sleeves so she could have sort of a tank top dress for the summer and then she could just wear a long sleeve shirt under in chillier weather. I think I am going to do that with the other shirt I bought cause I have a feeling it’s going to look cute!

Here is what the dress looks like after a run-in with my rotary cutter, mwahahaha!

A close-up of the sleeves.
*I washed this dress after cutting it up and guess what I learned? Thermal doesn’t fray all crazy ugly!!! I really liked the look so I didn’t do any hemming. But, of course, if you want a more finished look, just turn the edges under 1/4 inch and then 1/2 inch and straight stitch your hem into place! Easy peasy no matter what you decide!

Another view of the thermal fabric after cutting and washing. Me likey 🙂
Now, at this point you may want to put the shirt/dress on your little girl to see if you like the sleeve and dress length as well as to mark or pin where you need to take the neckline in.
 Cut down the middle of the back of shirt ONLY to the point where the shirt flares out to go over your girly’s bum, or just to the top of the skirt portion of the dress. This will help give the top a more fitted look and still give a flare to to bottom half of the dress. You probably don’t have to cut it down the middle but doing so helped me figure out how much I wanted to taper the dress and gave me a visual of where to end my pinning.
 *This is the difference between nighttime and daytime pictures, yikes…sorry about that!!!
 Now, turn your dress inside out and fold your dress in half lengthwise, so that the two cut edges are lying one on top of the other. Pin from where you marked on the neckline down to the top of what is going to be the skirt portion of the dress. Make sure to pin slightly past the cut portion of the dress! Penny’s dress needs to be brought in about 2 inches at the neckline and then I just tapered it down from there with a nice simple curve.
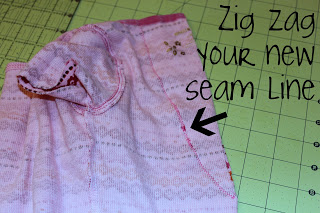 Zig zag stitch along the pins to create your new seam!
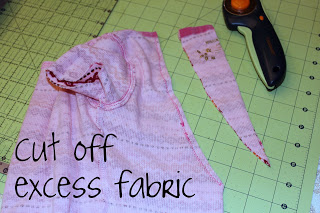 Now, just cut off the excess fabric.

 Now, turn your dress inside out and fold your dress in half lengthwise, so that the two cut edges are lying one on top of the other. Pin from where you marked on the neckline down to the top of what is going to be the skirt portion of the dress. Make sure to pin slightly past the cut portion of the dress! Penny’s dress needs to be brought in about 2 inches at the neckline and then I just tapered it down from there with a nice simple curve.
  Zig zag stitch along the pins to create your new seam!
 Now, just cut off the excess fabric.
If you’d like you can press your new seam flat or just go ahead and flip your dress right side out and put it on you little girly girl!
Wow!
The fastest shirt to dress repurpose ever, am I right or am I right?

You can see at the bottom of the new seam, here, how it puckers out just a little bit…perfect for that diaper bum!

The full on dress and legwarmers view…with her crazy striped hat and box of conversation hearts, of course 🙂

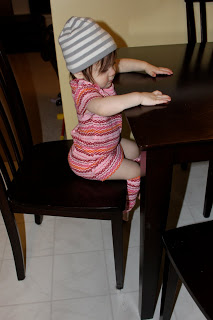
Feed me! Feed Me! Feed Me!
I guess it’s time for the little Miss to eat!
At least she’ll look stylin’ while she does it 🙂


oh you smart girl!
i love it. i have a target shirt i’m about to add some fluff too for my little girl. but this is a great idea. love thermal. love leg warmers. right up my alley!
have a good day!
Both of those “repurposes” turned out so great. I love them!! Looks so cute on your sweet little model too! Thanks for sharing. It is always nice to see how you can redo something and turn it into something even better!
That’s a really cute trnasformation. And you are right – very ski bunny indeed! 😉
Mucho cuteness!! She is SO ski bunny!! I love how her leg’s all primped up. hehe
Thanks for the tute! I think I’ll check out our Target this week!!
Thanks so much! I just love repurposing and this one rocked even more cause I was able to use everything 🙂
Oh so cute! If I would have had this yesterday, I would have posted it with the other dresses I posted. you rock!
Thanks for stopping my blog (Our Journey) … LOVE both your re-purposed projects!
This is very cute – I especially love it with the matching leg warmers. Way to use the entire shirt!
Oh my goodness this is SO adorable I LOVE this idea and tutorial! Thanks!
Hi, I’m knew to your blog! Love this idea, very cute and very helpful! Thanks!!!
So fun! I love the way it turned out – and I love the idea to do a tank dress instead!! I linked to this (and the legwarmers) on my weekly roundup – thanks so much for sharing! (And who knew this stuff didn’t fray?!? Awesome!)
Love it! Come link your cute tute at my party: Thursday’s Treasures!!
http://treasuresfortots.blogspot.com/2010/02/thursdays-treasures-week-11.html