Hold on to your horses, cause I have a tutorial up and ready for you!!! This is a super simple one that you’ll love, you can make 20 in less than an hour, Rock On!
So, as you all know by now my Christmas holiday was a little less stellar than I had planned because of all my morning sickness. I told my family not to expect any packages from our family until into the New Year because I just was/am so tired and had no energy to do any shopping. Well, the New Year is here and I actually have all of their gifts ready to be mailed. I just have to figure out how I am going to get in a trip to the post office, Hmmm…anyone want to run to the post office for me!?!
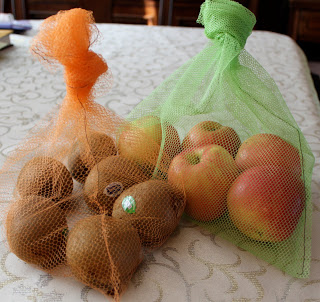
I really wanted to send them all some reusable produce bags, we use these all the time at our house and I just love them! A few weeks ago I was finally able to get them done. Mind you, they are not hard to make…unless you are nauseated and throwing up, then they may take you a little time. These are great to have and great to give as stocking stuffer gifts because they reduce the amount of all the flimsy plastic produce bags that you find in every aisle of the produce section. Me likey…you likey too? Ok, then let’s get on with the tutorial!!
Reusable Produce Bags
1 yard mesh netting (may also use tulle, you just want it to be light and see-through enough to read the produce stickers!)
thread
sewing machine
rotary cutter and mat
A yard of mesh netting will make around 6-8 12 inch x 24 inch produce bags, more if you make smaller sized ones!!!
Cute and Practical, the way all things should be!
 First, fold your mesh netting in half so that it measures 24 inches in length. I then cut my bags at the 12 inch width mark. You can make them bigger or smaller, I just think this size represents the plastic produce bags size nicely!
 Then, keeping the bag folded you will straight stitch down both long sides. Leaving the top open and the bottom folded. Sorry about the wrinkly-ness of my tablecloth and the mesh…neither affects the outcome of the project, promise!
 Now, just straight stitch your two long open edges together. You can do this twice if you like but once is plenty strong.
 **Side Note** Go slow when you stitch, if you go too fast I found that my thread would break cause the mesh just messed with my sewing machine. If you take your time, it should go quickly and easily!!

It’ll look like so when you are finished. I used brown thread just cuz I like the contrasting look but you can be match-y if you like!
**Side Note** You can also turn the top under to make a casing in which you could put some twine to tie the opening closed but I like to keep mine nice and lightweight since the weight plays into how much your produce will end up costing you!! I just knot mine at the top to keep the produce from falling all over my shopping cart.
Go Earth!!



Oh, so easy! I love it!
I just had to comment and say that I love your blog design! It is so cute!
easy peasy! I need to get crackin’ and make some for myself!
Maggie, those are great!! Definitely going to have to give those a try :-). Great tutorial!
Great idea! I am going have to try this!
Great idea! I totally featured this one at somedaycrafts.blogspot.com
Awesome! I will be making this very soon. Thanks for sharing. I also shared on my blog.
http://doehlerdays.blogspot.com/
thank you so much for this! i have some left over tulle from some x-mas gifts that i didn’t know what to do with. hooray!
What a fantastic idea.
Adding these to my list!
Me likey too !!!!!!! I’m going to pass the link on to my crafty buddies at a Yahoo group that works on getting gifts ready in time for Christmas/birthdays – this would be a great project to make in multiples to be ready for gifting 😀
Thanks so much for this tutorial – a great idea which I’ll be using.
I’ve added a link to your post on my blog!
Oh, I just love this idea. Thanks!
Those are great — thank you for sharing!! I’ve seen them sold in stores, but never actually thought about trying to make my own!! 🙂
nice tute! And I think the wrinkles of the table cloth give a nice texture, lol!
Nice to see someone else who makes them without the ties…
I LOVE these and will be making some for me and for my friends to help give them the “green” push. I didn’t used to be very good at recycling/being green, but last year I turned that around work very hard at it and reusing things too! Thanks for the tutorial!
This is such a great idea! Thanks for sharing!
Go EARTH is right! So easy and awesome!
Wow, so easy! I will be making some this weekend!
Cute idea! I have a hobby of recycling discarded furniture and making it usable again.
Great, Great idea! And so easy to make. I just have trouble remebering to take them with me!
Thanks for the inspiration and stopping by my blog.
What a great idea! Thank you.
Great idea! Thanks for sharing!
I love anything reuseable! These are great!
Such a great idea! I’m working on some this weekend and will link you back on my blog, thehandmadeproject.com 😉
I love, love, love this! I hate using those plastic bags at the store. So much waste – I’d rather not be a part of it. I will definitely be making these. They’re so easy!
How cute and I love that the colors of your bags match your blog so well:) They are terribly cute colors together.
Thanks for linking!
Andy
Poppies at Play
This is fabulous! I was debating buying some produce bags the other day, and held off because I just can’t justify the expense right yet. These have just been added to my list of projects to get going on!
Thanks everyone for the love on these bags! They are so easy to make that everyone should do make them and help get rid of all that yucky plastic that is out there! You ladies are the BEST!!!!
Mags
Wow, what a brilliant idea – I’d never have thought of that one in a million years. I avoid the placky bags when I can – I even put produce straight in the basket as is, no bags at all… but the greengrocer then puts them in paper bags – ok-ish but I end up breeding paper bags as well as plastic! Go Earth!
Awesome idea! I never thought of taking produce bags with me to the store… I have my reusable shopping bags alway packed and ready to go, now I will be adding reusable produce bags to them. Thank you for sharing this tutorial!
Hi
Thanks for the tutorial!
Its better than what I was going to do so I linked it to my blog!
Have you seen the Hip Mountain Mama One Small Change Challenge?
Its fun… You may want to join!
Carrie at http://www.taoofcraft.typepad.com
Carrie-
That sounds like a super fun idea. I think I may join up for Feb. Thanks for the info!!!
-Mags
Love this! Thank you!
Those are great!
Thank you! I have wanted reusable plastic bags for awhile, but hated the thought of adding weight and paying more for my produce. I just realized I have some old sheer curtains that I should be able to use and won’t add much weight at all! Thanks for the tutorial!
What a great idea! I’ve been using reusable grocery bags for awhile now and have been looking for a way to get around using all those plastic produce bags. This is perfect! Thank you!!
this is a great idea! I have tulle in my shop if you ever need some more.
thanks!
Nicole
FitsAllWhoFitIn.etsy.com
These are great! I am going to make some with very fine mesh to stop my fruit being eaten by the plague of fruit flies we are currently having in Perth, Australia. Thanks, Megan http://www.meggipeg.com
Love these and making them now. Wondering if you mean 12″ by WOF b/c 12″ x 24″ doesn’t give much fabric to make at knot. Can you pls comment? Thanks for all of your great ideas!
Nevermind! I see the detail in your instructions above!
This comment has been removed by the author.
Hi Jenn!
The bags are 24 inches lengthwise by 12 inches wide, although you will need 48 inches of total mesh in length since you fold it in half. Does that make sense? Look at the second picture and the following sentences to understand it a bit better. Let me know if you are still confused!
These are exactly what I have been looking for, I have been trying to find something appropriate for this exact use as I am trying to reduce my plastic intake. Now I have found it I am off to the shop to buy some netting going ot make them straigh away.
OOOOO – Love it! I have all my canvas shopping totes but I needed produce bag alternatives. Can’t wait to do these. I think I’ll make some for friends too. Fun colors, yay! Thanks for the inspiration.
great idea thanks