Right now, I am really into sweater dresses…are you? I think they are just the cutest thing for little girls in the fall and winter with a pair of fuzzy boots and some knit tights…just darling! Well, I found this old sweater at Goodwill and I thought this sweater pattern would be the cutest pattern for a little girl’s dress. It’s a really simple repurpose to try and if you cut your dress using the edges of the old sweater there is absolutely no hemming to be done! Yay, a simple sweater dress that can be done in an hour…and look stylish too!

A sweater dress for your little girl, so precious and perfect for fall weather…and repurposed out of an old sweater of yours or Goodwill’s!
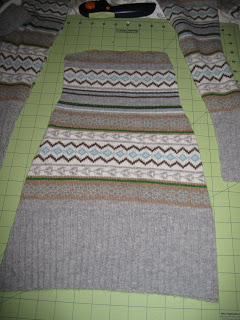
 First, find an old sweater that you just have no use for anymore. Then, what I did was find a dress with a silouette that I really liked that my little girl already had in her closet. Or you could just free hand it, little girl’s dresses can be quite simple in lines. Lay the little girl dress, with the sleeves tucked behind, flat on top of your old sweater on your cutting board.
Now, cut all the way around the dress leaving a 1/4 inch seam allowance…DON”T FORGET this part!!!! If you do, your dress will be too small for your precious little angel!
 Next, cut a shallow curve at the top of what will be the front piece of your fabric so there is a nice curved neckline. ONLY do this to the front piece. Leave the back piece of fabric alone!
 Next, I used the extra fabric on the sides of the dress I just cut out and used the bottom portion to make the sleeves (this way there are no seams to hem, wahooo!!). I wanted a longer sleeve that went down to the elbow for the chilly fall weather so I cut about 5 inches of the sweater’s length and 2 1/2 inches was my remaining width on each side, so that is what my sleeve width became.


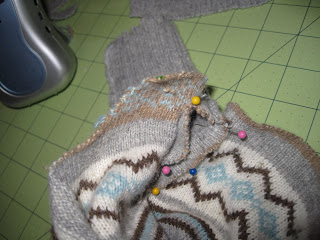 Now, pin the sleeve to the top of the sweater dress where the armholes are going to be. Make sure to do this right sides together so none of your seam shows! I used a zig zag stitch. Please excuse the baby monitor…gotta get my projects done while the kiddos are napping!

It should look like this!
 Next, cut a shallow curve at the top of what will be the front piece of your fabric so there is a nice curved neckline. ONLY do this to the front piece. Leave the back piece of fabric alone!
 Next, I used the extra fabric on the sides of the dress I just cut out and used the bottom portion to make the sleeves (this way there are no seams to hem, wahooo!!). I wanted a longer sleeve that went down to the elbow for the chilly fall weather so I cut about 5 inches of the sweater’s length and 2 1/2 inches was my remaining width on each side, so that is what my sleeve width became.

This is what one sleeve looked like. I turned the fabric inside out and zig zag stitched the sleeve closed on the long side.

Here is a picture to show you the tube I made for the sleeve. DO NOT sew the short ends together or your little girl will not be able to put her arms through the sleeves!
 Now, pin the sleeve to the top of the sweater dress where the armholes are going to be. Make sure to do this right sides together so none of your seam shows! I used a zig zag stitch. Please excuse the baby monitor…gotta get my projects done while the kiddos are napping!
Then, zig zag stitch all the way around the dress, connecting the front and back pieces. Make sure to stop at the sleeves and then to start up again at the inch or so you have next to the neckline. I used a zig zag stitch because knit sweater fabric is a bit stretchy and I wanted a nice secure stitch knowing that my kids abuse clothes when they are learning to put them on themelves! ie. leg in armhole and stttrrreettchhh, head through leghole and stttrrrrreettcchhhhh…you see what I mean!
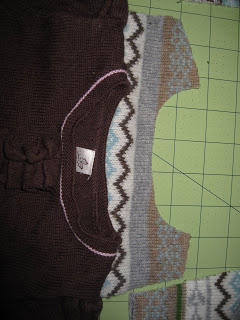
 Now, go and find that sweater again and take the collar and cut it off the old sweater, trying to preserve as much of the collar as you can!
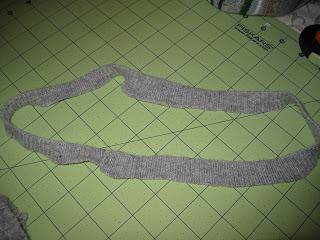
 Now, go and find that sweater again and take the collar and cut it off the old sweater, trying to preserve as much of the collar as you can!

A look at the old collar all cut off.

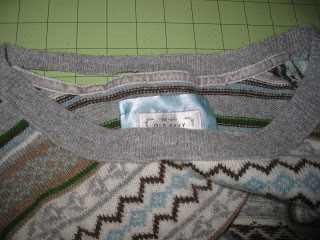
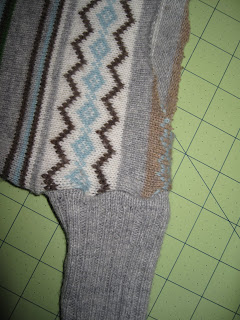
A close-up view of the sewn in sleeve and the raw neck/collar line.
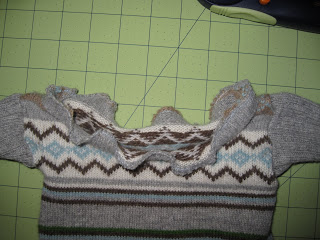
 Now, place the collar from the old sweater and pin it on the new collar line, you’ll have extra but just leave it there and cut it off once you have sewn it all on…that way you will have enough. I pulled my collar a bit tight when I zig zagged it to the collar line. That way it wasn’t a loosey goosey neckline.

This is what it will look like. It is a bit ruffl-y looking because I pulled the old collar tight as I sewed it on.

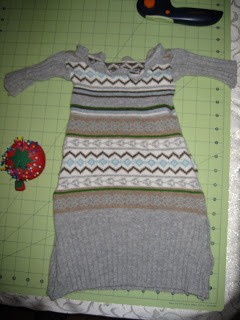
Ta Da, the completed dress…like I said, the collar looks a bit ruffl-y because of the zig zag stitch on knitted sweater fabric…don’t worry, it flattens out once you put it on your little girl!

See, a flattened collar!

A backside view…aren’t my littles just so cute looking outside for bunnies!
And if you noticed Noah in boots too, well, he saw that I had put Penny in her fall/winter boots so he just had to go and get his winter boots and put them on too! What a kid! Too bad today’s temperature is a nice and warm 75 degrees…I think I see some sweaty, stinky little toes in my future!


Super cute!!! Definitely going to make one for my girl!
Oh, this is such a cute idea. The sweater dress is adorable on the little models.
Stormie 🙂
OMHeck!! This is so adorable! What a clever idea!! I totally love it! I wish my little girl was still little enough to make this for her. ADORABLE!!!
I. LOVE. THIS. I posted a link to your tutorial on Craft Gossip Sewing:
http://sewing.craftgossip.com/tutorial-toddler-sweater-dress-from-adult-sweater/2009/09/09/
(link will go live at 12:15 CST)
–Anne
Sweet, cute and adorble!! Both your children, the sweater dress.
I like your little girls boots too!!
God Bless You and Yours!!
I will definitely be making one of these this fall! Thanks for the tute! I linked today:
http://www.luvinthemommyhood.com/2009/09/link-luv-roundup_09.html
Oh, so cute. Love it!!! Thanks for sharing. Gotta make one for my little one. This will be fun.
That is so cute!
I stumbled across your blog. This is too cute. I will have to do this for a friends daughter. Thanks!
You are a genius. I just totally made one of these in about an hour and blogged about it here:
http://binkiesandbriefcases.blogspot.com/2010/09/this-aint-your-grandmas-sweater.html
(giving you credit, of course)
Tried this to practice my sewing and so far its adorable! Having trouble getting the neckline though. Did you turn the dress inside out to sew on the collar? I even made a matching beanie hat for my little one! Pics to come!
Hi Samantha!
I pinned the collar to the outside or right side of the dress (right sides together) and sewed it at the top/raw edge. That way when you go to flip the collar up it will have the finished edge up at the top and the sewn seam to the inside. Hope that helps!! Please send me a picture of your beanie, I would love to see that!!
XOXO,
Mags
thanks exchange for this tips
pmu
turf
This is exactly what I’m wanting to do. Glad to see how you did it.
Thank you so much for the tips! This baby’s dress is so lovely. I can’t wait to create one for my niece. Thanks again.
So adorable!