Today I am posting a tutorial for a super soft and comfy Terry Cloth Bath Wrap. It is a great project for a beginner to try and should only take a couple of hours to complete! Please let me know if I have not explained something well as this is my first attempt at a sewing tutorial…explaining the process is much harder than it seems, who knew! Make sure to read all the directions and take your measurements before starting!! And, as always, I appreciate any comments you have and would also love to see pictures of your completed projects too…Happy Sewing!

For this project you will need:
1 1/4 to 2 yards of terry cloth (depending on your measurements)
1 yard of 3/4 inch wide non-roll elastic
14 inches of velcro (cut into one 4 inch length and one 10 inch length)
coordinating thread
In order to figure out how much fabric to buy you must first measure the area beneath your armpits and above your bust. Essentially, the place where you would want the wrap to ‘wrap around’ your body. Once you have this measurement you will add 14 inches to it. This will give you enough fabric to have some overlap at the front of your body and for the fold-over edge seam. For me, my measurement was: 31 inches + 14 inches = 45 inches in width of fabric
The length of your wrap will depend on how much coverage you want. I wanted mine to hit right above my knees. So when you decide where you’d like yours to be take that measurement and add 3 1/4 inches for the hem at the top and the bottom. Mine was 29 inches in total length. Be sure to save the remaining fabric that you cut off the bottom so you can use it for the ruffle, you’ll need 3 inches in width and 1/3 more fabric than the length you chose!
Next, take the elastic and wrap it around the area under your armpit and above your bust. You will want to stretch the elastic a little bit so that it gives the wrap a snug fit at the top. Cut the elastic with a sharp scissors so you have the least amount of fray possible. My elastic measurement was 26 inches.
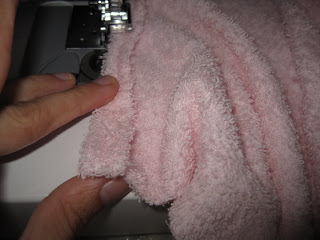 Once you have your terry cloth cut to size, fold the edge of the fabric a 1/4 inch two times (a double fold) on both the right and left edges of the wrap toward the inside or ‘wrong side’ of your fabric…I know with terry cloth you can’t really tell which is the wrong side so you will just have to make sure you remember which side you chose the inside of the wrap to be so you can turn all your seams in to that side! Or, I suppose you could mark the inside with a fabric marking pen and that way your brain won’t have to work as hard as mine did, doh!! Press the seam with your iron so you won’t have to pin (yay for no pinning!) Sew a 1/8 inch seam using a straight stitch and remembering to backstitch at the beginning and end of your seam.
 Once you have your terry cloth cut to size, fold the edge of the fabric a 1/4 inch two times (a double fold) on both the right and left edges of the wrap toward the inside or ‘wrong side’ of your fabric…I know with terry cloth you can’t really tell which is the wrong side so you will just have to make sure you remember which side you chose the inside of the wrap to be so you can turn all your seams in to that side! Or, I suppose you could mark the inside with a fabric marking pen and that way your brain won’t have to work as hard as mine did, doh!! Press the seam with your iron so you won’t have to pin (yay for no pinning!) Sew a 1/8 inch seam using a straight stitch and remembering to backstitch at the beginning and end of your seam.
 Once both right and left hems are done you will stitch the bottom hem. Fold over 1 inch to the inside or ‘wrong side’ of the fabric and press with your iron and then fold over another 1 inch and press again (another double fold!). Now, you can straight stitch using a 1/4 inch seam, remembering to backstitch at the beginning and the end!!
Time to make the casing for the elastic! At the top of the wrap you are now going to fold the edge down 1/4 inch to the inside and press. Then, you will fold that down another inch and press again. Carefully straight stitch over that little bit of a 1/4 fold that you just tucked under. Hooray! You made a casing for the elastic!!! Now, pin a safety pin to one end of the elastic and push and pull it through your casing little by little until you get to the opening on the other end. Once you have it pulled through you are going to pin the elastic 1 inch from the edge of the fabric to hold it in place while you sew the casing with the elastic closed. This way the elastic won’t zing back into the casing and you would have to pull it through again…what a pain! Use a zig zag stitch to close the opening for extra strength. Do the same on the other end. Sorry I didn’t take pictures of this…I completely forgot!
 Get out your velcro now and separate it into the hook (scratchy) side and loop (soft) side. Place the 4 inch hook side of the velcro closure horizontally next to the edge seam on the inside or ‘wrong side’ of the terry cloth right on top of the elastic casing you just made like the picture above. Sew in place with a straight stitch all the way around it making sure to backstitch. Take the 10 inch length of the hook side of the velcro and place it vertically 2 inches below the innermost end of the 4 inch piece you just stitched, like the picture above. Sew into place all around with a straight stitch and make sure to backstitch your beginning and end!
 Now, take the 4 inch piece of the loop (or soft) side of your velcro closure and place it horizontally on the outside or ‘right side’ of your fabric at the other end of your wrap with the end of the velcro next to the seam you have folded over twice and sewn. You are basically mirroring what you did with the hook closure so they match up and can stick together. Measure 2 inches down from the end farthest from the edge of the fabric and place the 10 inch piece of loop velcro vertically there like the picture above. Sew all the way around and don’t forget to backstitch your beginning and end!
 Now for the fun part…making the ruffle! Remember the bit of fabric you cut off the length of your terry cloth that I told you to save? Well, you are going to use this to make your ruffle. You will need this piece to be 1/3 longer than your measure length. Mine was 45 inches long since I had 29 inches of length for my wrap. If you don’t have enough terry cloth you could use any fabric that coordinated in color, or even contrasted…that would be cool too! You want the width of this piece to be 3 inches. Double fold both long edges 1/4 inch and straight stitch with backstitching the beginning and end down the folds. Now change your stitch length to the longest stitch and increase the tension on your thread a bit. Sew right down the middle of the length of the fabric without backstitching!!! This should give you a nice ruffle effect. If you need or want a bit more ruffliness, leave a tail of thread when you are finished and then go ahead and pull the bottom thread a little…kind of like when you gather fabric.
 Now pin your ruffle, seam sides down, on the outside or ‘right side’ edge of the left side of your wrap (the edge where you stitched the hook closure to the inside) like the picture above. Make sure to fold in the edges of the ruffle to give it a clean look. Sew with a straight stitch from top to bottom making sure to backstitch at the beginning and end.
Congratulations, you just made yourself a terry cloth bath wrap! Give yourself a round of applause!! You made it all by yourself…you go girl!


Ooh, I’ve been wanting to buy one of these for years, but keep telling myself I’ll take the time to figure it out and save money..
You’ve finally given me inspiration! Love the ruffle!
So cute! Love the ruffle too. Thank you so very much for taking time to put this tutorial together and sharing it with us.
great tutorial! very easy to follow, i only wish there was a PDF version. Thanks so much GREAT JOB!
Very, very cute! You make it look so simple 🙂 Thanks for posting.