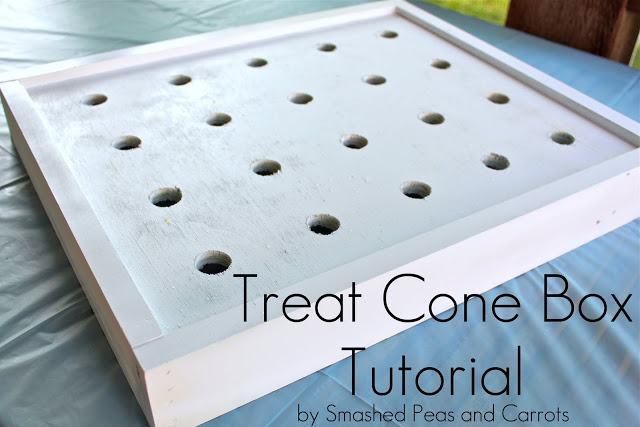
Since I’ve received a lot of emails from you asking about how we made those Treat Cone Boxes we had at Eloise’s Vintage Milk and Cookies party seen here, I thought today would be the perfect day for Mr. Smashed Peas himself to share how he made them. A tutorial from Mr. Smashed Peas? Is this for real…umm, YES! Who would have ever thought he would be on my blog sharing a crafty project of his own? Well, he did with a bit of arm twisting…I’m so happy he gave in to my persistent pleading, I can be good like that 😉
After explaining to Mr. Smashed Peas how I wanted him to make me two simple boxes that I could put craft foam in, cover with some type of decorative covering and then stick lollipop sticks into for holding my Treat Cones my hubs came up with these Treat Cone Boxes which would eliminate the need for a) craft foam b) a decorative covering and c) lollipop sticks…seriously? Not only did he save me (and therefore him) some money, he also saved me some time having to run around to buy that stuff and put it all together…he’s always thinking, that one! Plus, these Treat Cone Boxes were made from scrap wood we had in our garage so they didn’t cost us a thing to make them. If you need the template for Treat Cones you can find mine in this post here.
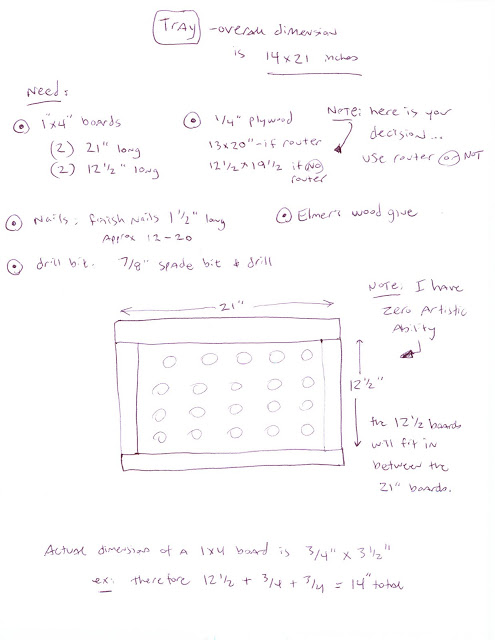
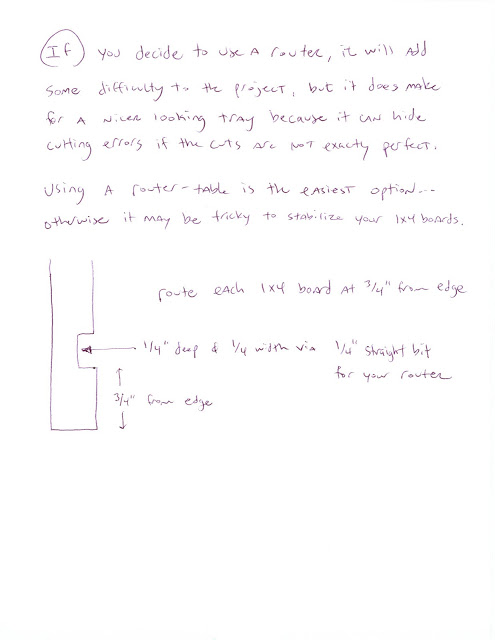
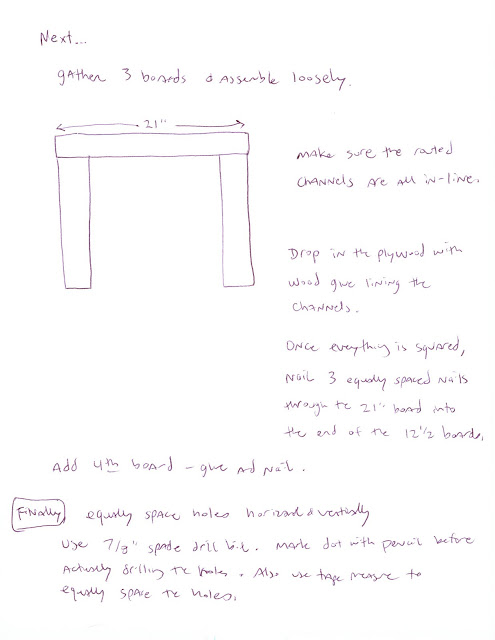
I asked him to tidy up (read: write out in a way you could understand!) his sketches he made before starting and then just uploaded them for you here, so this is a bit of a different tutorial then you might normally see here 🙂 I just thought it might be easier coming from him then me since it’s his project and all…you know how that goes! Enjoy!
Treat Cone Box Tutorial
As a side note, I wanted to add that we flipped the cones upside down on the box to see exactly how many we could display in each box. Then we used a pencil to mark their spots and measured to equally space the holes. Remember, the size of your cones will depend on how many you can have in your box!
Now the mister wanted me to share that if you don’t have a router available then no glue would be necessary for this project…hooray! (?) Just cut the plywood slightly smaller then he first suggested. The next change would be to secure the 3 boards together with nails first before you drop in the plywood. You will place the plywood 3/4 inch from the edge just as if you had routed a channel and then tack the plywood in place with more nails. Finally add the 4th board and nail into place.
Easy, no? Once you are done you can go ahead and spray paint the Treat Cone Box any color you desire, we chose white as you can tell! Well, I hope you enjoyed Mr. Smashed Peas foray into crafty blog world. Please let me know if you have any questions and I will pass them on to him!
Have a great day!
XOXO,








This is such a great thing to learn and just in time for my granddaughters 5th birthday. Thank you!
This comment has been removed by the author.
great idea Maggie!
What a sweet display !
Yay Mr. Smashed Peas and Carrots! Good job by you…
Love it! {I wish Mr. Love would make me one too…} 🙂
FANTASTIC! This is so perfect for my LO’s 1st birthday party. I wasn’t so sure my Mr. would be up for making the Treat Cone Box, so I purchased plastic buckets from the dollar store and am flipping them over & drilling holes in them. Thanks so much for the great post!
Thinking I’d be more likely to stick with your original idea of using foam which might hold the cones better…
I think your Mr. is very clever. Thanks for the direction.