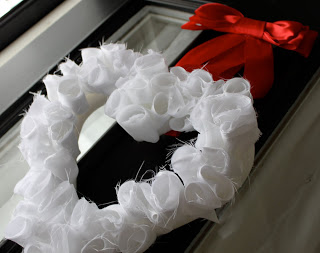
Need something fun for your front door? How about a super cute Valentine’s wreath made of fabric roses? Me thinks this is a great idea! And, super easy!!! Wanna see how cute my front door looks these days? Ok, go ahead and check it out:

Romantic and Pretty, isn’t it!
So, I am finally feeling good enough to get some crafting done. Man, I miss it. What withdrawal I have been in these past few months. Darn little baby causing me so much strife! Nah, two months and counting of being nauseated is worth it especially after seeing him/her (see this post).
Do you want to make one of these beauties for your front door? I think you should!
 I also alternated by making some of my strips 8 or 9 inches long just to vary the thickness of the fabric roses. Totally optional though 🙂
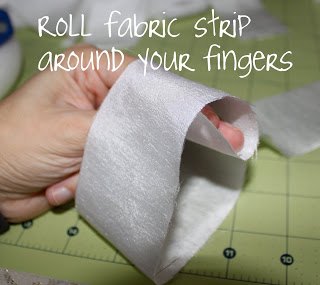
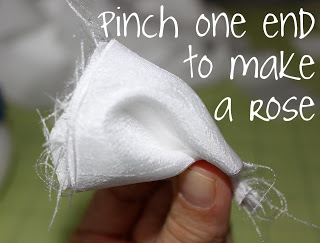
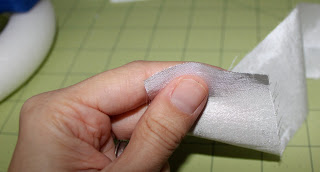 To make your fabric roses, start by placing one end of a fabric strip between your index finger and thumb.
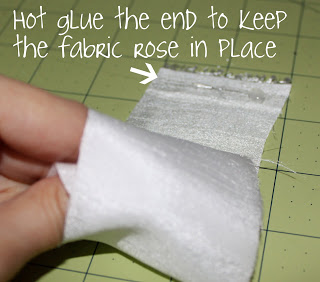
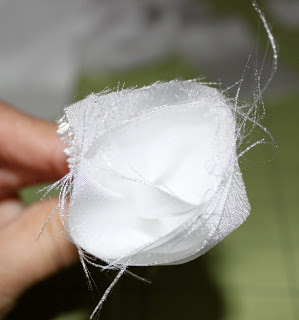
 Press the hot glued end to the fabric roll and there you have it, the beginnings of a fabric rose!
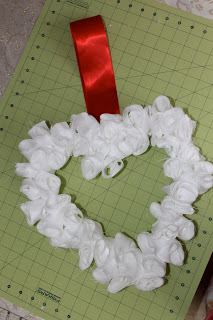
 Fill the entire wreath (front only) with your fabric roses, making sure you have a nice full wreath when you are done.
 Now, cut a length of ribbon that you think will hang nicely from your door. Hot glue the two ends together to make a circle, like so.
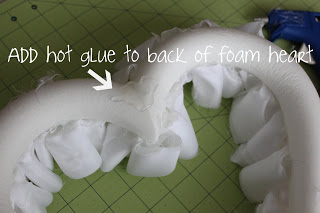 Flip your wreath over and place a huge dab of hot glue to the top center of the foam back. Press your ribbon circle from the last step into the glue.
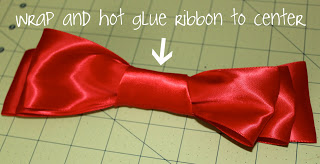 Cut another much smaller piece of ribbon to wrap around the center of the 3 layered ribbons you made above. Hot glue into place on the backside.
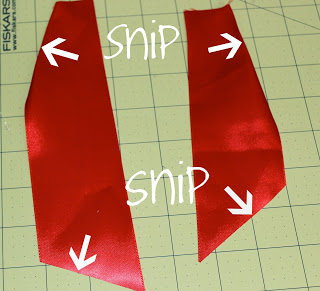 Now, cut two more strips of ribbon to make the ends of the bow. Go ahead and snip the ends at the top and bottom, like so.
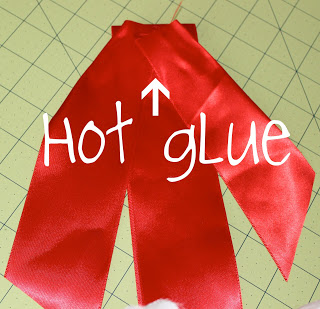 Now, just hot glue the two ribbon strips to the top of the main ribbon (see above picture)
 Glue your bow to your main ribbon and Voila, you are done with your Valentine’s wreath!! What a beauty!
Fabric Rose Wreath
1 foam heart (I bought mine at Joann’s)
1 1/2 yard white party tafetta (you could also use apparel lining or bridal satins, you just need the fabric to be a little stiff so the roses stand up!)
red ribbon (mine was 2 1/4 inches wide!)
rotary cutter and mat
hot glue and gun
fray check (optional…I left my fabric frayed and thought it looked great!)

Here’s what you’ll need to get started!
Ready? Ok, let’s go!!!
 Cut your fabric into 1 3/4 inch up to 2 inch wide strips by about 20 inches long.
 I also alternated by making some of my strips 8 or 9 inches long just to vary the thickness of the fabric roses. Totally optional though 🙂
 To make your fabric roses, start by placing one end of a fabric strip between your index finger and thumb.


 Press the hot glued end to the fabric roll and there you have it, the beginnings of a fabric rose!


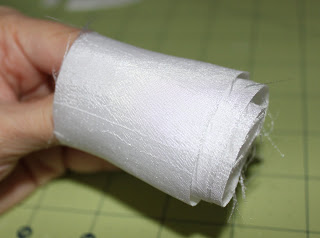
See, now it looks all rose-y!
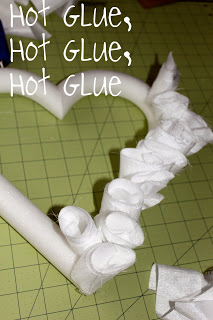
 Now, start dabbing hot glue onto the front of your foam wreath and press the fabric roses into place.
 Fill the entire wreath (front only) with your fabric roses, making sure you have a nice full wreath when you are done.
 Now, cut a length of ribbon that you think will hang nicely from your door. Hot glue the two ends together to make a circle, like so.
 Flip your wreath over and place a huge dab of hot glue to the top center of the foam back. Press your ribbon circle from the last step into the glue.
It should now look like this! Pretty cute, right!?!
 Now, cut 3 smaller strips of ribbon in varying lengths and glue the ends to make circles. This is going to be your bow. You will layer largest on bottom, then middle sized, then smallest on top.
 Cut another much smaller piece of ribbon to wrap around the center of the 3 layered ribbons you made above. Hot glue into place on the backside.
 Now, cut two more strips of ribbon to make the ends of the bow. Go ahead and snip the ends at the top and bottom, like so.
  Now, just hot glue the two ribbon strips to the top of the main ribbon (see above picture)
 Glue your bow to your main ribbon and Voila, you are done with your Valentine’s wreath!! What a beauty!

Go hang your new wreath on your front door and Admire!

Now your front door is ready to welcome your guests in style!
So Love-ly!


I love this!!
I am really looking for unique and fabulous Vday crafts right now and this is PERFECT! I’ll be featuring this week!
That is so pretty!
Just found your blog, count me as a new follower.
Thanks for the tutorial. You made it very easy to follow, especially for a craft challenged gal like myself!
~Amy
Pretty! thanks for sharing!
Have a wonderful and crafty week!
So romantic. I love it. I think I have a craft to get to. Thanks!
Wow very pretty!
Very beautiful!
Super sweet! Thanks for the tutorial!
Kristi
Punkin Seed Productions
What a great tutorial, and no-sew to boot. Thanks for sharing!
I just found you on ucreat today—
LOVE this!!
thanks for sharing
Thanks for sharing this wreath…I am going to have to try it out! You have a darlin’ family!
Aww, thanks for all the love! I am so happy you all like this wreath as much as I do!!!
hugs,
Mags
I just found your blog! This is such a cute idea! Thanks for this adorable tutorial!
Looks fabulous! I might have to try it!
How pretty! thanks for the tutorial 😀
I love this! Beautiful job.
Perfect for weddings/bridal showers.
Rhonda
That wreath is fantastic…I’ve added it to my to do list….which is like a mile long 🙂 I need to stop looking at blogs because there are sooo many great ideas and so little time. Your blog is great! Following now 🙂 Thanks for stopping by mine and for the comment love 🙂
Beautiful! Great tute! Thanks for sharing.
Check out my blog for a giveaway (one or two posts back)
summerduffield.blogspot.com
Thanks for stopping by my blog! I love your wreath too ~ it has a nice simple, clean look! Maybe another foam heart is in order 🙂
Very pretty!
Fabulously flirty and romantic. Great tutorial!
Chelsea
I can’t believe how beautiful this is! WOW!!! I want to make one… yippi!
Those turned out so pretty, and they look great against the red ribbon and black door!
Thanks for linking up with Talented Tuesday!
wow….so simple! Love it.
Hi, Came over from One Pretty Thing.
This is cute. Very clever idea.
Thanks for sharing.
I love this idea! THanks for linking!
Hi! Popped over from RiggsFamilyBlog as you’re site was mentioned there….
I LOVE the Valentine Heart!!! It’s so Sweet & you made the instructions SIMPLE for me to understand… THANK YOU! 🙂
Oh I am in LOVE. So gorgeous. I can’t wait to make one. Thanks for the tutorial!
Kris @ shabby2sweet.blogspot.com
Turned out SO cute! It looks like such soft fabric too. What a great choice!
Stunning, TY fs this wonderful idea!!!!
Thanks for stopping by my blog. I’m glad you liked the Snow Day box. I think your rose wreath is so pretty! I would want to keep the wreath up all year long.I can’t wait to make one.
Too cute!!! I would love one on my front door!
xo,
cristin @ simplified bee
What a clever idea!!! Thanks for this tut.
Can I link your tut on my blog?
Thanks.
Eleonora from Sweden
This has to be my favorite Val wreath of the season!
Thats awesome and your tutorials makes it look easier than it actually might be! Thanks a lot, glad I bumped in here…
I have seen this on SO many blogs!! Everyone LOVES your project!! Good job!
You can see mine here…
http://bethouaknight.blogspot.com/2010/01/liannas-labels-debut-and-giveaway.html
Really cute! And THANK YOU for the tutorial on how to make a bow. I am bow-tying handicapped. For real:)
mythriftytreasures.blogspot.com
The tafetta is perfect for this and makes it looks so elegant.
just linked to this in my latest post!!! Loved it so much.
xo,
cristin
http://www.simplifiedbee.com
Thank you for this tutorial! I made this the other day and it is proudly hanging on my front door. Very pretty!
I gave you a blog award for this: http://delightfuldwelling.blogspot.com/2010/02/kreativ-blogger-award.html
just darling! I love projects that are so simple and creative! 😉
Gorgeous and you made it look so easy! I’m off to give it a try!
Thanks for sharing this beauty!
xo,
Rebecca
Hi there, thanks for your GREAT tutorial, I’m linking to your post today!
http://fearfullyandwonderfullymade81.blogspot.com/2011/01/my-valentines-day-vignette-and-fabric.html
I’m in LOVE with your fabulous wreath! It’s just so pretty 🙂 Thanks for sharing the How-To.
~Mary
http://www.thecraftygals.blogspot.com
This is so pretty! I made it last year and cant wait to take it out for this year.
I love how easy these roses are to make – no muckin’ about, just simply and effective! Thanks for such great instructions. I’ve seen some fabric roses that sound reeeeeally hard to make, but these ones are fantatic! Thanks for the great inspiration and excellent instructions.