So, it occurred to me…after receiving several emails from you lovelies…that maybe I should give you a run down of how to sew with bias tape after I posted the Double Oven Mitt Tutorial here last year (umm, did I really just type LAST year!) This project uses quite a bit of bias tape and I didn’t even think that maybe some of you might not sew with it often or even ever to really know how to put it on. Sorry about that, my bad!
Here is a picture of what bias tape looks like…
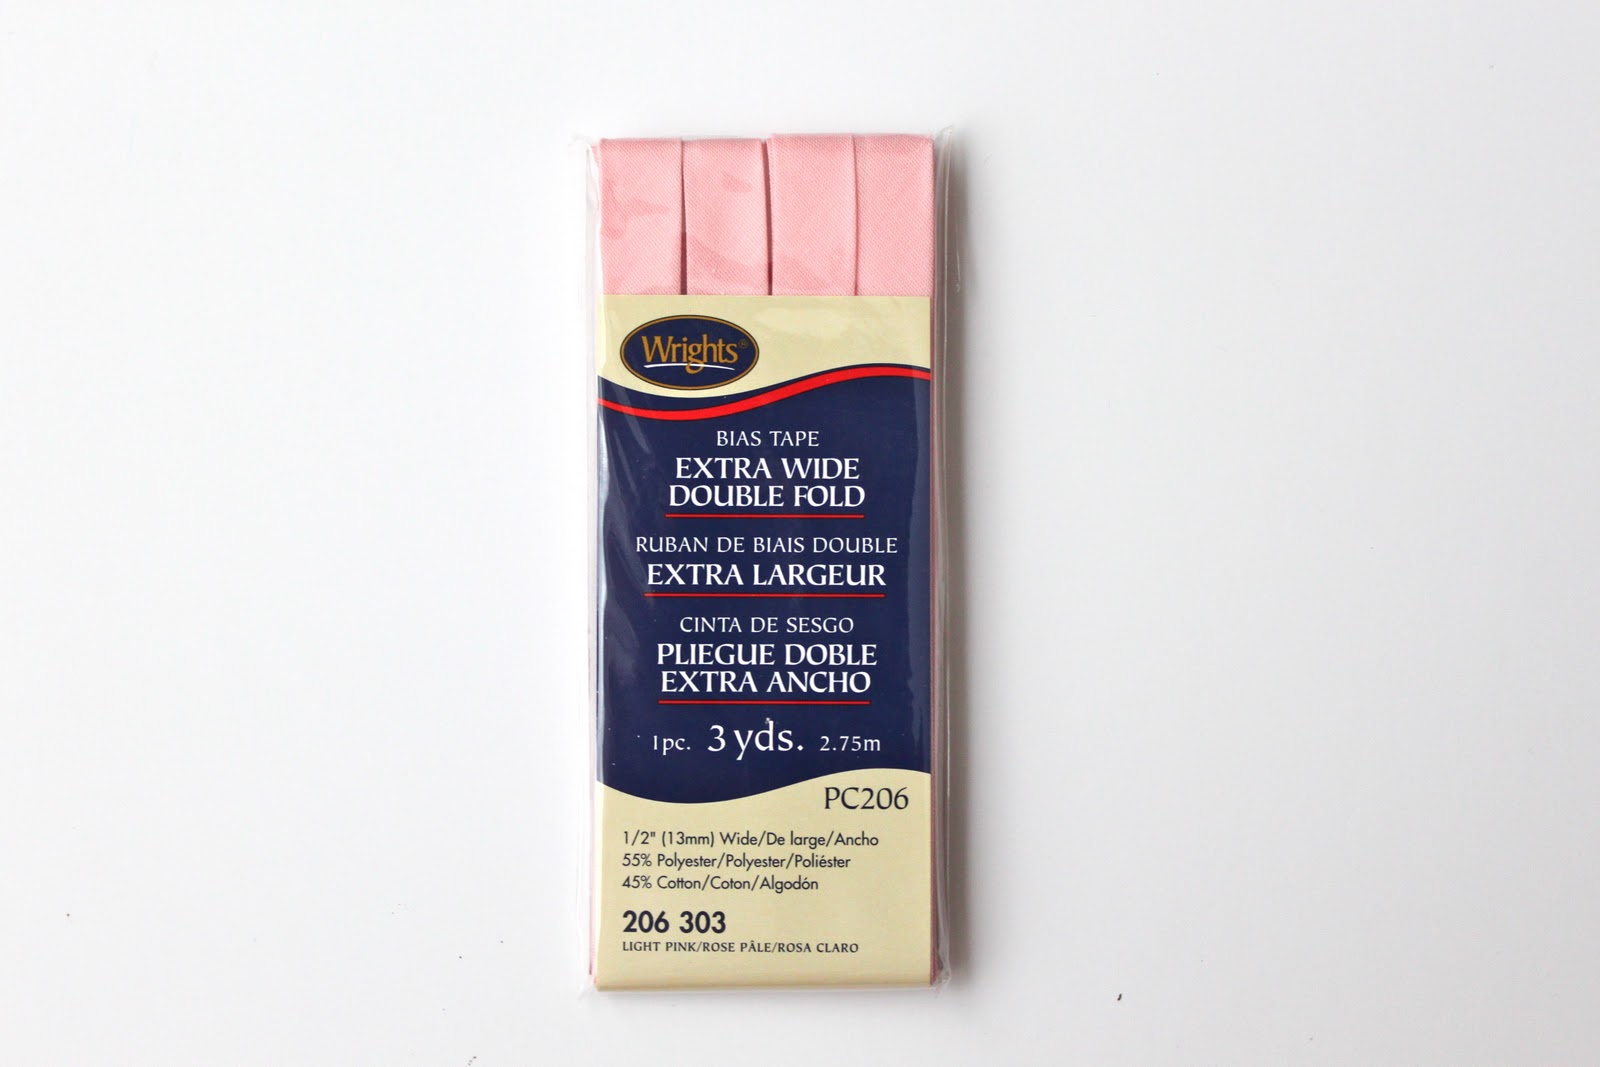
You will usually find it near the zippers and quilt binding in most fabric stores. It always comes pre-packaged like this and Wright’s is usually the brand you will see on the label.
Bias tape comes in single fold and double fold as well as in a variety of widths. I tend to use more of the double fold and I like extra wide for most of my projects although smaller widths tend to work better for children/baby clothing as seen in the going home kimono I made here.
For this tutorial I’m going to show you how to use the extra wide double fold as seen in the picture above!
**Edit** Click HERE to see the Tutorial for How to Sew Bias Tape Around Corners!!

Okay, so here is the bias tape out of the package. If you look closely there is a crease down the middle and two folds on each side of it. Yuppers, that is where the double fold name comes from!!
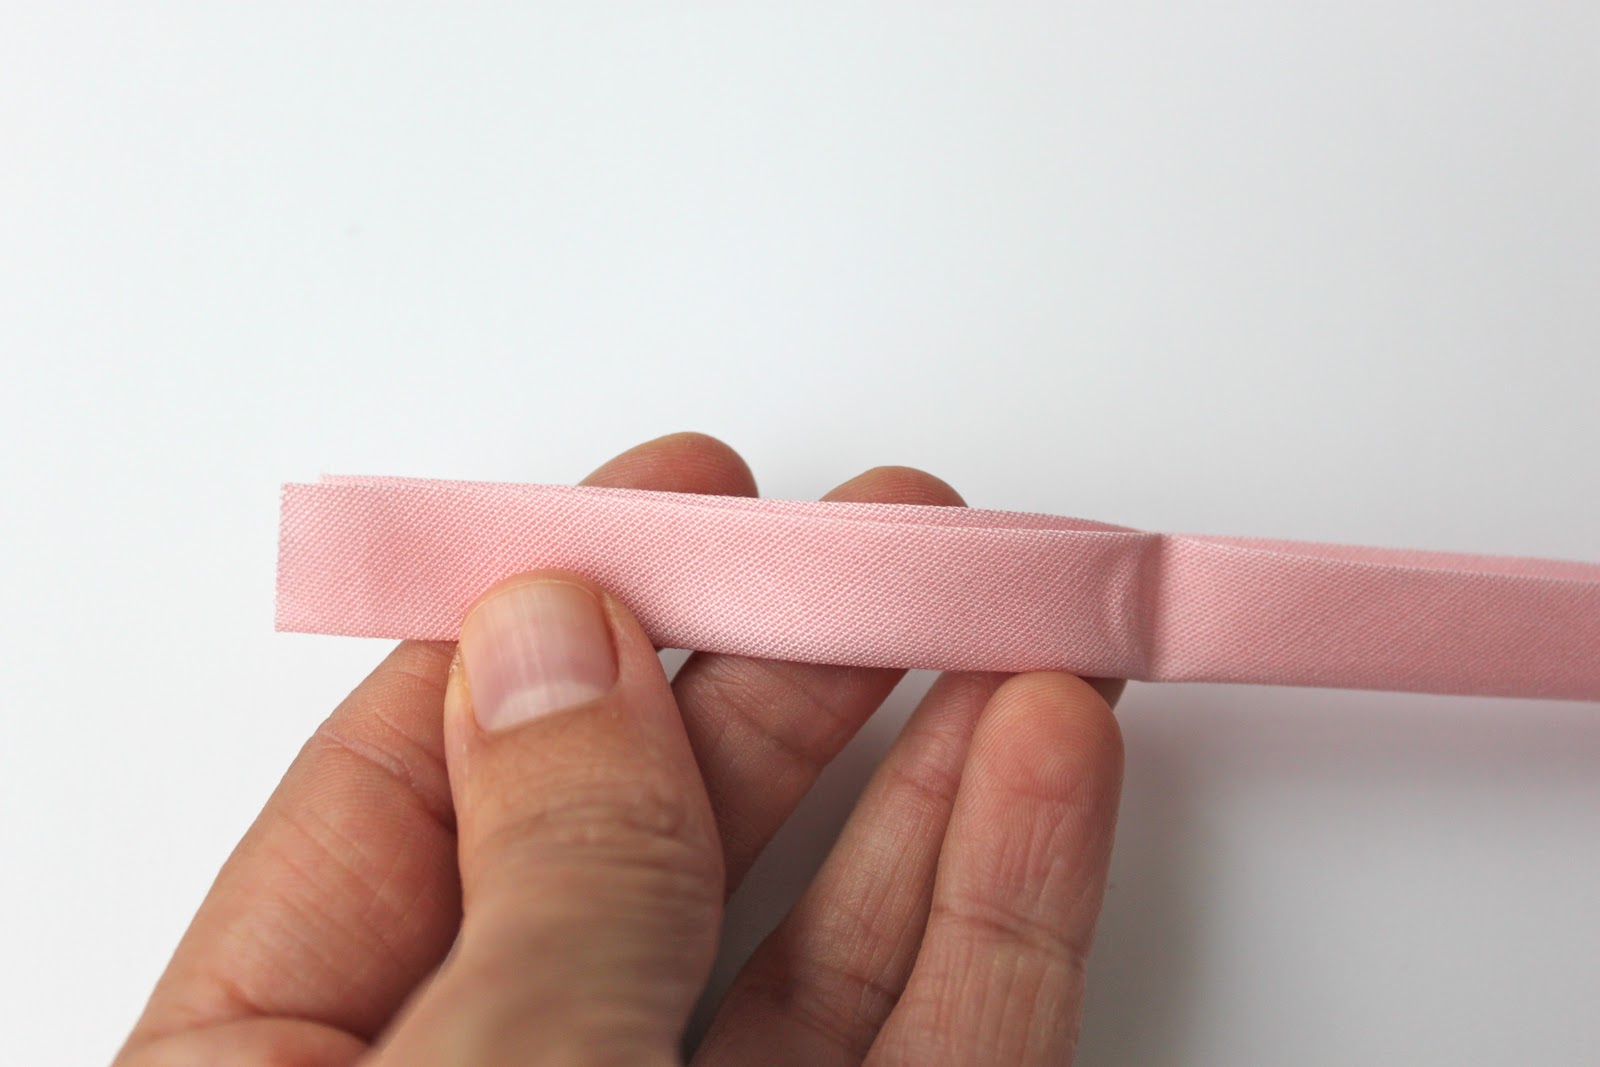
Now, if you look at your bias tape from the side you will see that one side is ever so slightly narrower than the other. You see it there in the picture? The side closest to us is just a teensy bit shorter than the farther side.
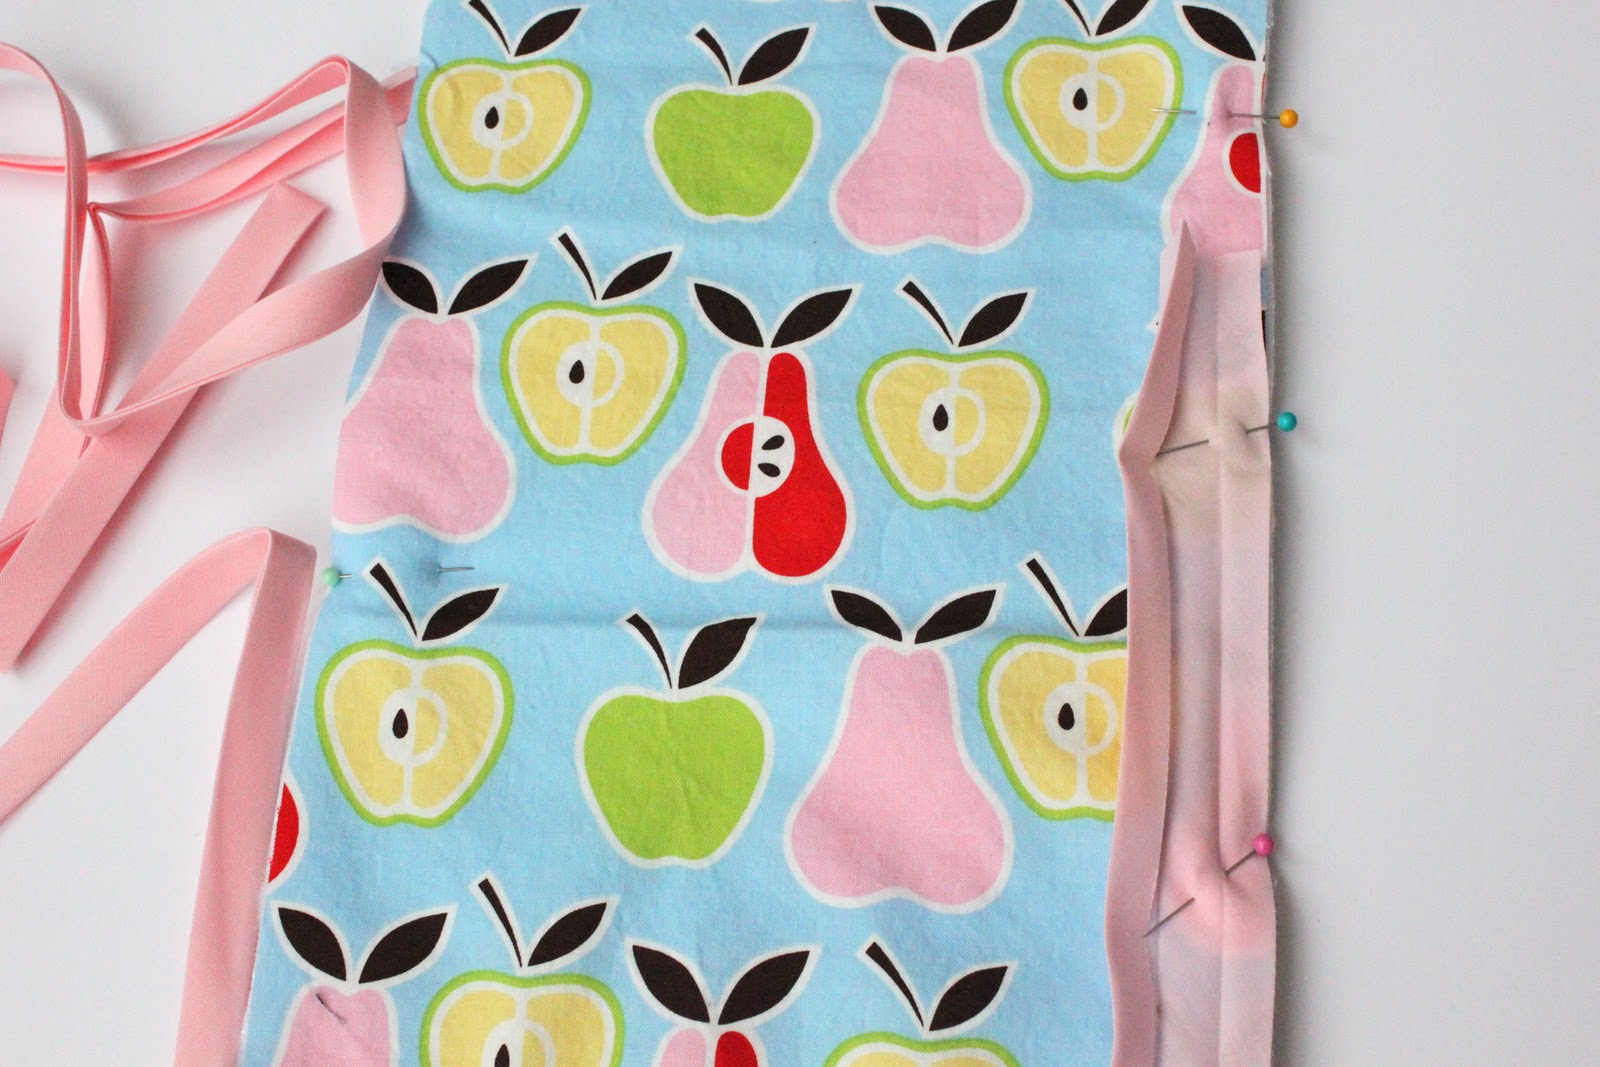
Okay, so what you are going to do is open your bias tape back up again and so that the narrower side is unfolded and laying against the raw edge on the right side of your fabric. Check out the picture above for the details! If you are new at this you may want to use lots of pins so that you get your bias tape to lay nice and smooth.
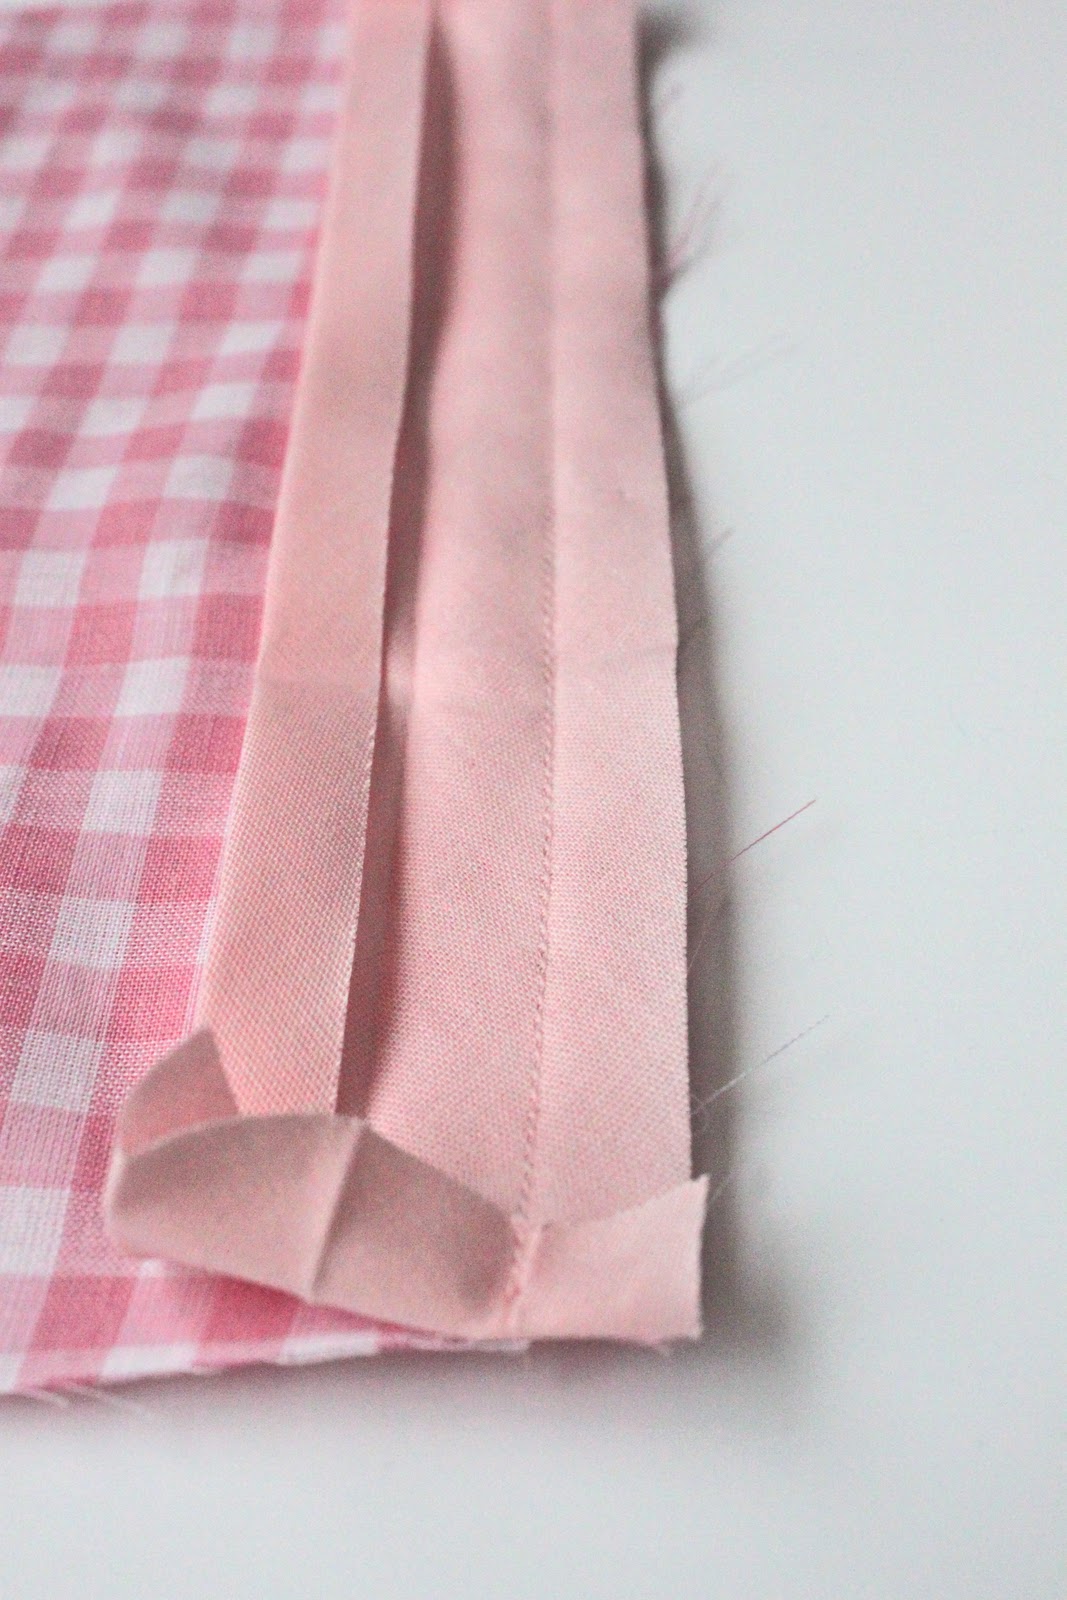
If you are covering all edges in bias tape (like for a potholder or the Double Oven Mitt) you can lay one end of your bias tape anywhere before you start sewing it down. I always choose the middle of a side verses a corner. Since bias tape is basically fabric cut on the bias it shouldn’t really fray so you don’t really have to worry about the ends of it at all 🙂
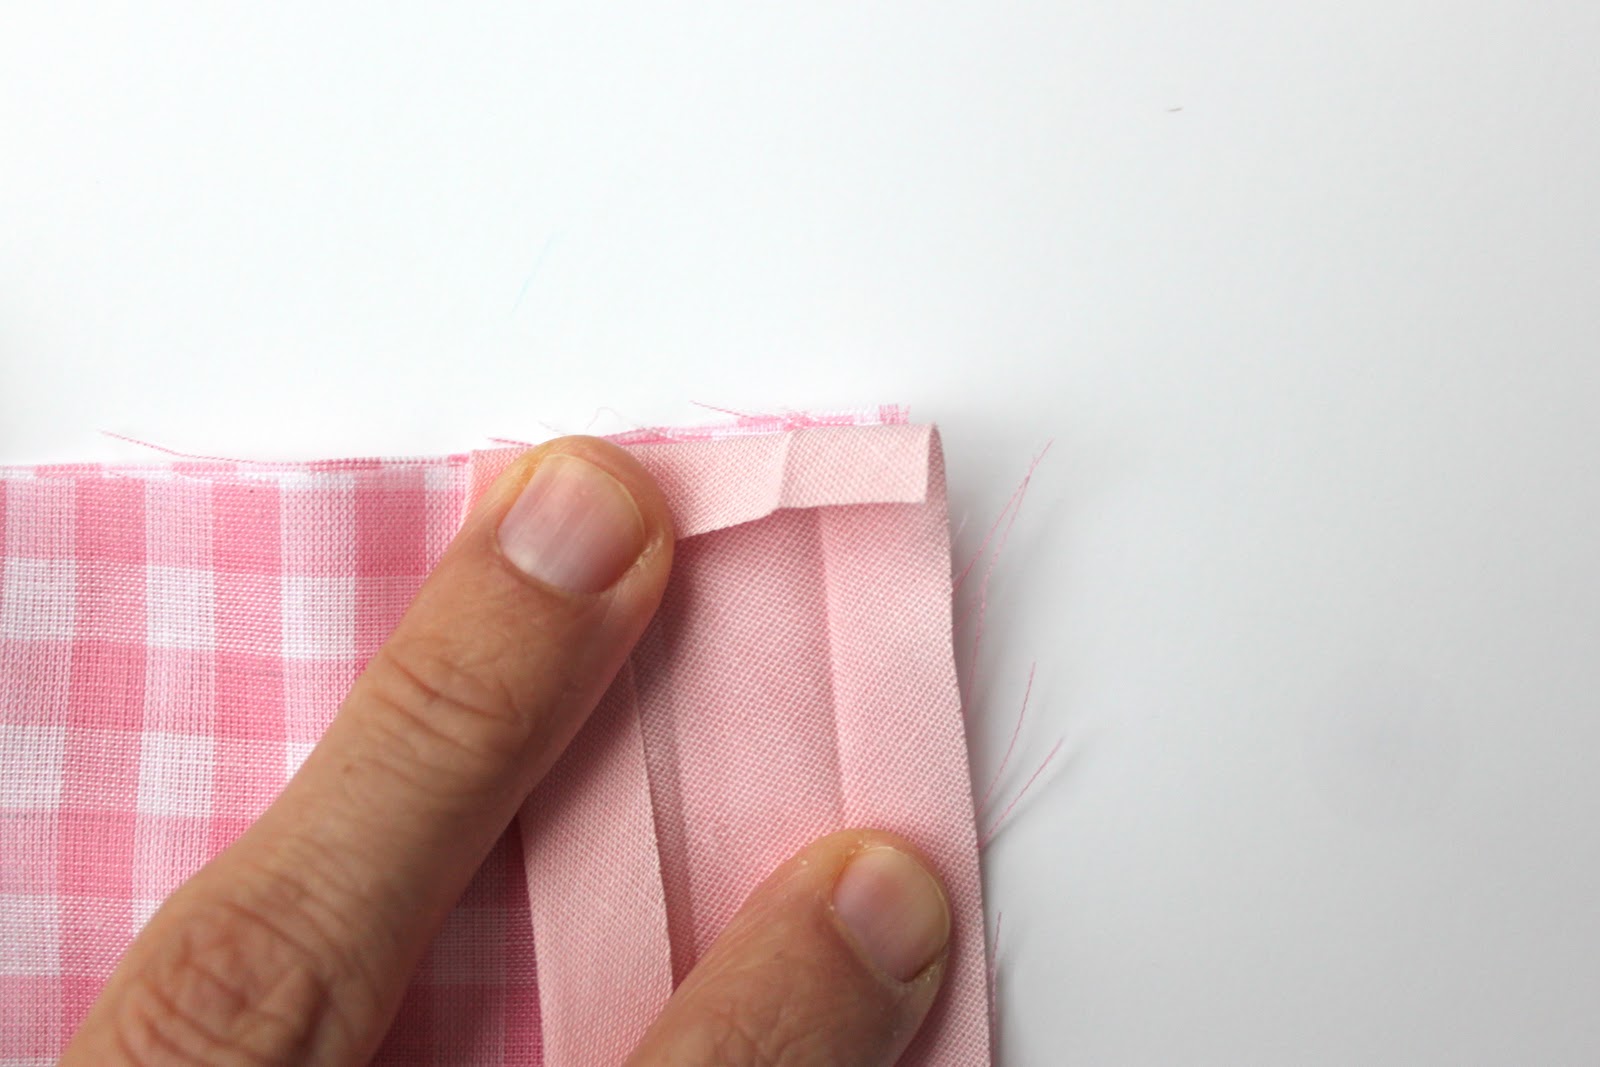
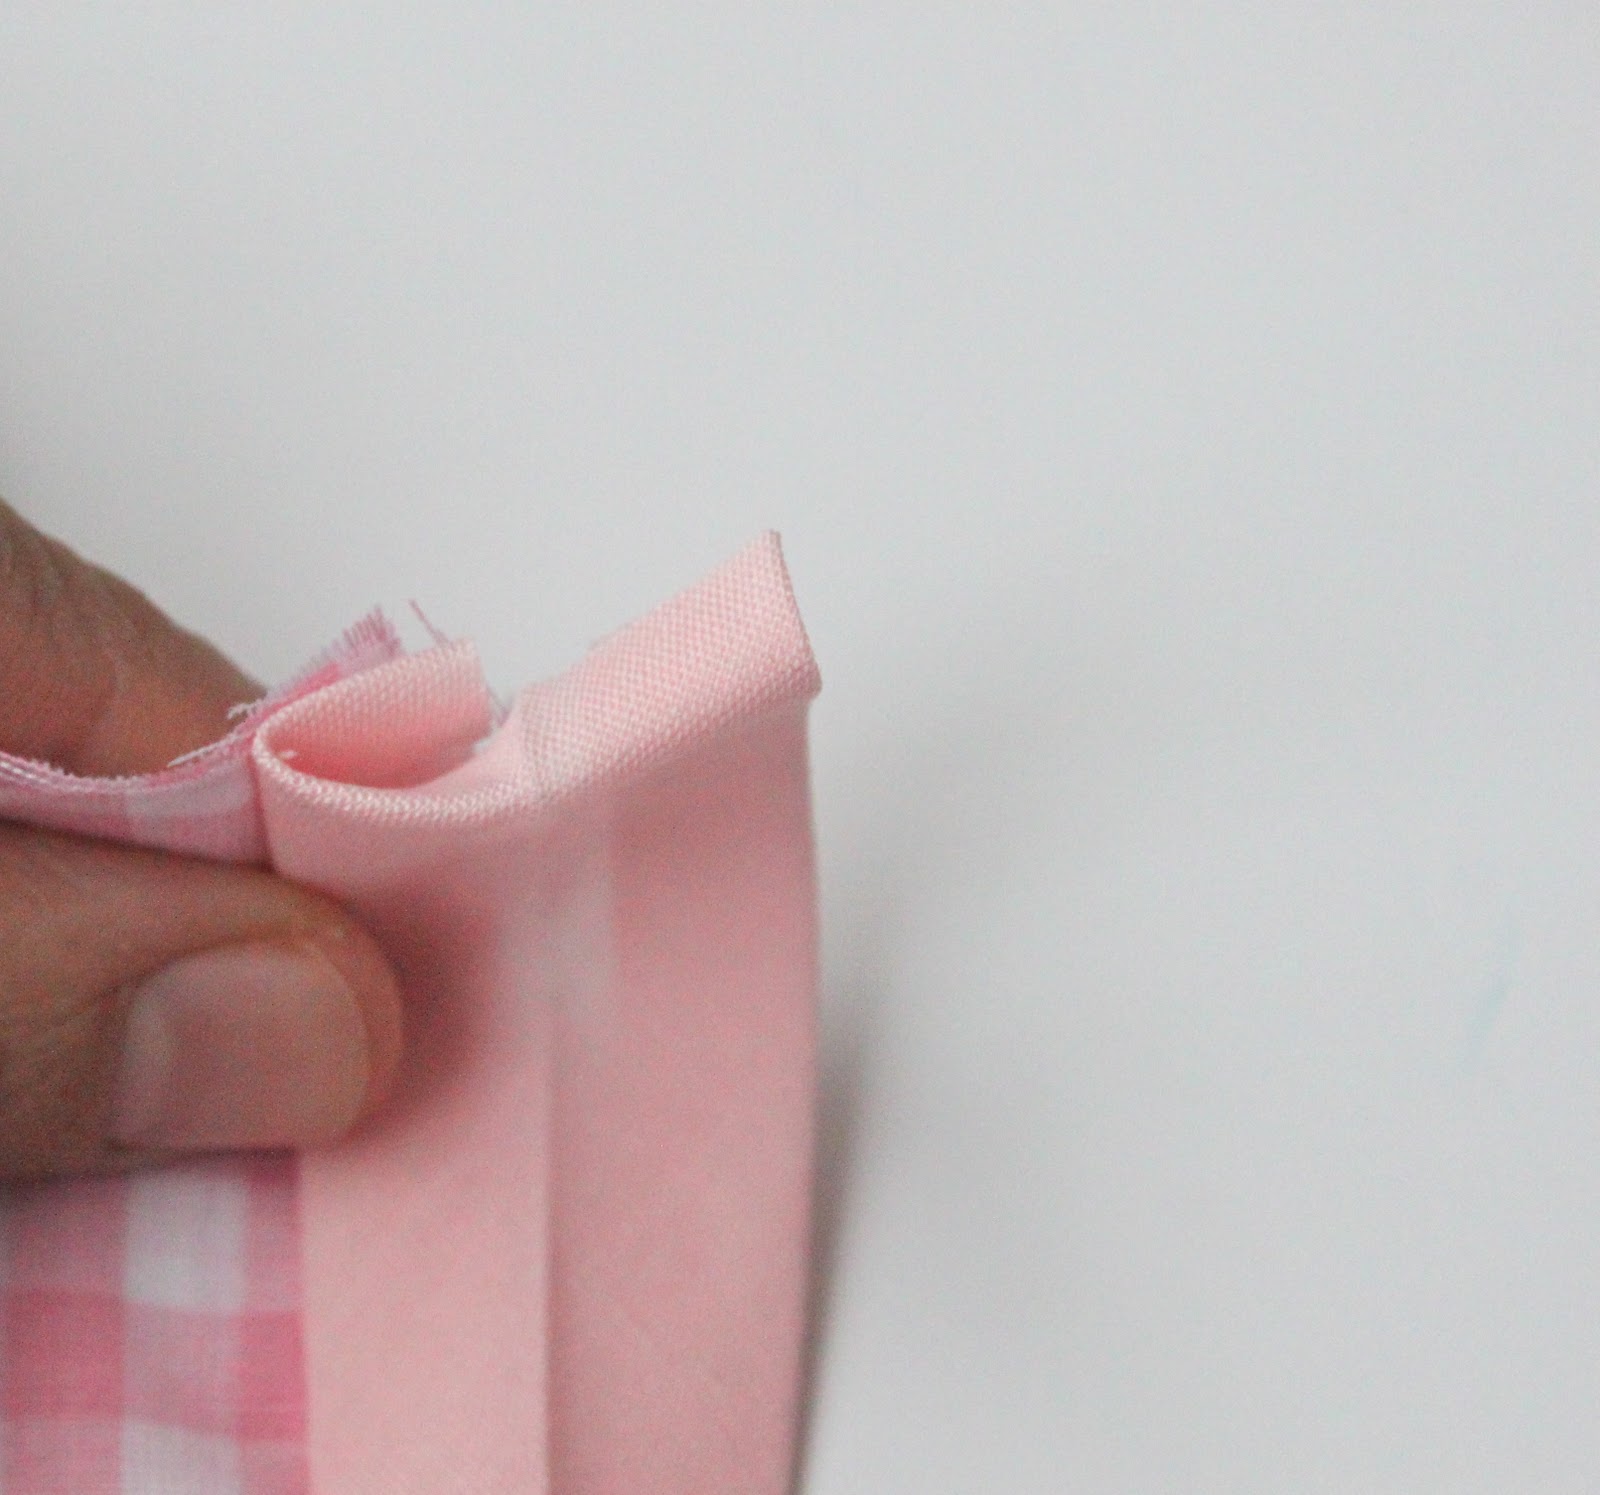
Now if you are just bias tape-ing one raw edge of a project you may want to fold in the ends (like the picture above) which will essentially tuck them under. This will give your project a cleaner edge and therefore a more professional look once finished.

Alright, so once you are all pinned up you are going to stitch down the fold crease.
Just like so.
See how I tucked in both my ends since I’m just bias tape-ing one side of this project?
And now you are going to fold the bias tape over the raw edge and back down the other side of your fabric. Make sure that you have the bias tape folded under on the back (wrong) side!

Now just pin the bias tape in place, again pins will help you go faster and make it much easier to keep things lined up, although wanna know a little secret? I don’t always use pins, most of the time I just wing it, yeah I’m a sewing rebel 😉 So, what’s the moral of this story? Do what’s most comfy for you!
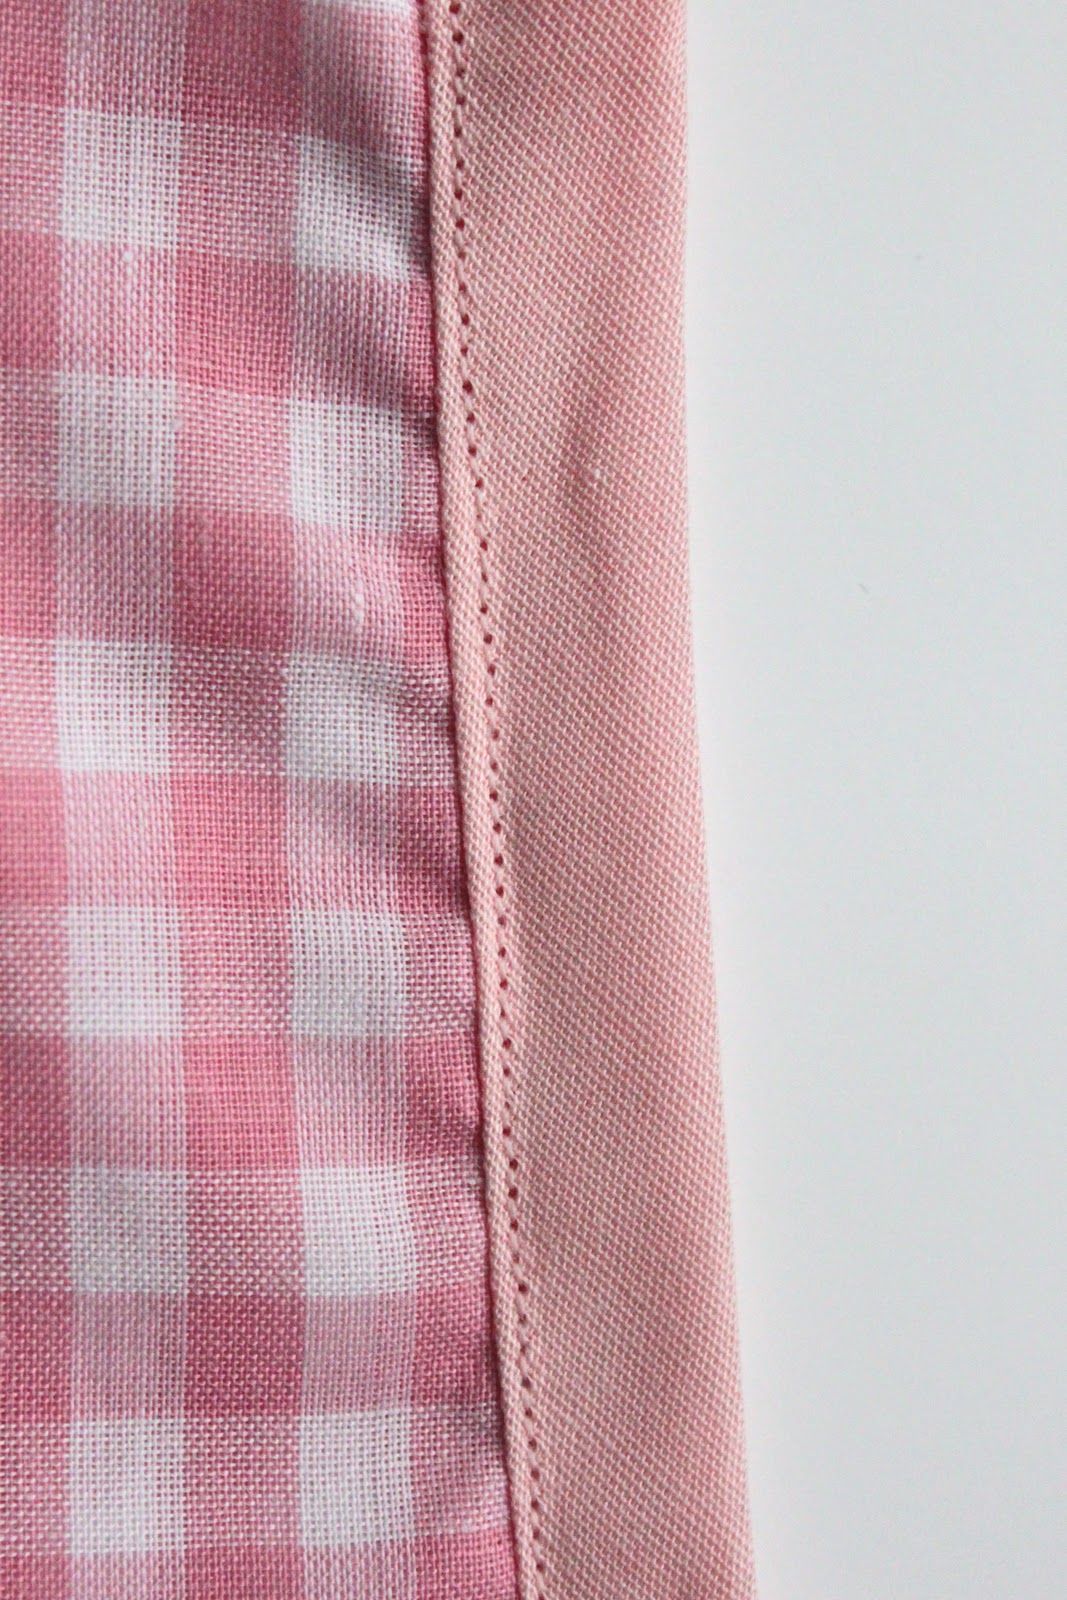
Then just sew very close to the edge of the bias tape on the right side of your fabric. I usually sew about 1/8 inch form the edge of my bias tape, basically I’m top stitching the bias tape on the right side of my fabric. This way you will be sure to catch the back (wider side) of the bias tape every time!!
Well, that’s it! You did it!!
Woo Hoooooo!
Bias tape-ing accomplished in 2011 🙂
Now you can bias tape anything…
{what will you do with your new found skillz?}
Happy Project Making To You!!


Thank you so much for posting this! I have been trying to figure this out for awhile! Now that i see your picture tutorial I am kinda like duh!! LOL!
I wish I had read this a few months ago! It would have made some Christmas projects turn out a lot nicer!
i have done it this way for years and it works well. Instead of a straight stitch on the front, I do a zig zag stitch. It adds a nice finishing touch.
This is a fabulous tutorial! I can’t wait to try it out and make an oven mit! 🙂
This is a fabulous tutorial! I can’t wait to try it out and make an oven mit! 🙂
I have never been able to make my bias tape look good, That is a neat idea on how to sew it. I think I am going to use this method from now on! Thanks for the tutorial.
Thanks for the tut! I realize that I’ve been sewing bias tape incorrectly for quite some time now. This is a great way to get a nice look. Thanks!
I knew i was doing this wrong – Thanks for the awesome tut.. i have it bookmarked now
Thank you so much for this great tutorial! I just received a bias tape maker for Christmas and did not have a clue how to sew the tape to my projects. In the past, I have folded it over the raw edge and hoped for the best. THANK YOU!
Lovely! But, I have one question–what do you do if you are using bias tape around the corners of something? i.e. putting bias tape around the outside of a table runner. Help please?! 🙂 Thanks for all your cute stuff!
Thank you for this great tut! I always have a problem with it!
Love it!! I featured you today on Today’s Top 20!
Amanda
todaystoptwenty.blogspot.com
Thank you for posting this! Great tutorial! What about putting bias tape that goes completely around a project?
Thank you so much! This is a great tutorial, now I just want to put bias tape on EVERYTHING. Or at least try to! ;D
Trudy
Awesome! I love to sew and have gotten pretty good at it, but bias tape has always seemed to be my undoing. Thank you for helping unravel this mystery for me.
If you want to apply bias tape so that it is absolutely neat and not puckered, you must pin the bias on the entire fabric piece that you want to trim. Then, and this is the secret, you must press the bias to follow the shape of the fabric, then sew. So you custom shape the bias before stitching. The finished bias-trimmed piece will have a smooth, flat edge.
Thanks for the tutorial!
Could you show how to do
the same thing on a curve.
I usually have a problem
doing it on a curve for
some reason.
God Bless You and Yours!!!
Thank you Thank you Thank you! I’ve been using bias tape only b/c I know it’ll make my projects better but I could never find a tutorial online! You are the most best for posting this…and yes, after seeing the pictures I said to myself, Duh.
Hurrah! I’m so glad so many of you found this tutorial useful! I will try to do another post this week about how to sew bias tape around corners for those that have asked!
XOXO,
Mags
That is rediculously easy!! I guess I’ve been thinking it’s much harder to do than it is! Thank you for sharing.
Sabrina from http://www.bgamefamily.blogspot.com
I’ve used bias tape for a ton of projects, but never realized there was a narrower side!! This could explain some of the ‘why does that look different than the last time?’ moments. Thanks for the revelation!!
Thank you very much! I have overlooked so many patterns because I just didn’t know how to do bias tape and it looked so difficult. You make it seem so easy! Thanks Again!
Acckkk if I had only known when I tried the oven mit…thanks…could you show us if you are doing all the way around a hot-pad/blanket? PWEASE…
Great tute! I’m so glad I’ve been doing it right! I just wanted to mention, there’s a $3 doo-dad called a “bias tape maker” in the notions section, and you can cut your own fabric strips (prettier than the standard offerings) and feed them through the doo-dad and follow with your iron, and it makes the niftiest pretty bias tape ever, and totally easy.
Such a great tutorial. I’ve added it to my Sewing 101 Round-up page.
Sewing 101 @ Pickup Some Creativity
Great tutorial! I’ve never used bias tape before. I’m curious if it would work as binding for a small quilted wall hanging – approximately 12″ x 18″?? I’m looking forward to your “bias tape corners” tutorial for that 🙂
This is cool. I too would like to see a tutorial on using bias tape for binding a quilt. I wonder if that would be easier than doing regular binding. Thanks for the information.
Thanks to you, I accomplished my first project with binding tape…and it’s not all bad! I credited you for your tutorial: http://zero7one9.blogspot.com/2011/01/wonky-wonky-cross-block-potholder.html
Thanks again. Love your blog.
I used this tutorial yesterday. WOW, that was so much easier. I have worked with bias tape before, but I was always doing something wrong. Thank you, thank you, thank you!
Thank you thank you thank you ! I was looking everywhere for a good explanation on who to sew bias tape. The “Wrights” website was not very clear on how to properly sew bias tape, BUT your tut is clear and easy to follow w/ excellent pictures !!! you rock =0)
Thank you thank you!! I have tried to use bias tape before and it has never turned out well – this makes so much sense now. Thanks!
I made some baby clothes for my daughter with bias tape and it didn’t catch in some places and in others it did catch but the first time I washed them it came a bit loose. I see now where I went wrong and this is a fantastic tutorial with great pictures. So many others I’ve found don’t have such clear pictures. I am making a dress for my older daughter and I feel a lot more confident in finishing it now. 🙂
Just posted about how great this tutorial is http://7craftymamas.blogspot.com/2011/06/fun-summer-clothes.html and what I was able to create using your fabulous tutorial. Thanks again!!
Thank you so much for this! This is first tutorial that truly made sense to me!
And I think we have the same machine!
Thank you! my mom always helped me with this stuff but shes 160 miles away now.
I agree with the others, your tute made a lot of sense. I appreciate the time you put into this. Thanks! New follower! I’d appreciate a follow back.
Thank you Thank you for posting this!! I have a blanket that needs double fold binding and I could not for the life of me guess how to make the binding turn out nice. Thanks again for making my life easier!!
wow! As I was reading this I was thinking…Man, how did I not figure this out? I’ve been doing it SO wrong all this time! (I am obviously not a sew-er). Anyway, then I read the comments and thought, ok, now I don’t feel so bad. LOL
Thank you so much for this tutorial! I’m wondering if I could use this on my sewing blog to follow up a guest post on making your own bias tape? I mean, exposure works for both of us, huh? Thanks for considering. ~Suzi
I just made the cutest blanket but the bias tape wasn’t perfect…now I feel like I should redo it all…Thanks for the tutorial 🙂
OK, I did it quiet wrong until now. Thanks fot this nice tutorial!
I have sewn for many years now. Never have I seen such a great tutorial and one done the right way!
Thank you, thank you!
Shelley
Thank you SO much for posting this tutorial. I have always, ALWAYS done it wrong and it ends up look like poop! Now I can finish my high chair re-covered padding, and make it look amazing! You’re awesome!!
-Abi
Eli & ELlie
Oh my word, you saved my sewing life!! I can’t believe how simple this is…yet the frustration I’ve had with trying to get the tape to enclose my raw edges and sew straight AND stay put…I had written it off for good. Now, I can try it again without fear! THANK YOU
Thankyou so much for the wonderful way to sew Bias Tape on! I have tried it before but not like that! I was doing it all wrong! Now I can sew and not be stressed out getting it to look right! Thanks again!! Yvonne
Very nice tutorial. Thanks!
Just curious; why did you turn under the ends, when the raw edges would be encased in the bias tape going around the outside? Also, if you “schootch” the longer edge under a bit more, you can stitch-in-the-ditch, and have an even pretter edge.
wow I like this…
Thanx!!
Like the others stated, I’ve been doing it all wrong for way too long. 🙂
Wow- awesome. I have also been doing it so wrong for too long. thanks for the tut and awesome pics 🙂
i’ve done this for years but i stitch in the ditch which “hides” the stitching.
I….I love you!
I finally get it! Can’t wait to get my sewing machine back from its tune up later this week. THANKS!
I have been sewing for years and never knew this! Thanks for posting!
OMG. I made about 25 table runners at Christmas with bias tape. I can’t believe I never knew this. Thank you.
Perfect timing…. making new ballet bags and now they will look nicer… THANKS
I hate bias tape..I even bought a bias tape foot and still couldn’t figure the damn thing out. At christmas when I was making a bunch of gifts, I ended up skipping using it at all and figuring out other ways to finish the item(s).
THANK YOU for showing me how to use bias tape. Now when I use it I won’t want to sob and throw my sewing machine out the window (haha, kidding I’d never do something crazy like that..though bias tape does make me go a little hulk haha)
I’ve found that when I pin bias tape it shifts it ever so slightly so the stitches aren’t quite as straight on the back side as this perfectionist would like. If it’s a short stretch I just hold it in place, for longer stretches, I use binder or other kinds of clips to hold it in place. That way it’s held right where I want to stitch it with no little shifts that come when I pin.
I mentioned this post on my blog today:
http://favoritelittleprincess.blogspot.com/2013/05/mothers-day-mixer-cover.html
You saved my project 🙂
I also mentioned this post on my blog! I was writing a post with tips and tricks for people that just started sewing 🙂
http://misspixiesblog.blogspot.be/
Greets,
Miss Pixie
Thanks so much for this helpful tutorial, I am making an apron and I can’t wait to post it on my blog! I will have to tell my readers that the edges look so great because I read this tutorial!
Happy posting!
What a great tutorial… And I’ve read quite a few! Thanks. 🙂
Awww! Why thank you, May!
love,
Maggie
I just made a sundress for my daughter and it used bias tape around the arm holes. I swear I spent an hour reading and rereading 3 lines of instructions and staring deeply at the pictures on the pattern. You just explained to me in 2 minutes what I never understood in the instructions! Turns out I sewed on the wrong crease – it still looks ok, but now I’m excited to make another dress properly! Thank you thank you!
Thank you so much, I have been tring to do this for years and never could figue it out ,you showed me in the time it took to read the instructions. This is by far the best tutorial I have seen, and believe me iv seen a lot.
thank you again
hi;
okay ; I did my apron pockets; one was almost perfect while the other was not;
one thing is I am going to buy the wider I got the smaller kind.
i will keep trying thanks for teaching this to us. <3
My Grandmother taught me this trick when I was a little girl and she was teaching me to sew. It even has a name…stitch in the ditch LOL
I am slightly confused you had mentioned earilier that the narrow part need to be on the rightside of the fabric. Then you mentioned (further down the page) fold the bias tape over and top stich close to the edge so it would catch the bottom (wider side).
But wouldnt we be sewing on the widerside of the bias tape if we already stitched the narrow to the rightside?
So all in all my question is: Do we put the widerside of the bias tape to the rightside and fold over the narrow to the back? Or vice versa?
I am hoping this all made sense
You place the narrow side on the top of the fabric, stitch it down, then fold the bias tape over with the wide side folded to the back and stitch it down from the narrow side (via the front). Does that make sense? It helps if you follow the tutorial while you are working with the bias tape so you can understand it in a 3D sort of way. hope that helps!
XO,
Maggie
Who knew? Thanks for sharing that awesome info!
Thank you so much for this explanation!! I wish you could tell me how to sew so tidy, as you show in the pictures. I have problems to mantain the line and usually “fall down” and make kind of curves …Thanks!!
I am so glad you found this tutorial helpful, Carola! And thank you on my straight lines 🙂 Truth be told, it just takes lots and lots of practice!!!
xo,
Maggie
actually, if you really want to do it right, you stitch it on the wrong side of the project and then flip it to the front. Then your topstitching is always perfect
Yes, that is what this tutorial is showing you except since this is a two sided project there is no “wrong side”!
Thank you! I took a sewing class years ago at a fabric store, and learned so much (I was WORSE than a rank beginner, having skipped the Home Ec classes offered in high school!); of course, we couldn’t learn “everything about everything” in the sewing class, and bias tape was one subject we never discussed. This tutorial right here, with awesome pictures and step-by-step instructions, is JUST what I need to sew bias tape more neatly and with confidence!!! The longer I sew, the more I feel like I know just enough to be dangerous! ha, ha! Again, thanks for a wonderful tutorial! I hear blankets with shredded satin binding calling me now!
I am so happy that this tutorial was helpful to you! That makes me so happy!!! I hope you are loving sewing, it truly is a fun creative outlet!!
xo,
Maggie
Just used bias tape for the first time using this tutorial and it is PERFECT! Awesome tutorial, love it!!!