Smashed Peas & Carrots

Inspiration For Living Creatively - DIY Crafts, Sewing, Recipes, Crafts & More

  • Press
  • Disclosure
  • Collaborate
  • Contact
  • Facebook
  • Twitter
  • Pinterest
  • Instagram
  • Dots
  • Google Plus

Become a Subscriber

never miss a thing!

  • Home
  • About
    • Advertising
    • Disclosure & Safety Disclaimer
    • Privacy Policy
  • Recipes
    • Appetizers
    • Bento Lunch
    • Beverages
    • Smoothies
    • Breads
    • Breakfast
    • Casserole
    • Crockpot
      • Visual Library
    • Dairy Free
    • Dessert
    • Gluten Free
    • Main Course
    • Holiday
    • Instant Pot
    • Paleo
    • Party Food
    • Salad
    • Side Dish
    • Soup
    • All Recipes
  • Tutorials
    • Children
    • Adult
    • Home Decor
    • No Sew
    • Sewing
      • Children Sewing
      • Adult Sewing
      • Home Decor Sewing
      • Sewing Basics
    • Sewing Studio
    • Knitting
    • Kids Crafts
    • Bento
    • Holiday
    • Parties
    • Gift Ideas
    • Natural Living
    • All Tutorials
  • shop
You are here: Home / Tutorials / Bento / TUTORIAL: DIY Bento Lunch Bag
May
1

TUTORIAL: DIY Bento Lunch Bag

| Filed Under: Bento, Home Decor Sewing, Sewing, Tutorials

After my Bento Series here and here a couple weeks ago, I thought wouldn’t it be fun to teach you how to make your own Bento Lunch Bag?  I know when I was searching online to buy them almost all the ones I saw were cute but pretty girlie and if you have a little guy, like I do, he may want one that has a bit more boy flair to it!
I found this really adorable Japanese hippo fabric in navy blue from my blog sponsor, Modes4U.com. It’s called Dark Blue Oxford fabric with Hippo by Kokka. Isn’t it so cute! And totally boy…my Noah loved it when he saw it online and I have to say it is just as cute in person! This particular fabric is kinda like canvas but not as heavy, it’s really a great weight and super easy to sew with…no special needles needed.
This Bento Lunch Bag will fit a standard two-tiered bento box as well as a utensil set, a smaller bento box, or ice pack too. It also has a drawstring closure so it’s easy for small hands to open and close, hooray!

Bento Lunch Bag
2- 10″x5″ main (upper) fabric pieces
1-10″x7″ secondary (bottom) fabric piece
coordinating thread and sewing machine
scissors
2-29″ pieces of 1/4″ wide double fold bias tape
safety pin
serger (optional)

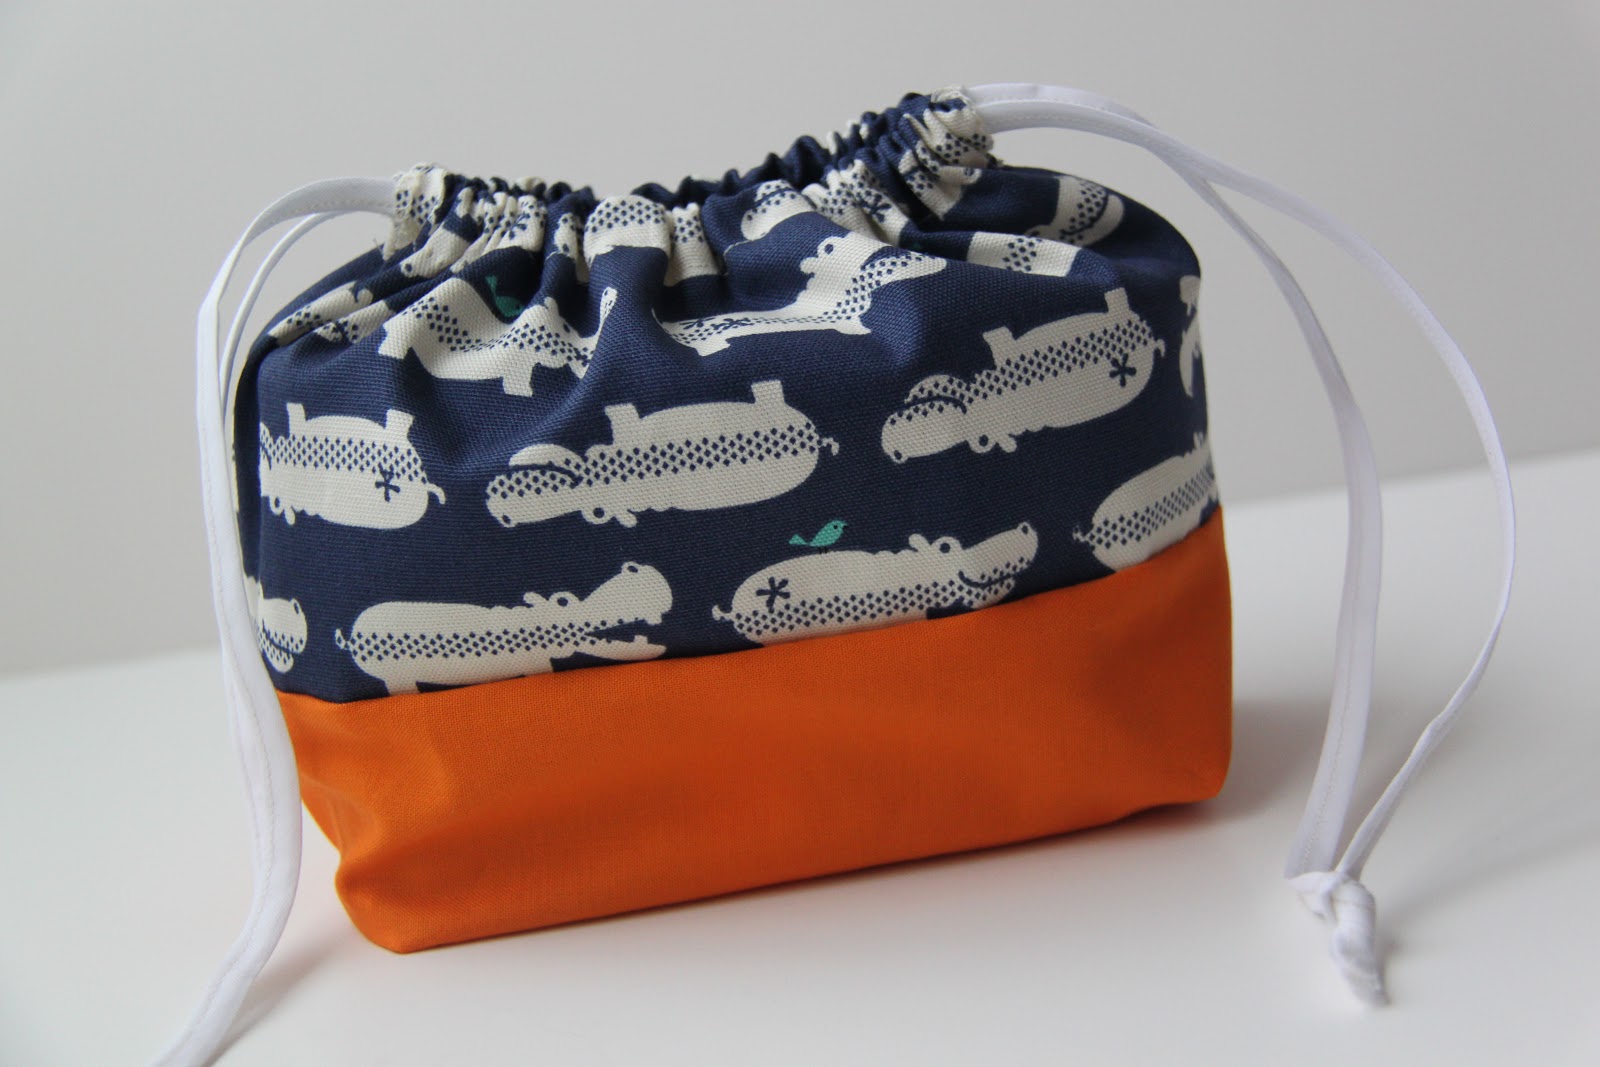
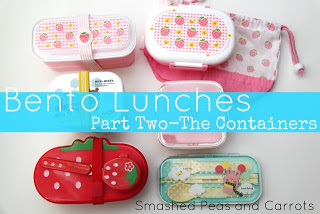
Isn’t this the most adorable fabric…I still can’t get over how cute all those little hippos are…and the little bird sitting on top every so often, cuuuute!

Ok, so you’ll need two pieces of you upper (main) fabric measuring 10×5 inches and one piece of your bottom (secondary) fabric measuring 10×7 inches.

First thing you need to do is sew the two main fabric pieces to the secondary piece with right sides together. Use a 1/4 inch seam allowance to do so.  You can serge your seams for a more finished look if you like.

Once you have all fabric pieces sewn together, you can serge all four sides of the rectangle to clean up the edges if you’d like as well (see photo above). If you want the edges to look a little cleaner and do not have a serger then you will need to add about 1/2 inch to all pieces so that you can make a 1/4 double folded hem instead.

Next, fold over the short edges (wrong sides together) about 1/2 inch to make your casing.  Sew in place.

Then fold the rectangle in half right sides together and sew down each long side, like in the picture above.  Making sure to sew from the fold at the bottom ONLY to the very edge of the casing otherwise you will not be able to get your drawstring through!  Use a 1/4 inch seam allowance.

Next, take the bottom corners of the lunch bag, still right side out, and pinch off the corner to make a triangle.  Sew a line 1 1/2 inches down the bottom of that triangle like the picture above.  Clip the triangle.  This will  make your lunch bag have a flat bottom to stand up on.

Finally, take your 1/4″ wide double fold bias tape and sew the open fold together to make one unit.  Pin one end with your safety pin and weave it into your casing at the top of your lunch bag.  Pull it all the way down one side of the casing and back down the other.  When you get to the end, make a knot so that the drawstring is connected and won’t get lost back into the casing.  Do these same steps but start on the opposite side so that you have a fully functional drawstring.

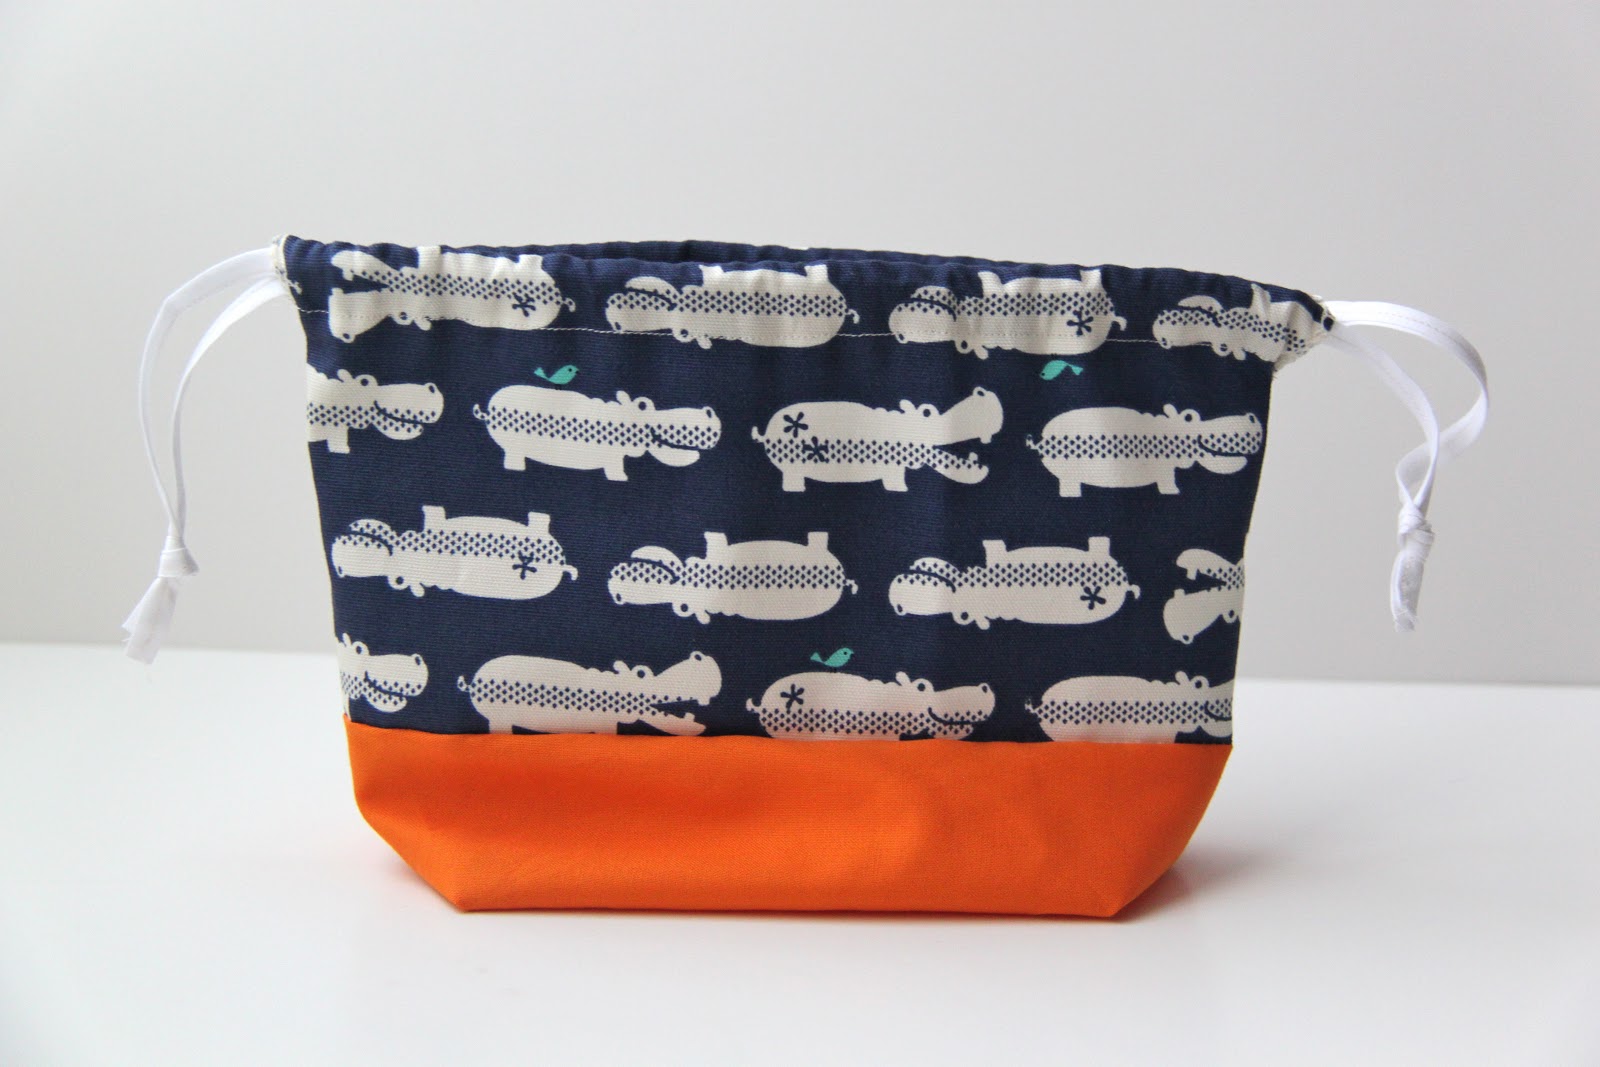
And there you have it!  One Bento Lunch Bag complete!
Do you see how that drawstring works?  You have two sets of strings in there each knotted on opposite sides.  Pretty cool, huh…magic!
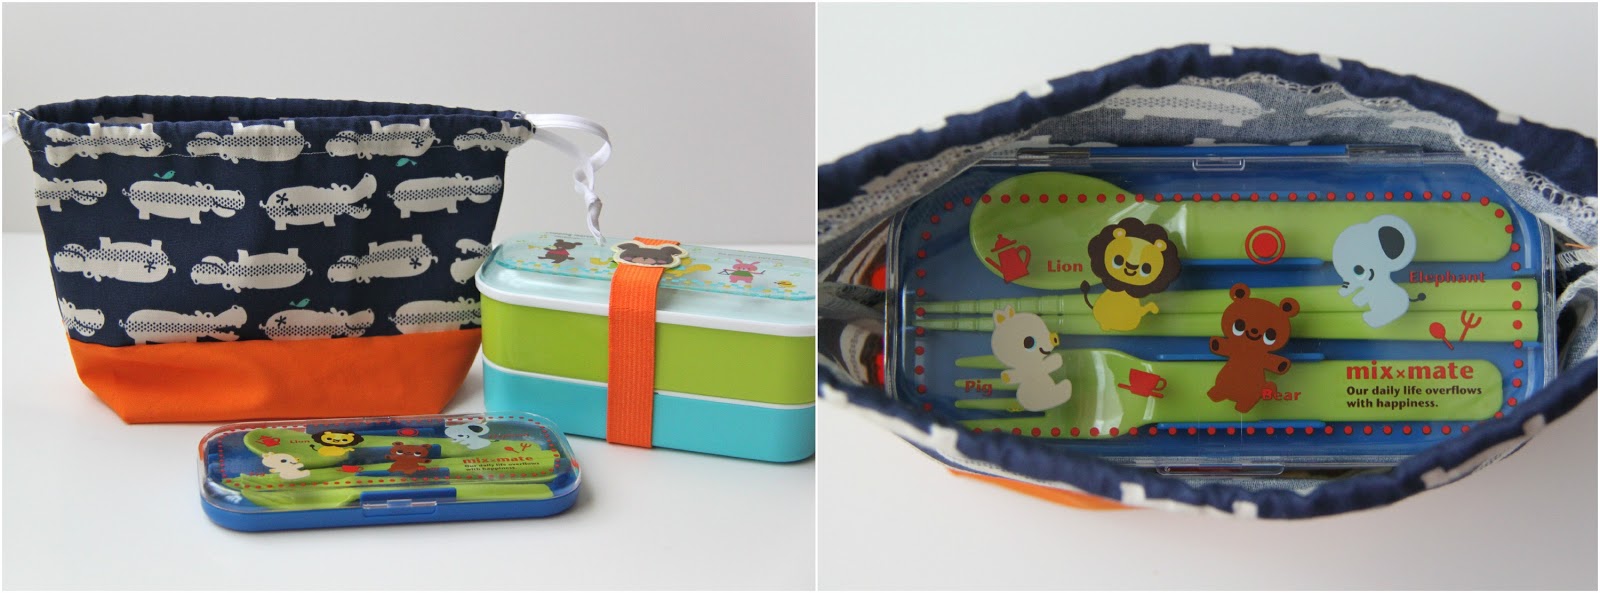
Now you can fill up your newly made Bento Lunch Bag with all your lunch goodies and hit the road!

Enjoy friends!

And thanks for stopping by today!

See Part One of the Bento Lunches Series here:

And Part Two of the Bento Lunches Series here:

XOXO,

You may also like -

Back to School Lunch Box Packing TipsBack to School Lunch Box Packing TipsEasy and Healthy Bento Lunch Ideas // SmashedPeasandCarrots.comEasy and Healthy Bento Lunch IdeasEaster Egg bento lunch or snack ideas…these are too cuteEaster Egg Bento Lunch IdeasSuper cute idea...St. Patrick's Day: Lucky LunchSt. Patrick’s Day: Lucky LunchValentine Bento Snack Box using a empty chocolate heart boxValentine Bento Snack Box

Become a Subscriber

never miss a thing!

Comments

  1. Jen Nelson says

    May 1, 2013 at 2:58 pm

    This is so cute, my little guy will love this!! Thanks for sharing!

    • Maggie says

      May 2, 2013 at 1:15 am

      Sure Jen! Anytime! I hope you get a chance to make one soon!

  2. Kp says

    May 1, 2013 at 5:29 pm

    So cute, and so easy! thanks for sharing!

    • Maggie says

      May 2, 2013 at 1:16 am

      Thanks!! 🙂 Hope you have a great rest of the day!

  3. imkate says

    May 9, 2013 at 12:23 pm

    What is the finished size of this bag? Thanks for the pattern and instuctions! Love your blog, you have such great ideas.

  4. Jess Trabulsie says

    May 14, 2013 at 11:58 am

    Adorable!!! Thank you so much!!!
    WHERE did you get those adorable boxes though?!

  5. Jackie H. says

    September 3, 2014 at 2:09 am

    I just made two of these for my granddaughter. One with Koi’s and one with sunflowers, the bottom a rust tie die. She loves them I used a dark brown base tape so that the strings wouldn’t look soiled easily. Thanks so much for sharing this pattern and instructions.

  6. Leanne says

    September 7, 2015 at 7:30 pm

    I am terrible at sewing because I hate the measuring and precision of it, however, I was determined to make this for my three year-old, who came with me to pick out the fabric and the drawstring.
    It took me almost five hours (as well as a test bag done yesterday), but I did it and it looks amazing.
    I have a tall, square bento box for her, so I had to do some calculating; good thing my husband’s a contractor and was able to help!
    The sense of achievement it gave me is awesome!
    Thanks for the great idea and the pictures (which saved my sanity) 🙂

    • Leanne says

      September 7, 2015 at 10:58 pm

      Here’s a photo of my completed project: https://www.facebook.com/photo.php?fbid=10153512725980867&l=1598796b79

      • Maggie says

        September 8, 2015 at 1:00 am

        Oh no, Leanne! I cannot get to the picture via the link you posted 🙁
        I am sure it is beautiful though!!!
        xo,
        Maggie

    • Maggie says

      September 8, 2015 at 12:59 am

      That is so awesome to hear!! I am glad this tutorial could be helpful to you!!! Hooray for you!!!!

  7. Ariel Dekovic says

    July 9, 2016 at 6:22 am

    Love this pattern! Do you have any more detail on the step involving the bias tape? I just can’t figure out where it is supposed to go. Thanks!

    • Maggie says

      July 14, 2016 at 4:11 am

      I have two tutorials that can be found in the Tutorials section (under Sewing -> Basics) that will give you the info you may need all about sewing with Bias Tape!

    • Brad says

      August 1, 2016 at 1:02 pm

      From what I can tell the bias tape is the drawstring. I was confused for a minute too.

Welcome to Smashed Peas and Carrots. You can read more about me HERE
 photo designTeam.png
Follow on Bloglovin

Popular Tutorials

Highlighter Valentine Card with Free Printable

Highlighter Valentine Card with Free Printable…

Play Doh Valentine Card Free Printable

Play Doh Valentine Card Free Printable…

Elderberry Syrup Recipe

Elderberry Syrup Recipe: Natural Cold and Flu…

Teacher Survival Kit

Teacher Survival Kit with FREE Printable…

Notebook Paper Pencil Pouch Teacher Gift Idea

Notebook Paper Pencil Pouch Teacher Gift Idea…

Free Silhouette File Teacher Canvas Bag Gift Idea

Free Silhouette File: Teacher Canvas Bag Gift…

Popular Recipes

No Bake Energy Bites Recipe…

Chocolate Coconut Cups {Gluten and Dairy Free}…

DIY Taco Seasoning Recipe…

Sugar. Cookie. Icing. {The Recipe}…

French Dip..Crockpot Style!…

Crockpot Banana Bread…for Real!…

My Sponsors

 photo FatQuarterShop-175x175.png

 photo cdf15248-e6f8-4276-abc0-c145e2451c35.jpg


Blog Archives

Posts by Topic

Stay Connected

  • Facebook
  • Twitter
  • Pinterest
  • Instagram
  • Dots
  • Google Plus

Join me on Facebook

Copyright Smashed Peas and Carrots © 2025 · All rights reserved · Design by Emily White Designs

Copyright © 2025 · Smashed Peas & Carrots Custom on Genesis Framework · WordPress · Log in